If you’re comfortable with the command line and want a more secure way to log in, choose this option.
Table of Contents
- 1 Part 1: Creating Your Virtual Machine in Microsoft Azure
- 2 Part 2: Configuring Your Server’s Firewall
- 3 Part 3: Connecting the Server to Your RunCloud Dashboard
- 4 Part 3: Experiencing the RunCloud Dashboard
- 5 Part 4: Disabling SSH Access
- 6 Final Thoughts
Part 1: Creating Your Virtual Machine in Microsoft Azure
This is how you (and RunCloud) will access the server for the initial setup. You have two choices:
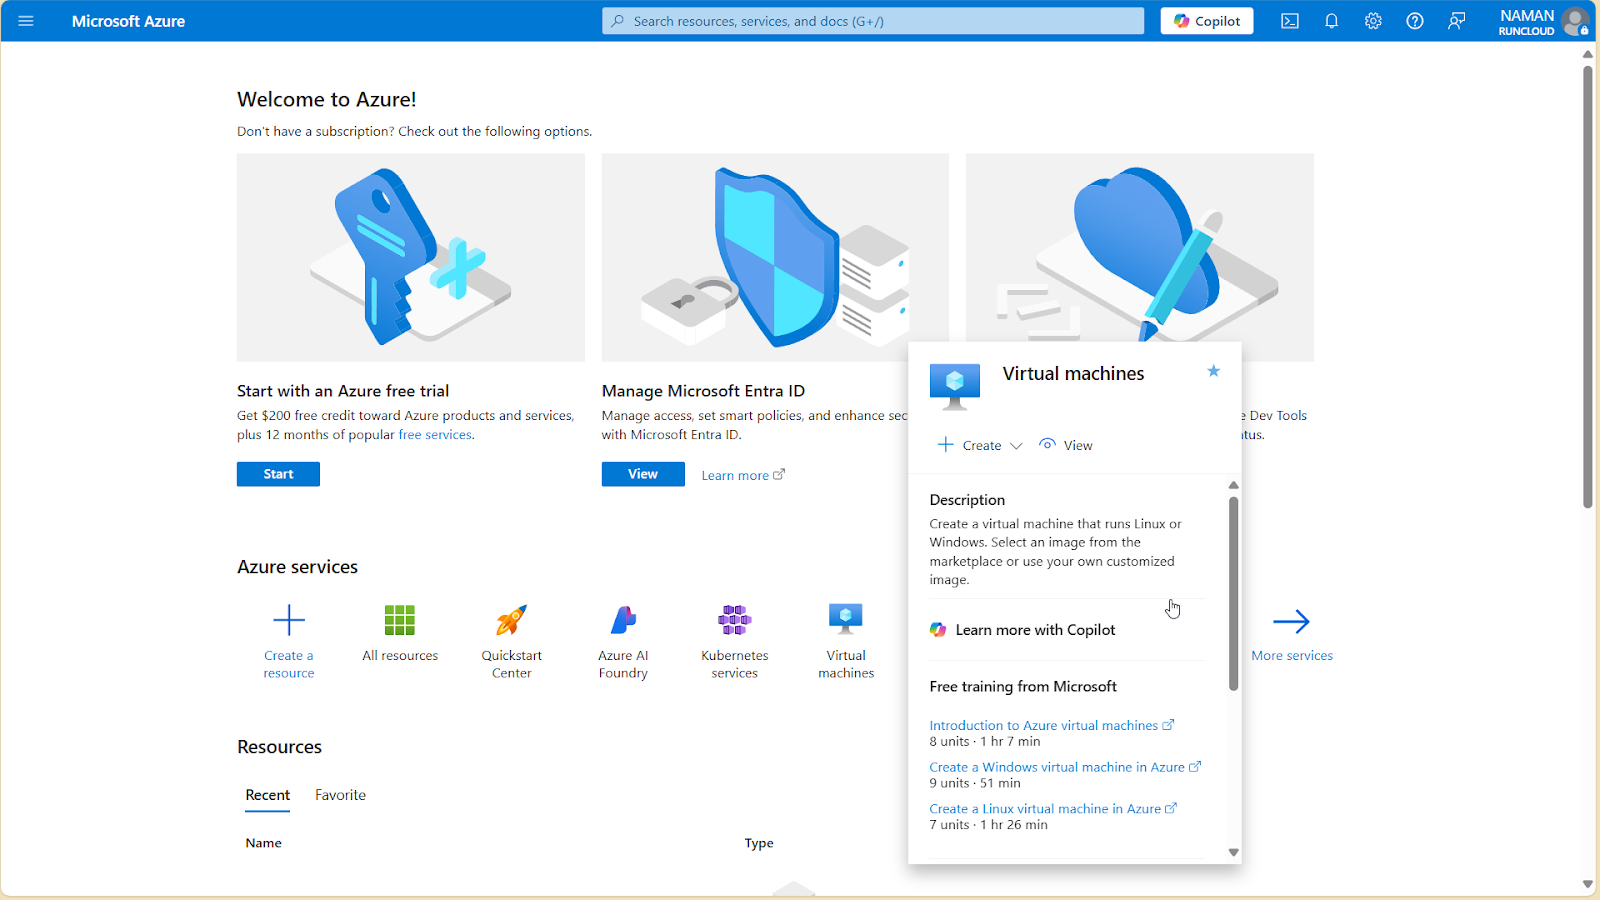
Step 1: Log in to Your Azure Portal and Create a VM
- Head over to the Microsoft Azure portal and log in.
- In the main dashboard, click on “Create a resource“.
- Search for “Virtual machine“ and select it, then click “Create“.
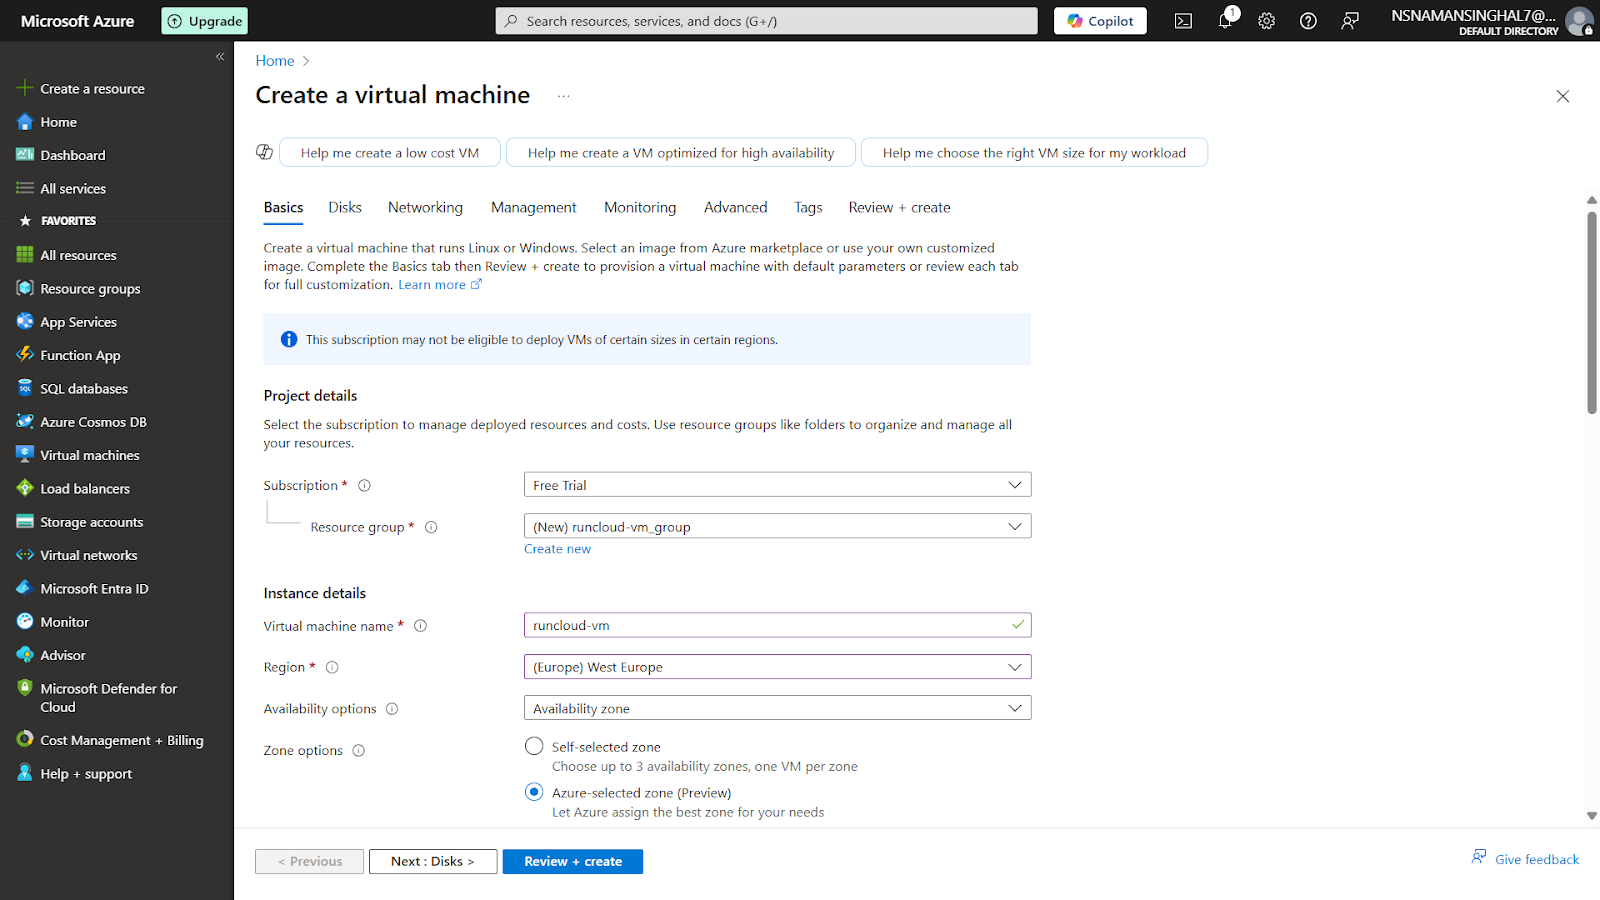
Step 2: Configure the Basics
Since you’ll manage your server through the RunCloud dashboard, you can safely close the SSH port (22) we opened for the initial connection. Follow these steps below to disable SSH access to your server:Important Note: RunCloud is designed to work on a fresh, clean server. This process will not work on an existing server with websites or other software (workloads) running on it. You must start with a brand-new server, which we’ll create together in the steps below.
You might worry that opening a port to “Any“ IP address is risky. Don’t be! RunCloud has built-in security to protect this port. Our agent uses a double authentication mechanism. First, it verifies that the connection is coming from a legitimate RunCloud IP address. Second, it uses a unique server ID and key to validate every request. No one can access the agent without passing both of these checks.
- Virtual machine name: Give your server a memorable name, like runcloud-server.
- Region: This is the physical location of your server. For the best performance, pick the region closest to most of your website visitors.
- Availability options: You can leave this as the default for now.
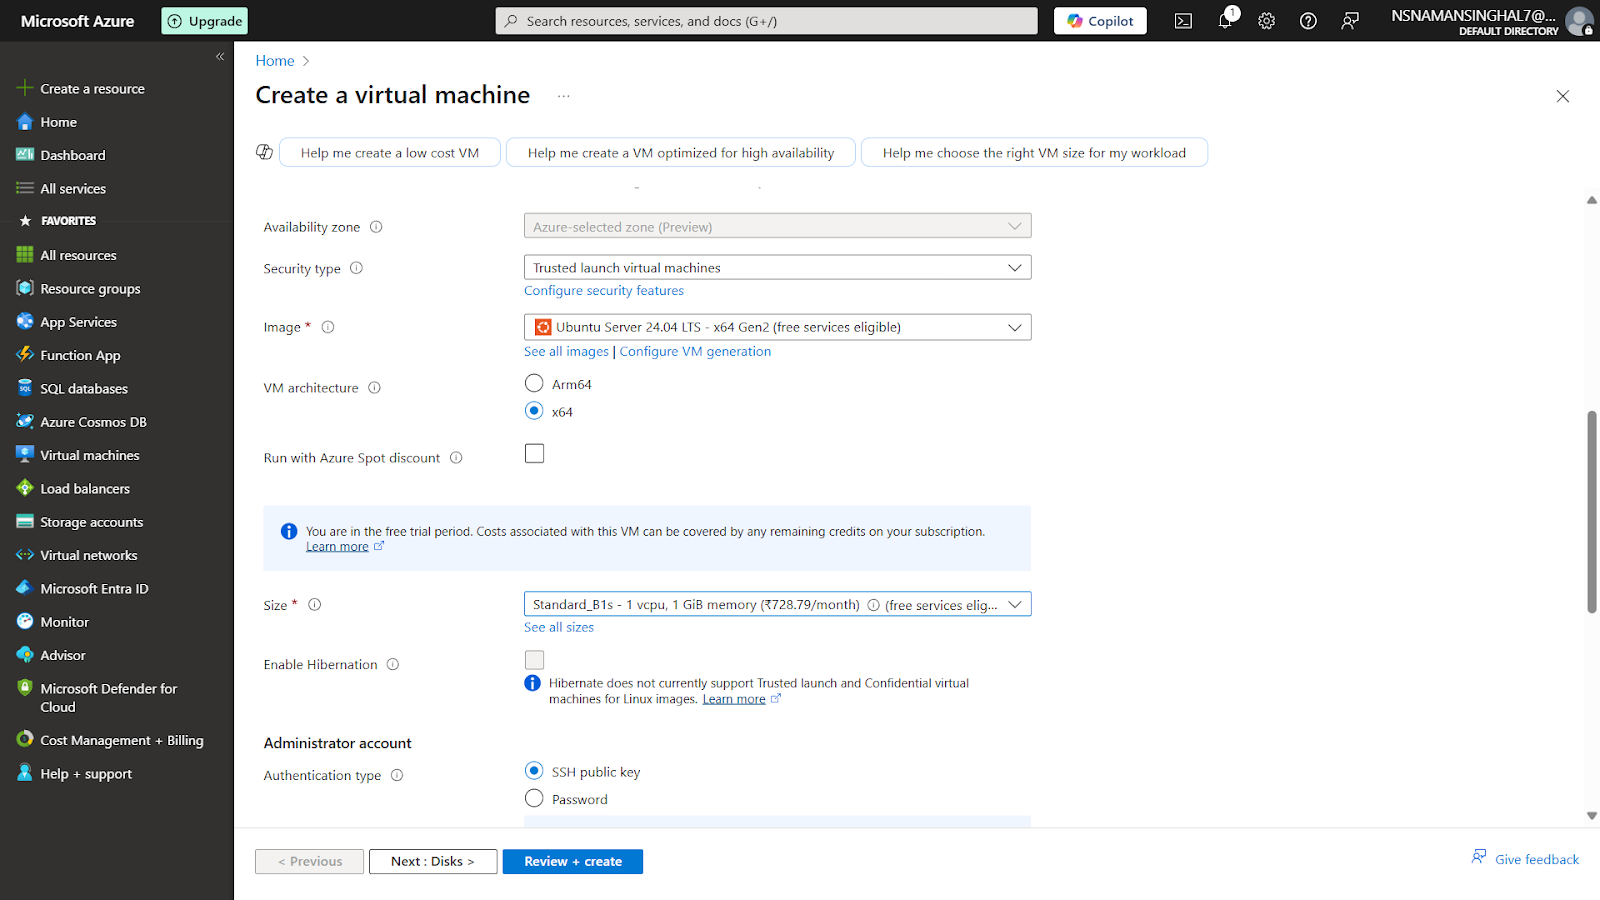
- Image: This is your server’s operating system. RunCloud works best with Ubuntu. Select the latest Ubuntu Server LTS version (e.g., Ubuntu Server 22.04 LTS).
- VM architecture: RunCloud supports both x64 and Arm64. Unless you have a specific reason for using Arm64, x64 is the more widely compatible option.
Step 3: Choose Your Server Size
These settings open 3 of the 4 required ports for RunCloud. We’ll manually add the final one (34210) in the next step. These features help simplify and speed up both development and server management tasks.
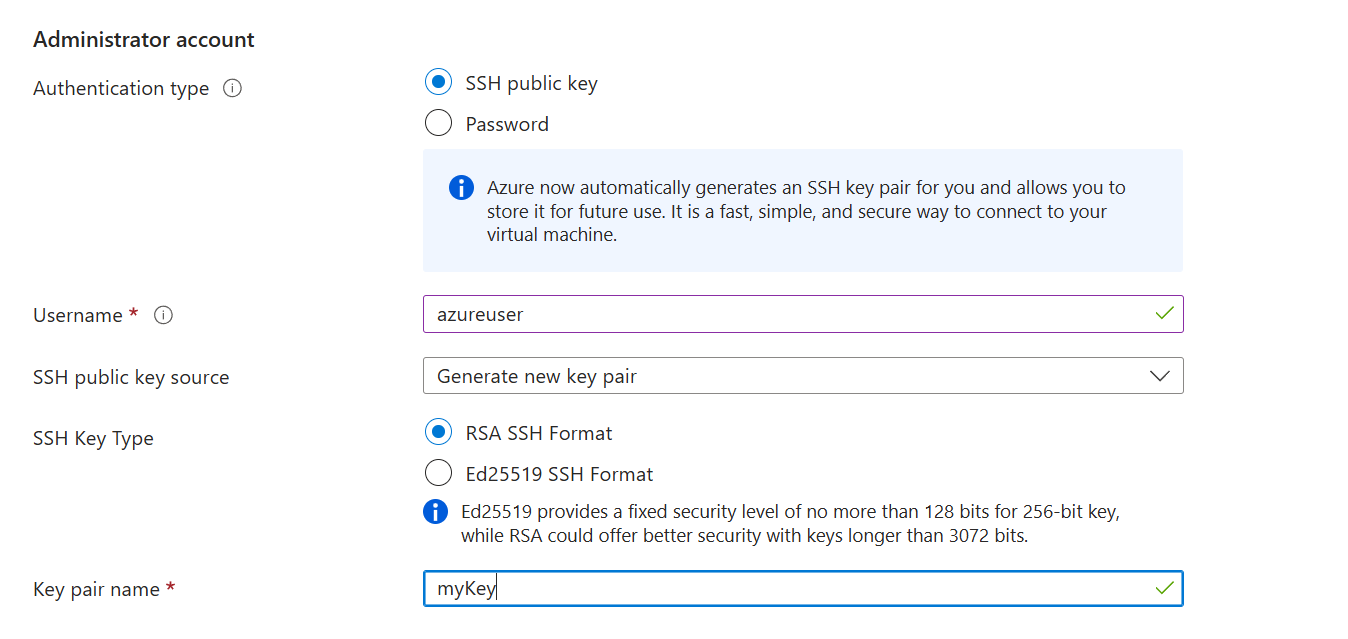
Step 4: Set Up Your Authentication Method
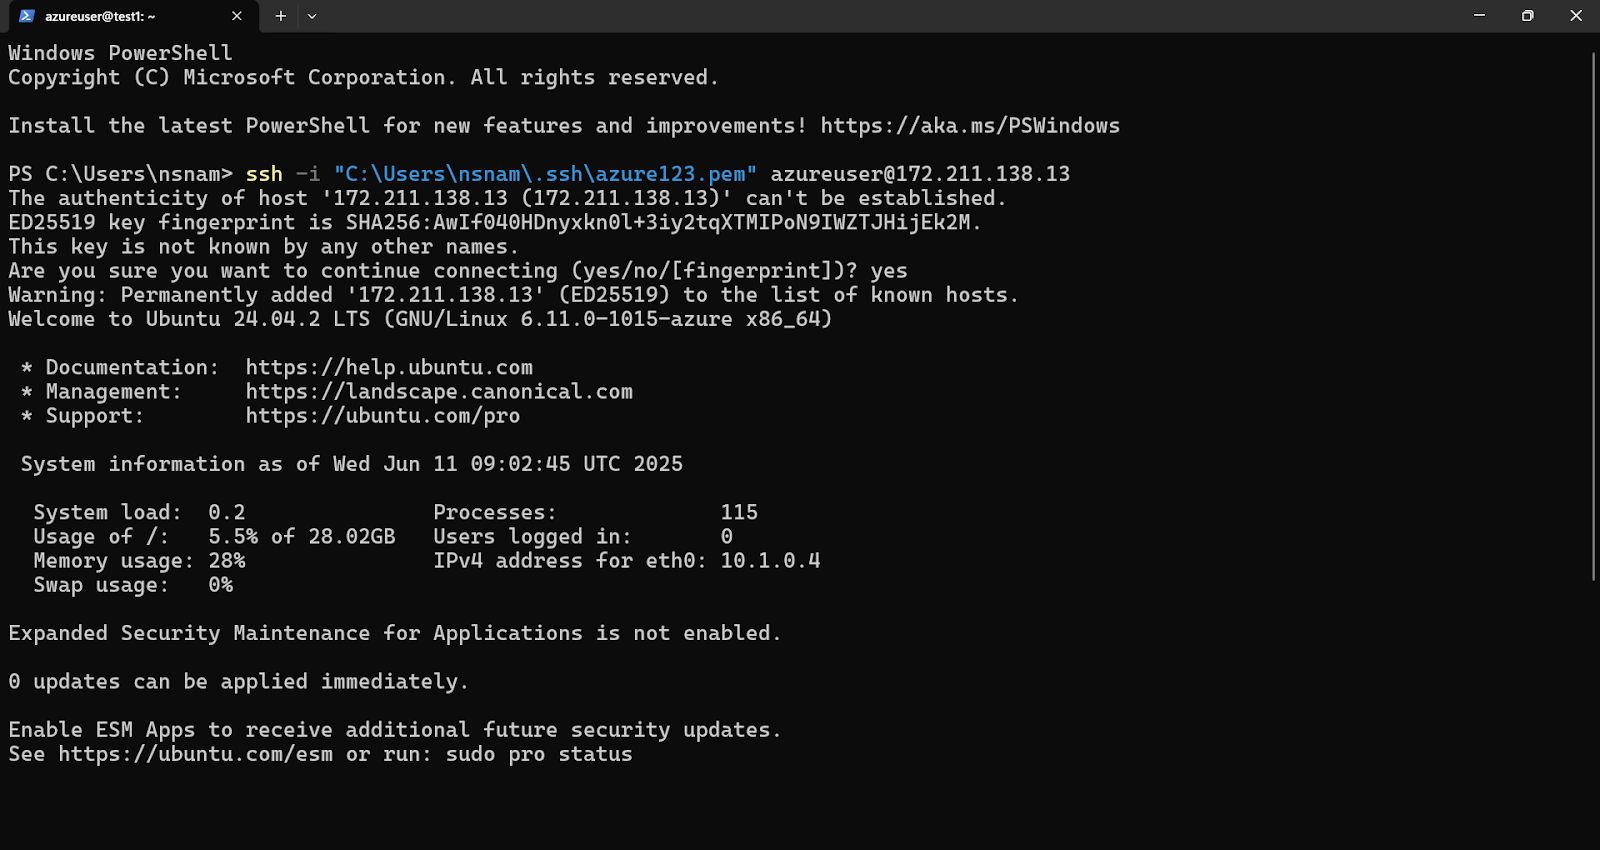
ssh azureuser@your_server_ip
ssh -i "C:pathtoyourazure-key.pem" azureuser@your_server_ip
Let’s get started!
Option B: SSH Public Key (The More Secure Route)
Project Details: Select your Azure Subscription and Resource Group. You can create a new resource group if you don’t have one. Think of it as a folder that holds all related resources for a specific project.
- Select “SSH public key“.
- Azure can generate a new key pair for you. A key pair is made of two parts: a private key that you keep safe on your computer, and a public key that lives on the server.
- Select “Generate new key pair“ and give it a name.
- When you create the server, Azure will automatically download the private key (a .pem file) to your computer. Save this file in a secure location. Anyone with access to the private key can log in to your server.
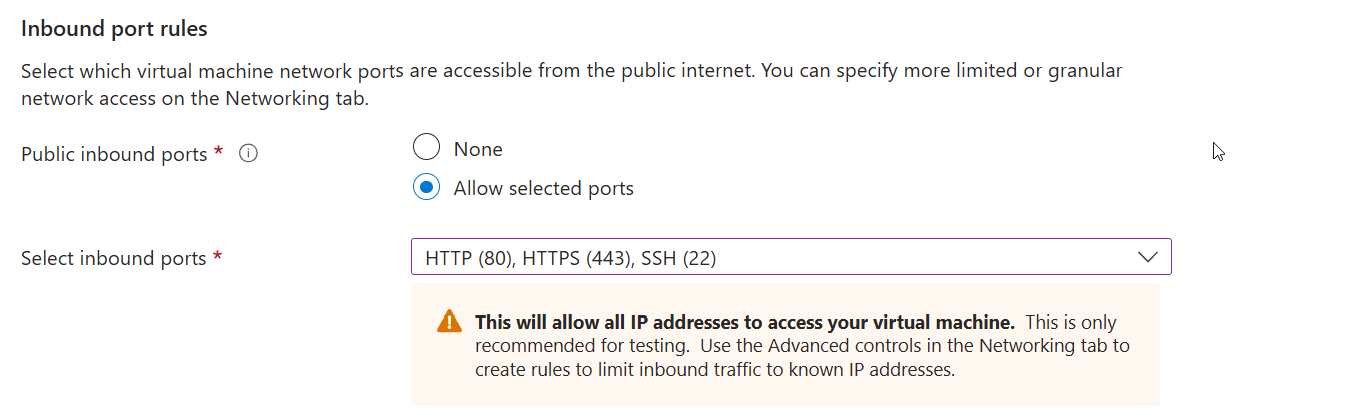
Step 5: Configure Inbound Ports and Firewall
After this, you can click the “Review + Create“ button. Azure will validate your settings. If everything looks good, click “Create“.
- HTTP (80)
- HTTPS (443)
- SSH (22)
You’ll need to log in to your server using a terminal and your downloaded .pem key file. We have already written an in-depth article that explains how to use SSH keys with PuTTY on RunCloud, but if you are in a hurry, then you can follow the steps below:
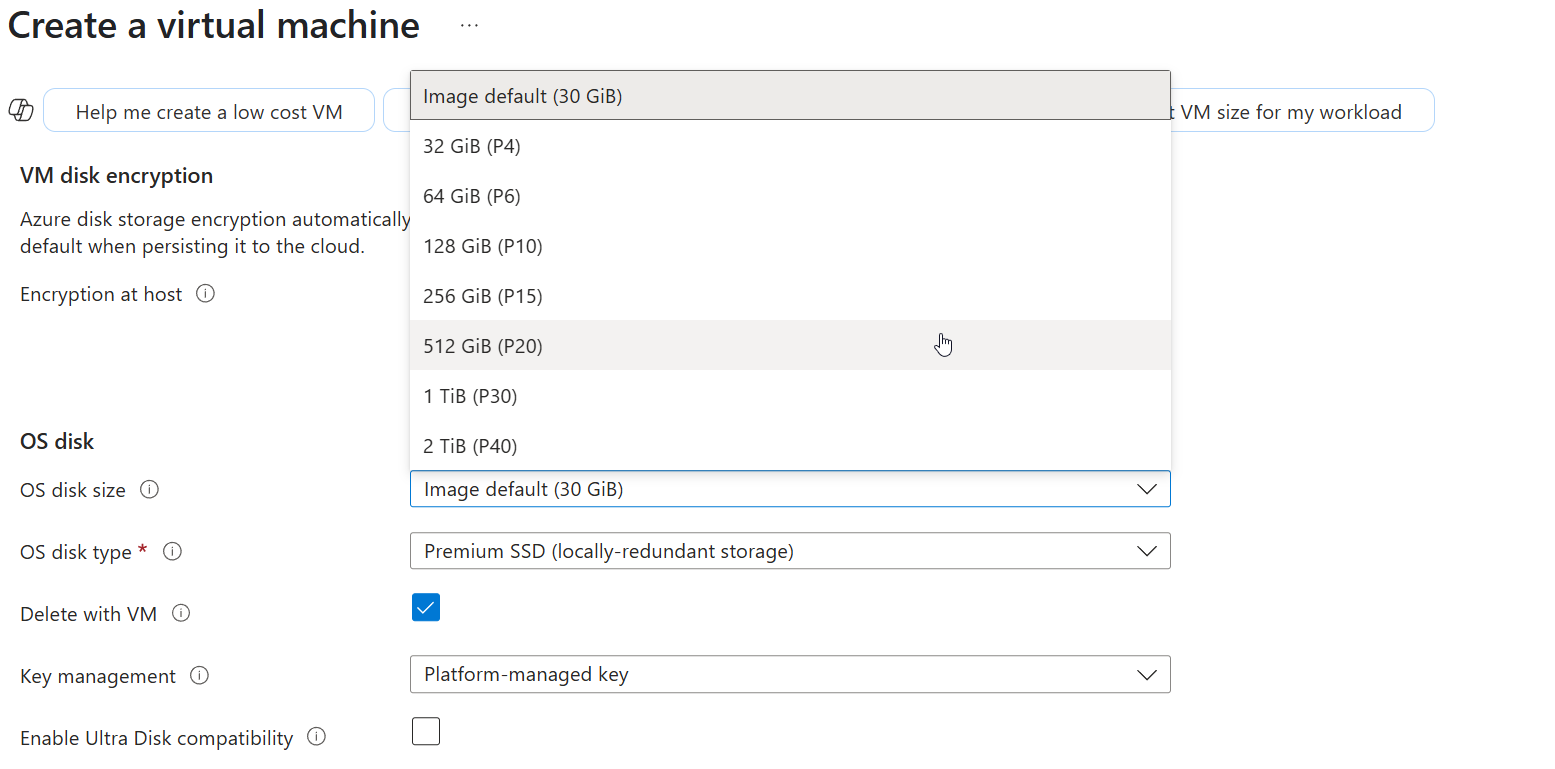
Step 6: Configure Disk Storage
If you opted for Password Authentication:
Step 7: Review and Deploy
Under “Inbound port rules“, check the boxes to allow selected ports. From the dropdown, select:Sign up for RunCloud and join thousands of developers, agencies, and business owners who trust RunCloud to simplify their workflow and keep their websites running smoothly.
Part 2: Configuring Your Server’s Firewall
This is the easy part! RunCloud will simply ask for the server’s password. Enter this password into the RunCloud dashboard. The setup will continue automatically from there.
- From your Azure dashboard, go to the resource page for your newly created virtual machine.
- On the left-hand menu, navigate to “Networking“ > “Network Settings“.
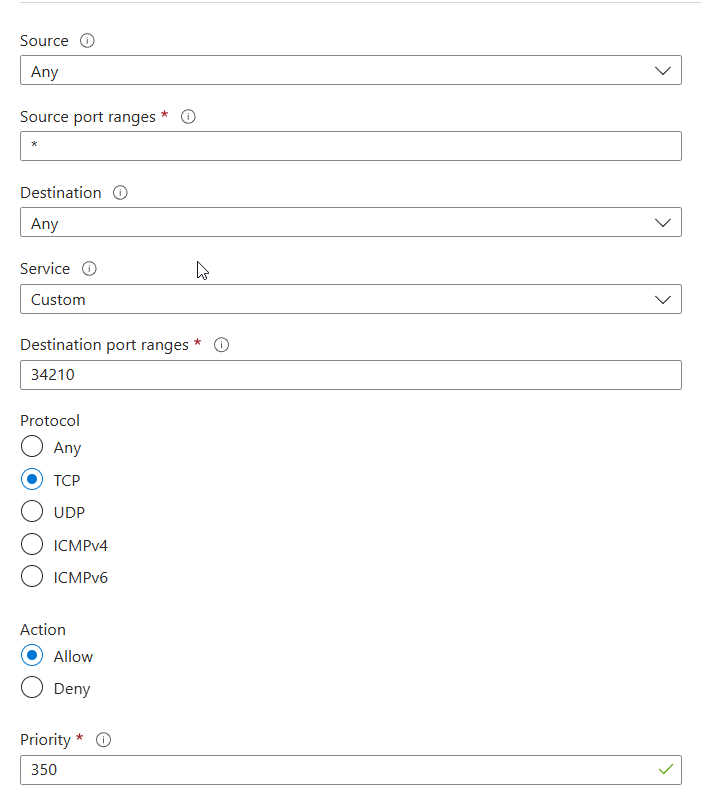
- Scroll down until you see a list of “Inbound port rules“. Click the “Create port rule“ button and create a new inbound port rule.

- A new panel will slide out. Fill in the following details:
- Source: Any
- Source port ranges:
* - Destination: Any
- Service: Custom
- Destination port ranges:
34210 - Protocol: TCP
- Action: Allow
- Priority: You can leave this as the default.
- Name: Give it a clear name, like
Allow_RunCloud_Agent.
- Click “Add“ to save this rule in your firewall. Once the rule is added to the firewall, it will be immediately enabled and applied to all the servers using this network security group.
RunCloud was built to solve this exact problem.While this guide covers the initial setup, RunCloud also offers a suite of tools for users with more advanced development workflows. Once you are comfortable with the basics, you may want to explore features such as:
- Port 22 (SSH): Allows you to connect via command line.
- Port 80 (HTTP): Allows standard web traffic.
- Port 443 (HTTPS): Allows secure web traffic (including UDP for HTTP/3).
- Port 34210 (RunCloud Agent): Allows RunCloud to manage your server.
Part 3: Connecting the Server to Your RunCloud Dashboard
This guide is perfect for anyone, from hobbyists launching their first project to developers looking for a streamlined workflow.
- Log in to your RunCloud Dashboard.
- Click “Connect a New Server“.
- Select “Microsoft Azure“ as your server provider, then choose the “Connect via IP Address“ method.
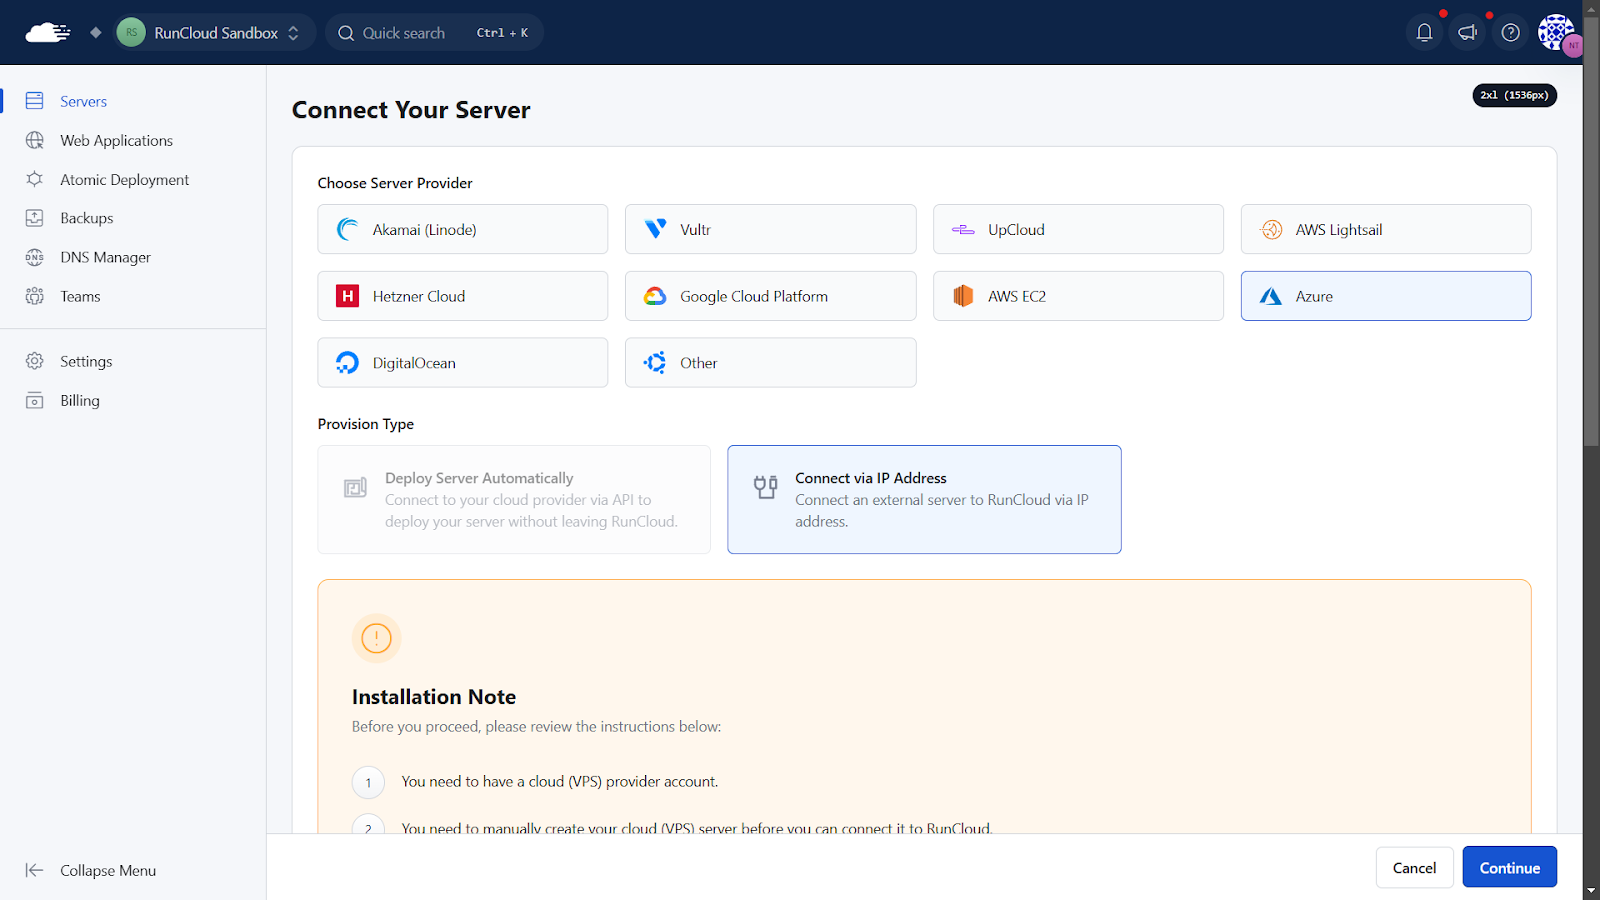
- After this, you will be required to configure the following details:
- Server Stack: Choose your preferred stack. If you are unsure, you can leave these settings to their default value.
- Server Name: Give your server a friendly name you’ll recognize in the dashboard.
- IP Address: Copy the “Public IP address“ from your Azure VM’s overview page and paste it here.
- Click “Continue“.
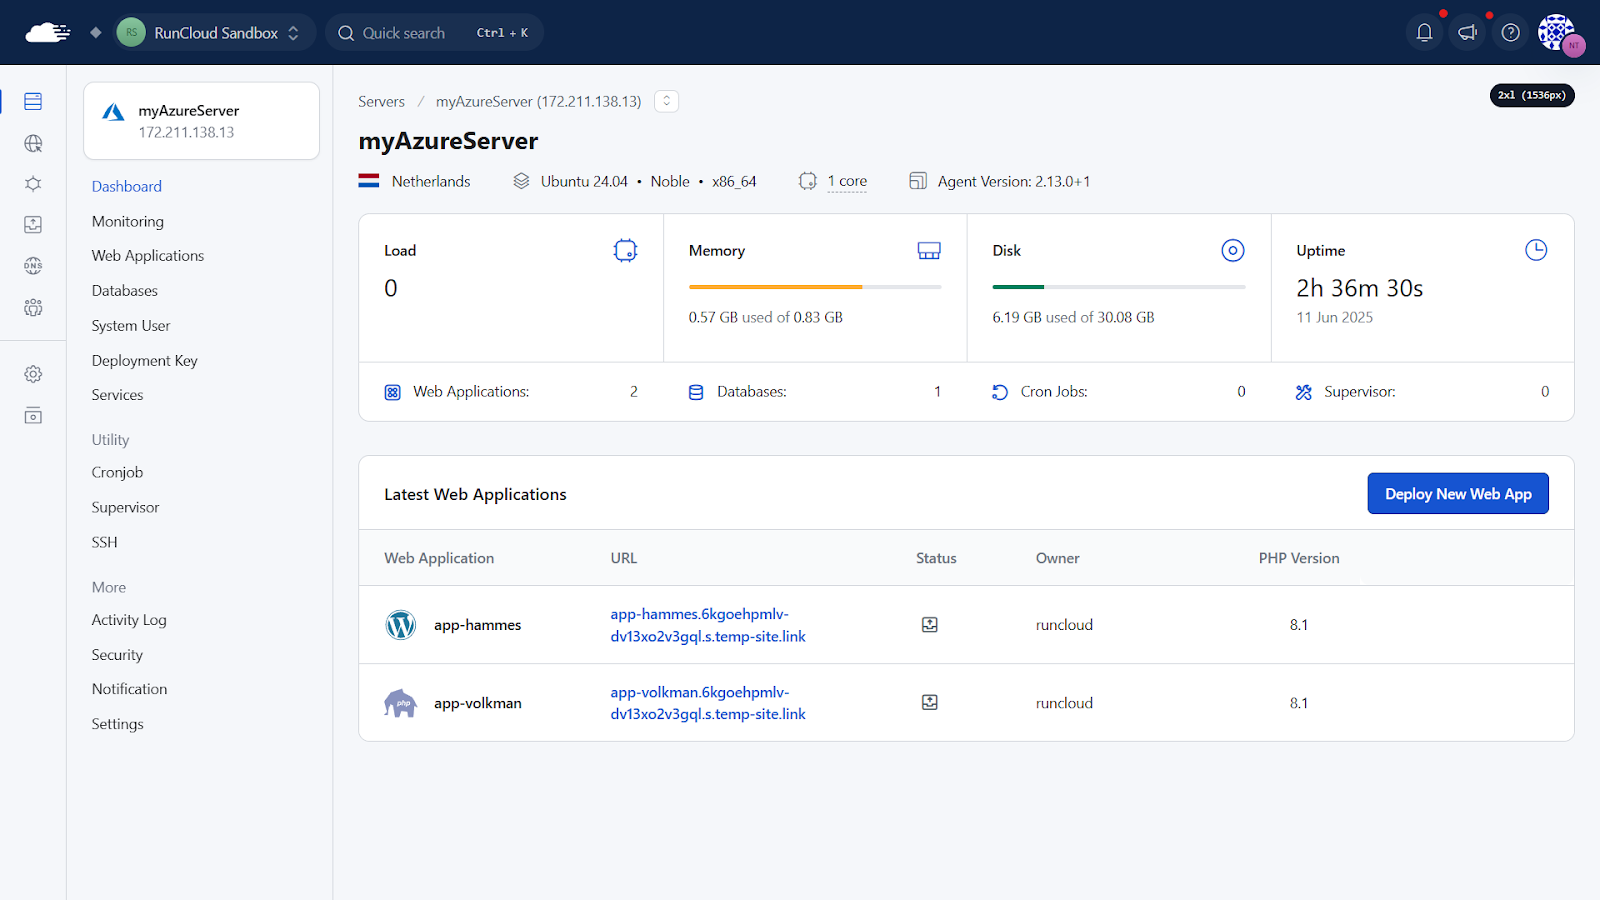
Once your server installation is finished, you can return to your RunCloud dashboard. Your new Azure server is listed, fully configured, and ready for action. You can now:The installation will now begin; it typically takes 10-15 minutes for the script to install and optimize nginx, PHP, MariaDB, Redis, and other essential tools for you.First things first, we need a server. In Azure, a server is called a “Virtual Machine“ or VM.Once setup is complete, you can manage your server entirely through the RunCloud dashboard. This allows for a more streamlined workflow for tasks such as deploying web applications, managing databases, and monitoring server health.Before you dive in, we suggest deploying a quick test web application to see RunCloud in action and confirm everything is running smoothly. Once you’re happy with the setup, we recommend taking one final step to enhance your server’s security.If you followed all the steps above, you can now connect this new server to your RunCloud account.
- Open a terminal (on Windows, you can use PowerShell or Command Prompt; on Mac/Linux, use the Terminal app). Use the following command format to connect to your server. Replace the file path and IP address with your own:
It is a flexible VPS management platform that works with any cloud platform, supports multiple server stacks, and supports both x86 and ARM CPU architectures.
"C:pathtoyourazure-key.pem"is the path to your private key.azureuseris your Azure username.your_server_ipis your VM’s public IP.
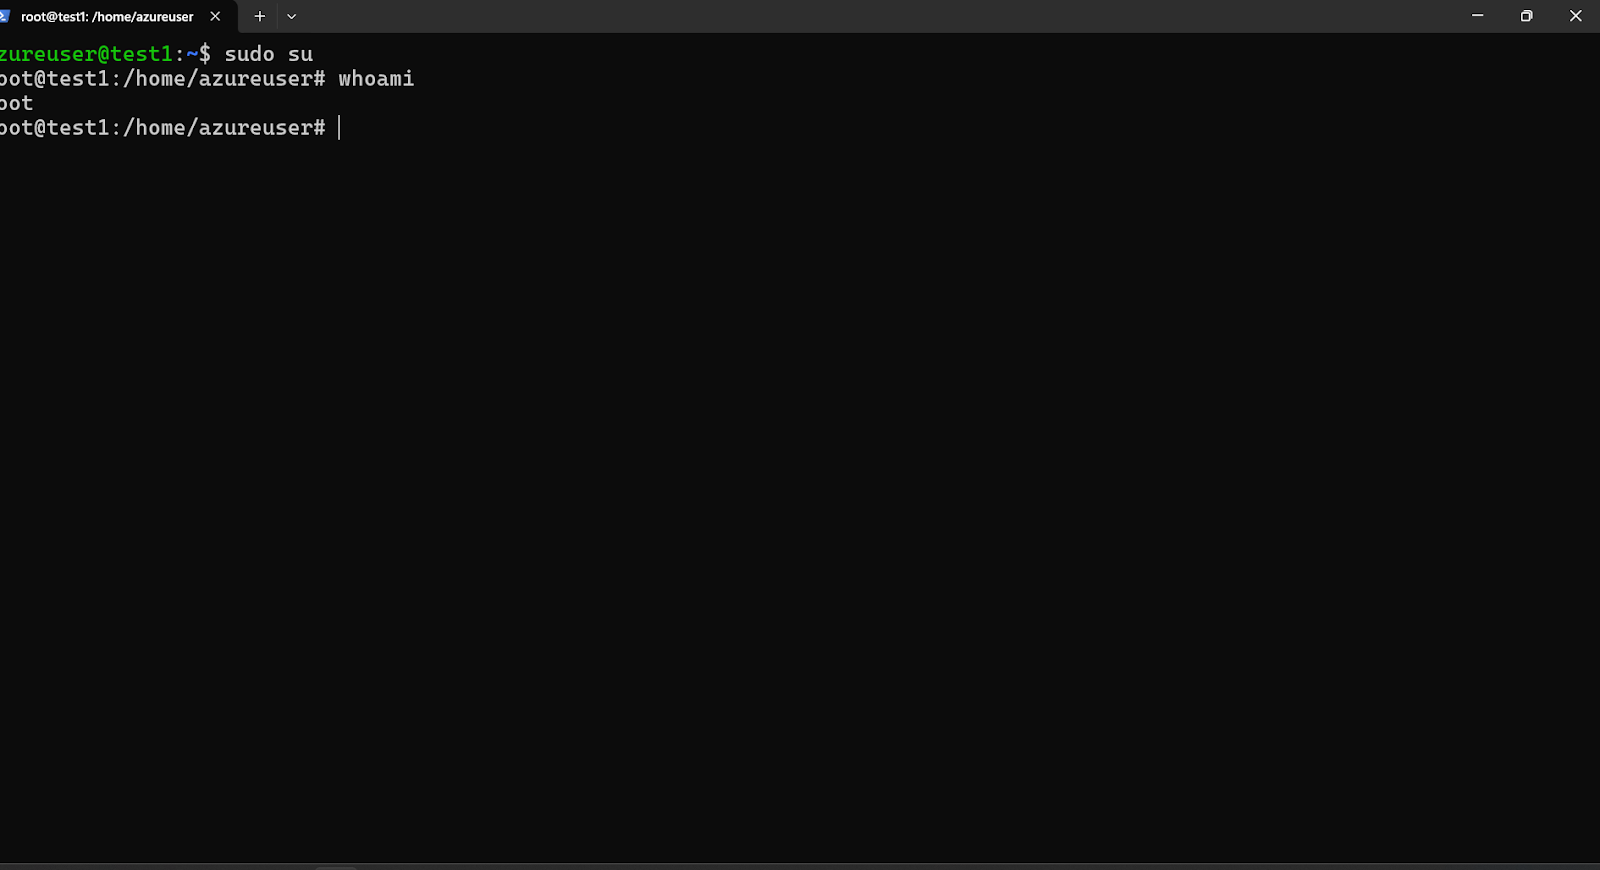
- Once logged in, type sudo su to log in to the user account. RunCloud needs this user account to install the necessary software on your server. If you are unsure what user account you are using, you can run the whoami command to see your username.
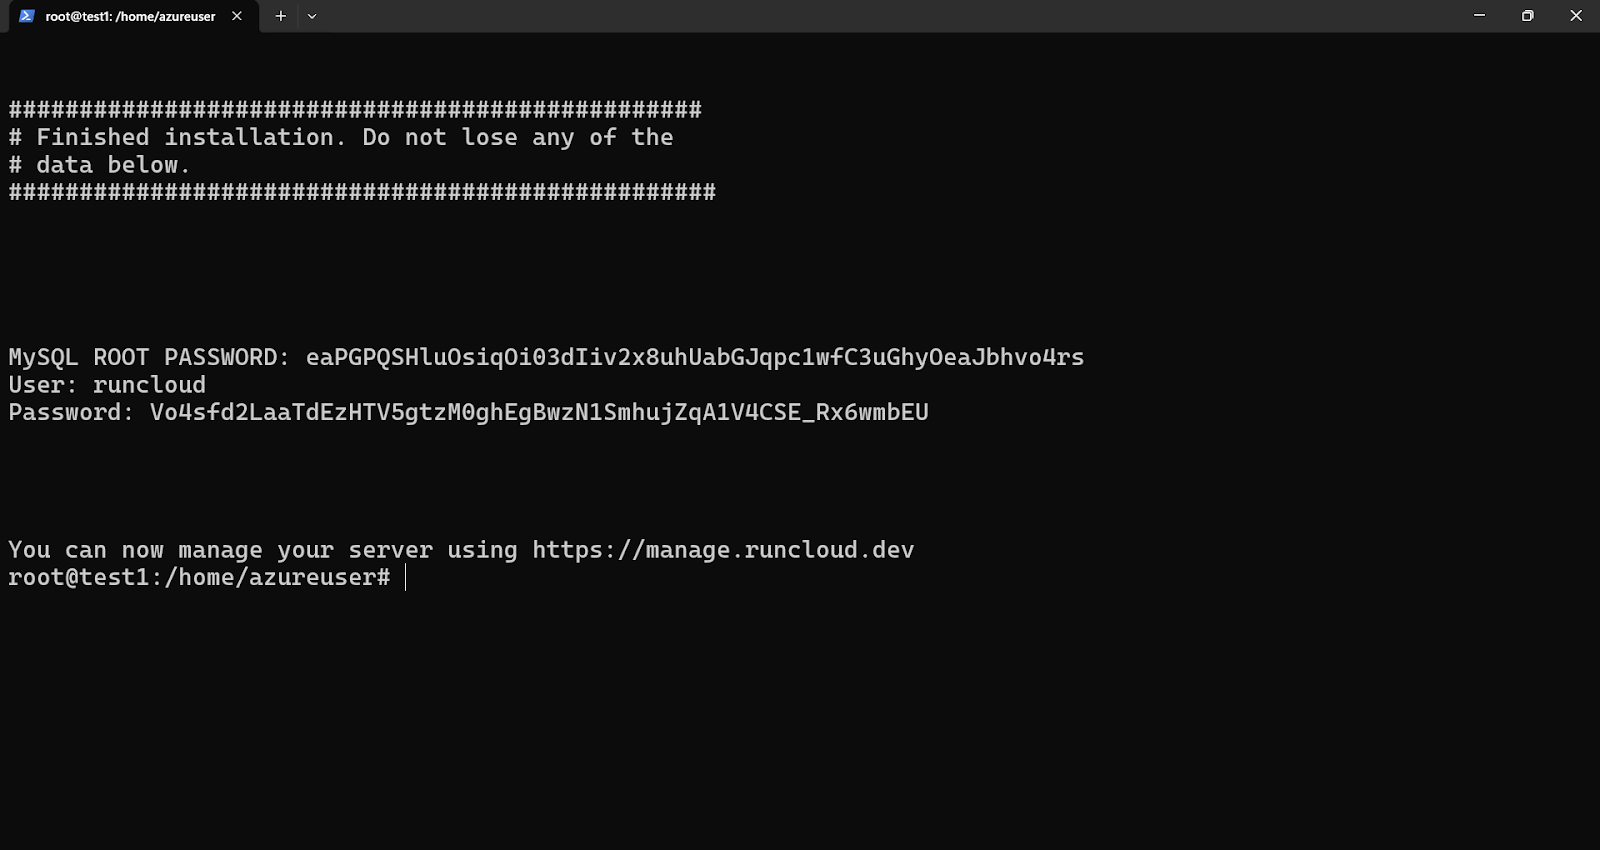
- After logging in as the root user, copy the installation script from the RunCloud dashboard, paste it into your terminal, and press “Enter”.
This is the easiest option if you don’t plan on regularly logging in to your server’s command line.In this blog, we will show you how to combine the power and reliability of Microsoft’s Azure cloud with the simplicity and efficiency of the RunCloud server management panel.
Part 3: Experiencing the RunCloud Dashboard
Managing servers through the command line can be tedious. Many cloud management platforms add to the friction by restricting functionality or locking you into their ecosystem.
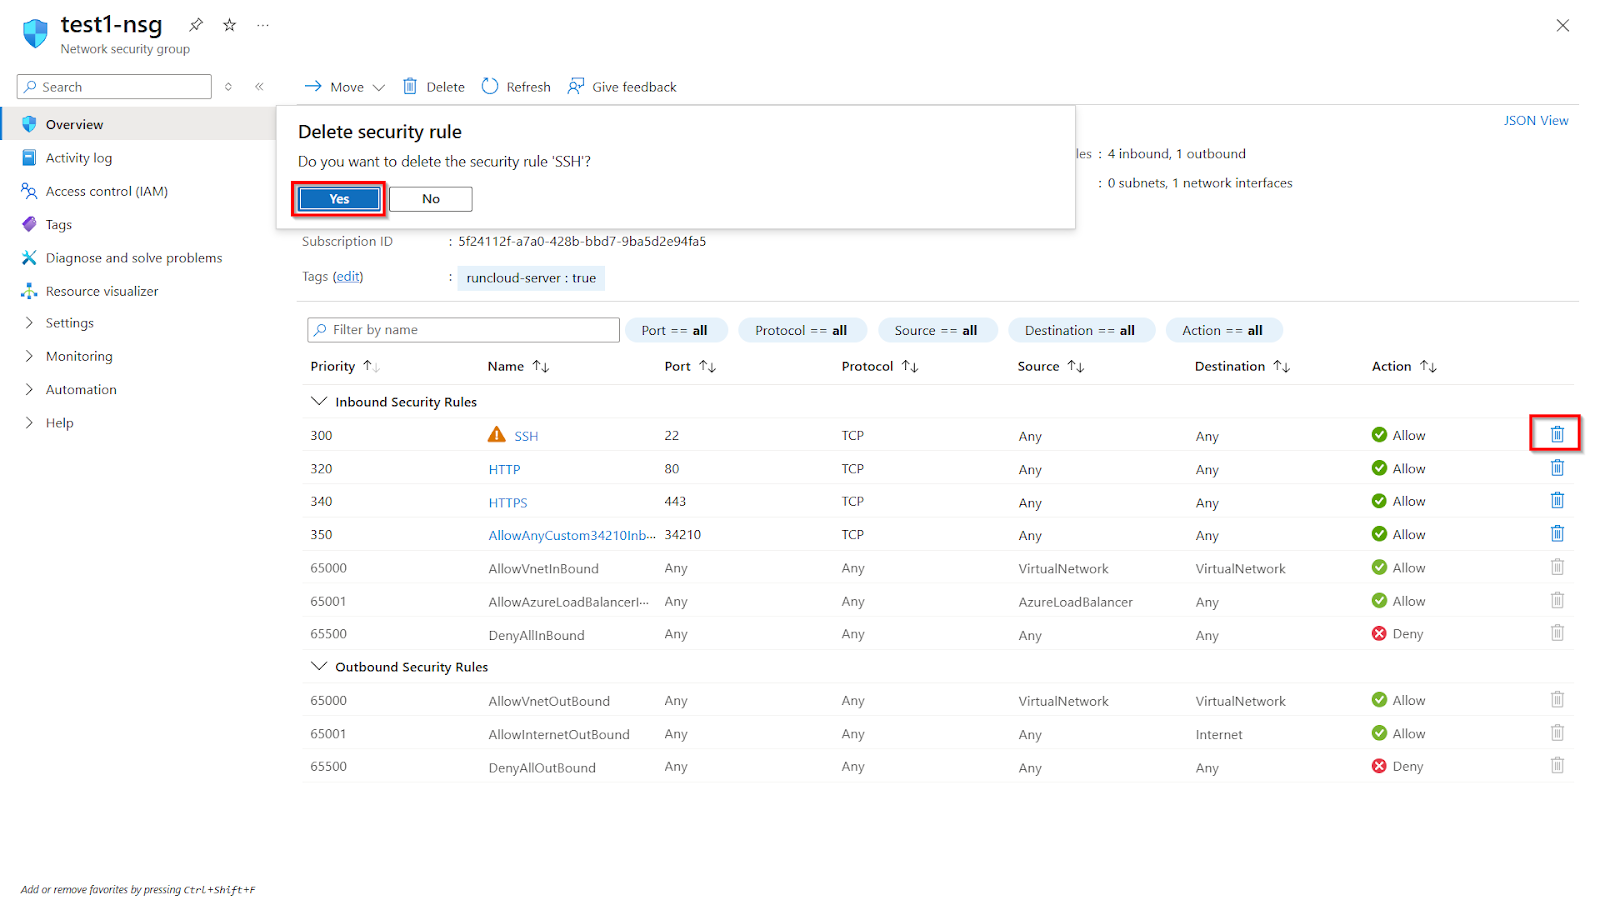
Part 4: Disabling SSH Access
Once your server is deployed, we need to configure one more networking setting. RunCloud uses a specific port to communicate securely with your server, and we need to open it.Your server will now be deployed, which usually takes a few minutes. If you chose the SSH key option, you will be prompted to download your private key file now.
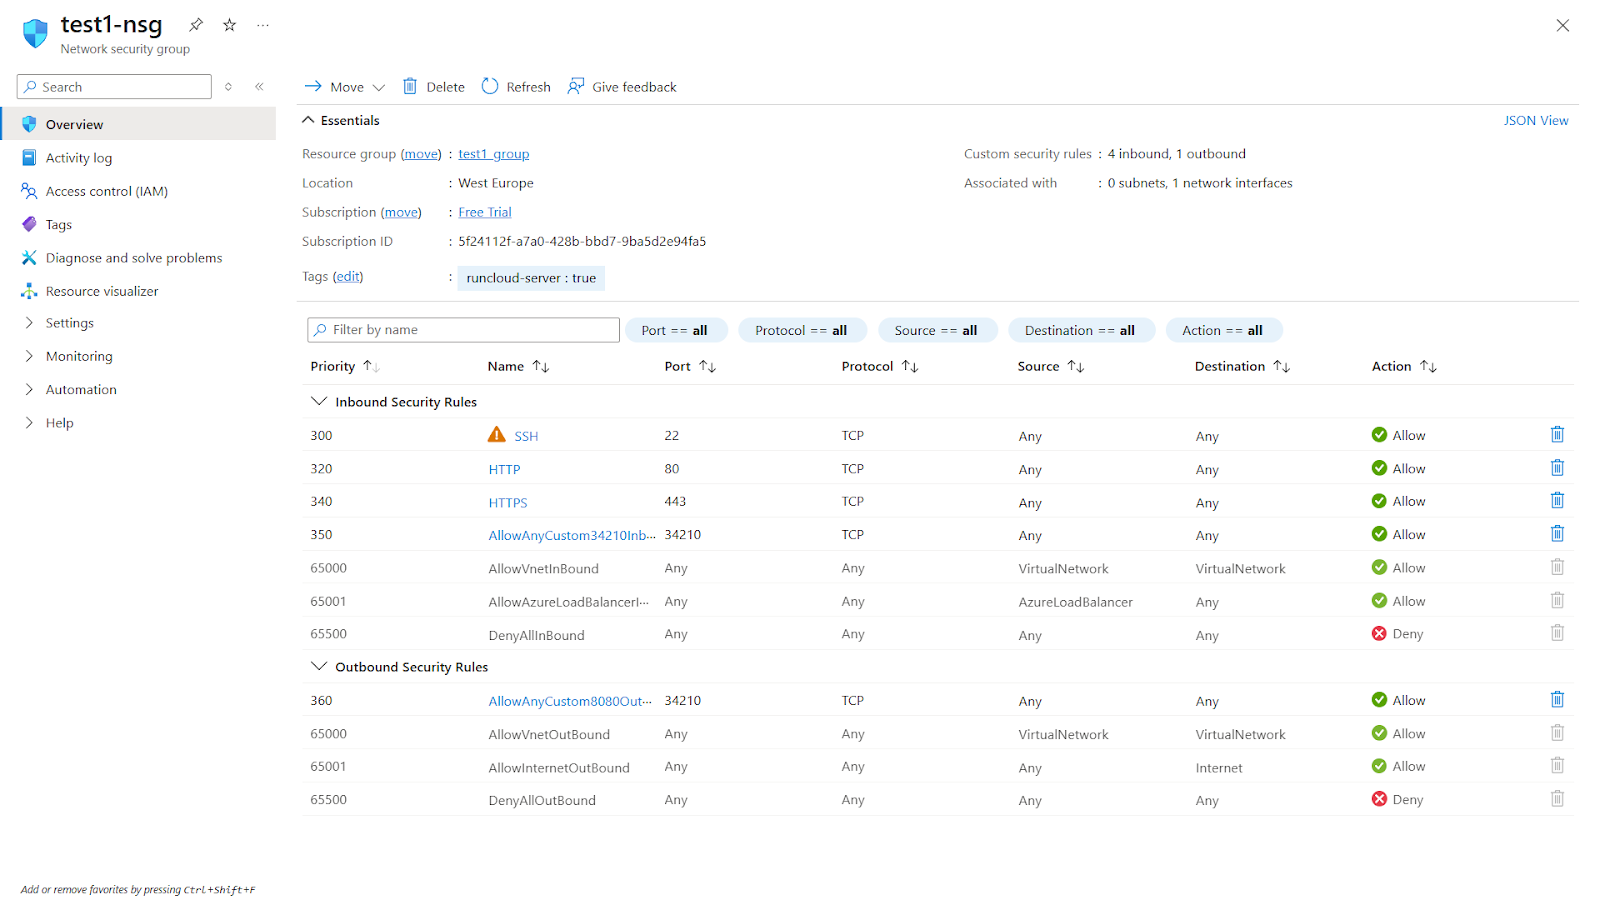
- Return to the “Network security group“ settings for your virtual machine in the Azure portal.
- Find the inbound rule for port 22 (SSH) in the list.
- On the far right of that rule, click the trash can icon.
- Confirm the deletion when prompted.
You can always resize your server later if your website grows! However, when you resize your server, it will be rebooted, so you should be aware that your applications will be unavailable for a few moments.
Final Thoughts
After configuring the above settings, you can move to the “Disks“ tab. Here, you can set the size of your VM’s disk.Alternatively, you can also use the following command in your terminal to connect to the server manually via SSH. Before you execute the following command, make sure to replace the Azure user with the name of your user account and your_server_ip with the public IP address of your server:This guide explains the process for connecting a new Microsoft Azure virtual machine to a RunCloud account. We covered the necessary steps, from creating the server and configuring its firewall rules in Azure to completing the connection through the RunCloud dashboard.
- One-Click Staging Environments: Create a safe copy of your live site to test updates, plugins, and code changes before pushing them to production.
- WordPress Canvas: Define a master template with your preferred theme and plugins to deploy multiple, identical WordPress sites quickly and consistently.
- Git & Atomic Deployments: Connect your repository from services like GitHub, Bitbucket, or GitLab for automated, seamless, and zero-downtime application deployments.
Now you’ll see a screen with several options. Let’s fill them in.By the end of this guide, you’ll have a brand-new, optimized server ready to host your websites and applications.