Your online store just went down.git clone -b 3.x https://github.com/cachethq/cachet.git --depth 1 .
/RunCloud/Packages/php83rc/bin/php artisan vendor:publish --tag=cachet
Cachet is a feature-rich, open-source status page system built with Laravel. Here’s a quick rundown of its powerful features:Not at all. RunCloud is designed to empower users who want the power of a VPS without needing deep command-line expertise. It automates and simplifies critical server tasks like security updates, creating cron jobs, and managing databases through an intuitive graphical dashboard, giving you full control with none of the complexity.What’s your first move?/RunCloud/Packages/php83rc/bin/php artisan migrate
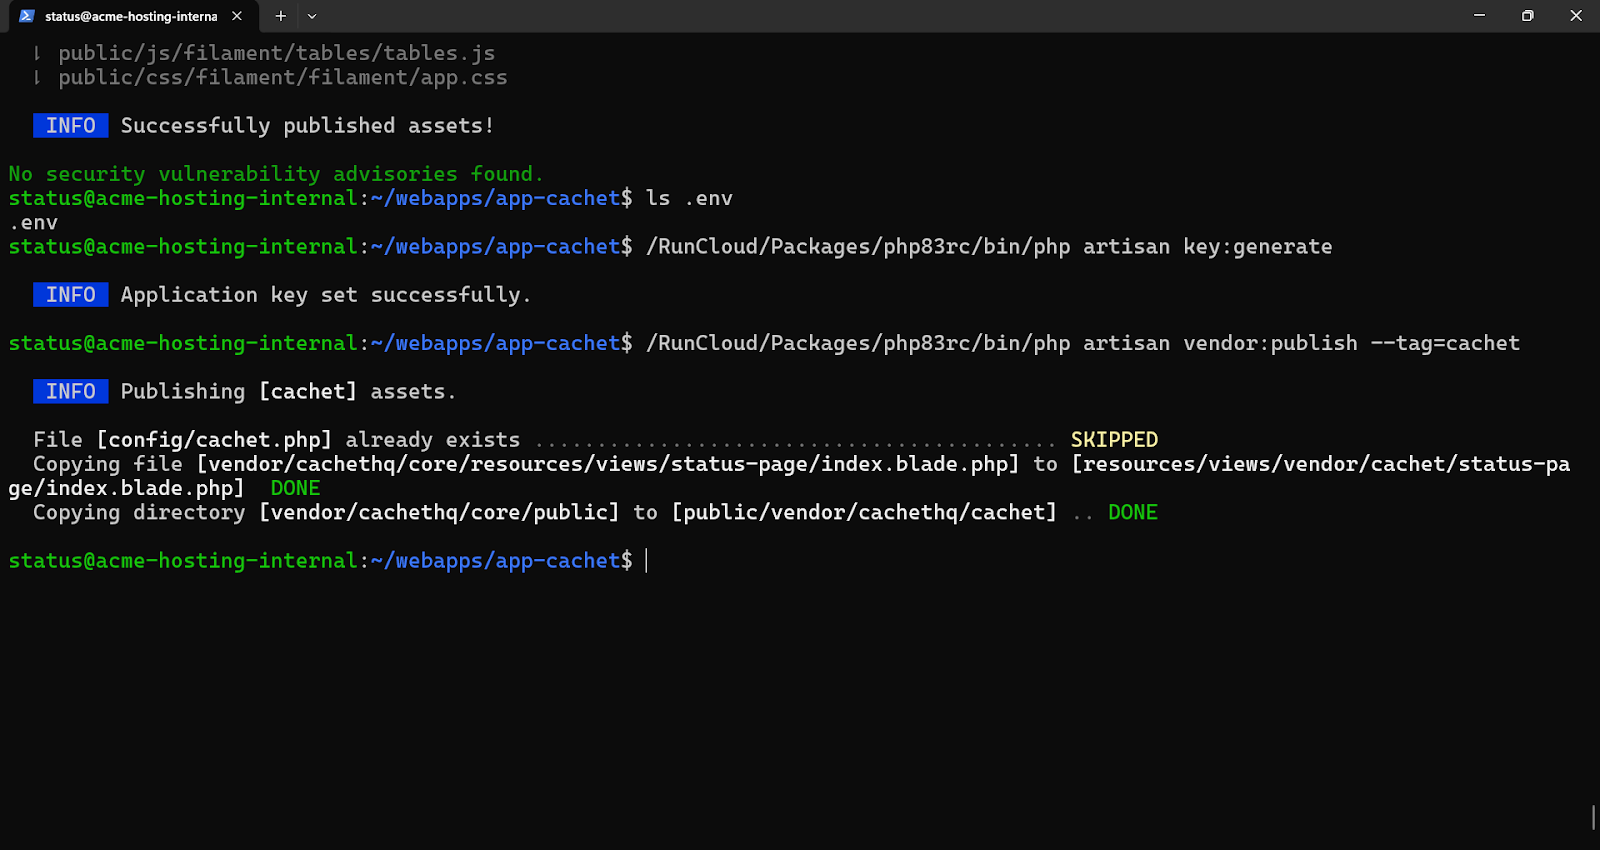
Table of Contents
Step 7: Create Your Admin User
Let’s set up your Cachet status page using the RunCloud server management panel to help streamline the process significantly. RunCloud handles server configuration and makes application deployments much simpler.
Benefits of Having a Status Page:
- Builds Trust: A status page allows you to proactively communicate downtime, which shows transparency and reassures your customers that you are on top of the situation.
- Reduces Support Load: It deflects a significant number of support tickets and calls during an incident, which frees up your team to focus on resolving the issue.
- Validates SLA Breaches: For businesses with Service Level Agreements (SLAs), a status page provides a clear and public record of uptime and incidents, making it easier to validate any breaches.
Tools to Get You Started
When things go wrong (and they inevitably do), clear and timely downtime communication is the key to maintaining user trust.
- UptimeRobot: Known primarily for uptime monitoring, but also offers a simple and effective status page feature.
- BetterStack: Provides a beautifully designed, free status page that integrates with their monitoring and incident management tools.
- Cachet: A powerful, open-source, and self-hostable status page system that gives you complete control over your data and branding.
cd <root path>
# Again, using the RunCloud-specific PHP path

/RunCloud/Packages/php83rc/bin/php artisan key:generate
Step 5: Configure the Application in RunCloud
A status page is a dedicated web page that communicates the current operational status of your online services. It is a centralized hub for all incident and maintenance-related information. Instead of flooding your support channels with inquiries during an outage, you can direct users to a single page with all the necessary information that is updated in real time.
Why Should You Use Cachet to Create Self-Hosted Status Pages?
There are many excellent tools available that allow you to create a status page, many of which offer free tiers to get you started. Some popular options include:
- Component Management: Allows you to define and manage individual components of your application (e.g., API, Website, CDN).
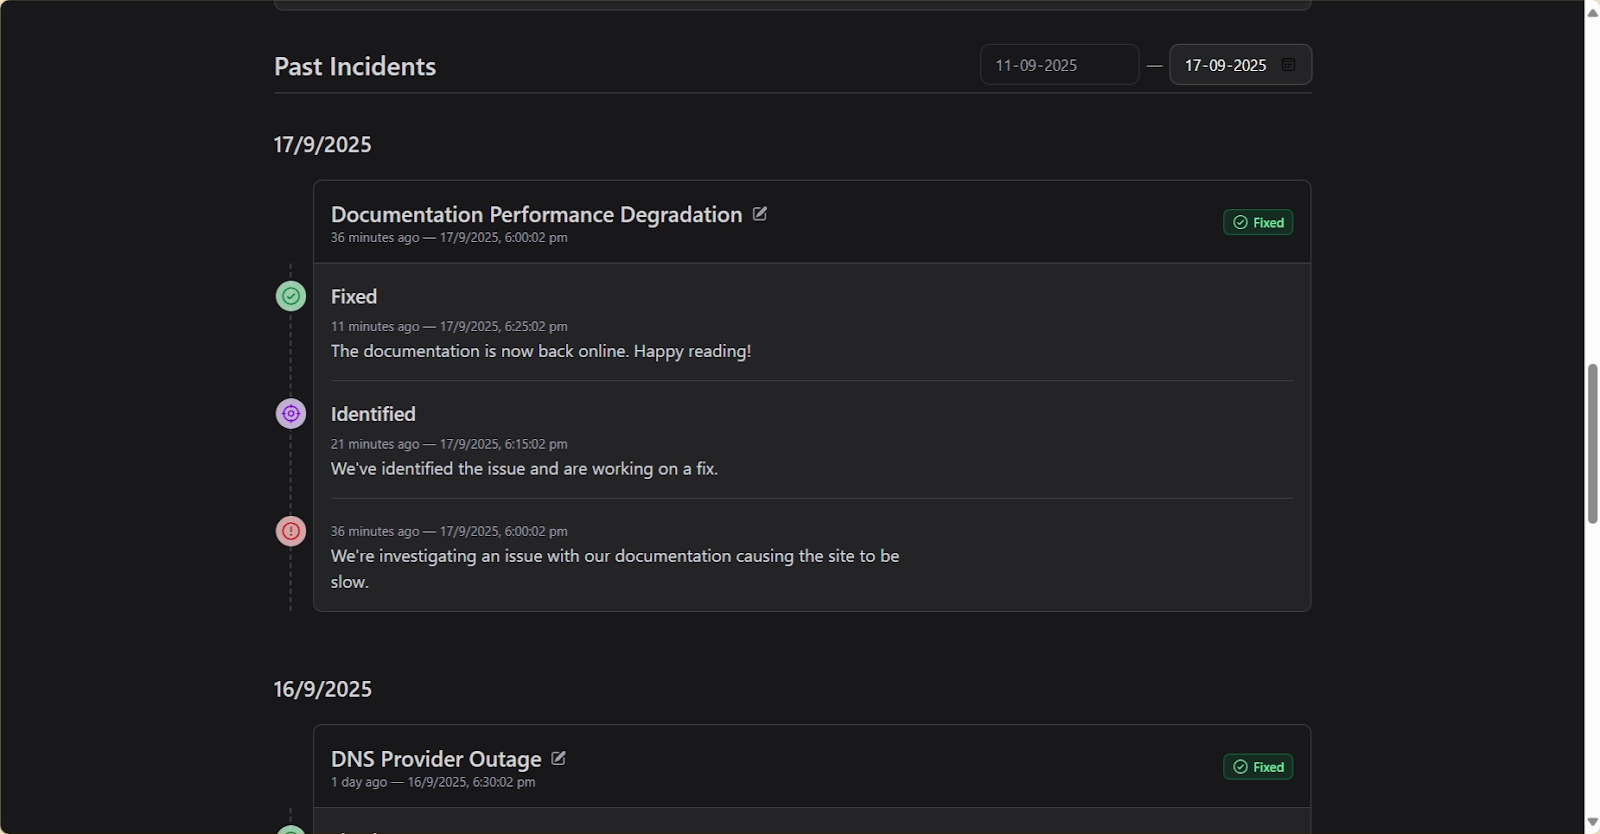
- Incident Reporting: Use it to clearly communicate incidents with status updates like Investigating, Identified, and Fixed.
- Scheduled Maintenance: Allows you to inform your users about upcoming maintenance windows proactively.
- Metrics and Graphs: Display key performance metrics (e.g., response time, error rates) directly on your status page.
- Multi-language Support: Cachet supports over 10 languages, which makes it accessible to a global audience.
- Subscriber Notifications: Allows users to subscribe via email to receive real-time updates on incidents and maintenance.
Step-by-Step: Installing Cachet with RunCloud
A self-hosted solution is extremely cost-effective, as your only costs are the cloud server (from providers like DigitalOcean or Vultr) and your RunCloud subscription. This predictable, low monthly fee is often significantly cheaper than hosted status page services, which can charge high premiums based on the number of subscribers or components. With RunCloud, you get unlimited potential for a flat, reasonable price.
Step 1: Create a Database and Web Application
cp .env.example .env
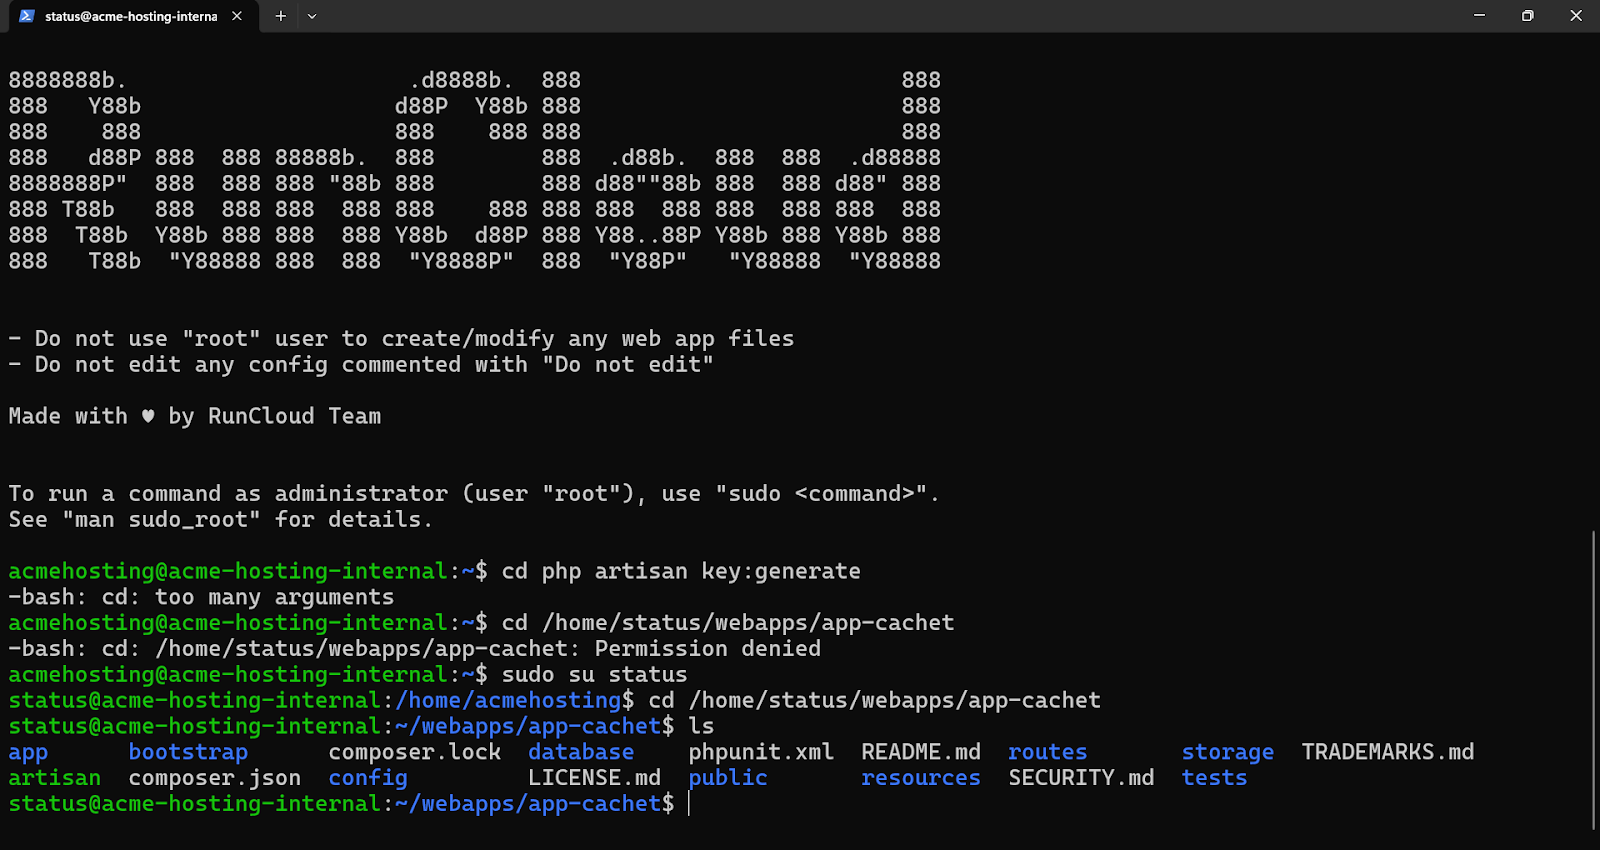
SSH into your server using your preferred method and navigate to your newly created application’s root folder. The path will look something like /home/YOUR_USERNAME/webapps/YOUR_APP_NAME, and it is available in your RunCloud application dashboard.
Step 2: SSH and Clone the Repository
First, you’ll need a dedicated database for Cachet. In your RunCloud dashboard, navigate to the Databases section and create a new database and a database user. Securely store these credentials, as you will need them shortly.If you value this flexibility, then it’s worth knowing that RunCloud makes managing and deploying web applications incredibly simple and efficient.rm index.html
As you can see from the process above, RunCloud eliminates the complexity of server configuration, database linking, and cron job management, allowing you to deploy powerful applications with confidence and ease.Next, create a new, empty Web Application in RunCloud. This will be the home for your Cachet installation.
Step 3: Install Dependencies
With the files in place, it’s time to install the required PHP dependencies using Composer.Save the cron job, and you’re all set!You can navigate to this directory by running the following command:While setting up any application directly on a server can be complex, a modern server panel like RunCloud makes it incredibly simple. RunCloud handles the server configuration, firewall, and database linking, providing a guided interface that turns a difficult command-line process into a few clicks. This gives you the power of a self-hosted solution without the traditional setup headaches.You can refer to the PHP Cheat Sheet in the RunCloud Docs to find the absolute path of your PHP binary.Ready to take control of your servers without the headache? Sign up for RunCloud today.Publish Cachet’s assets:
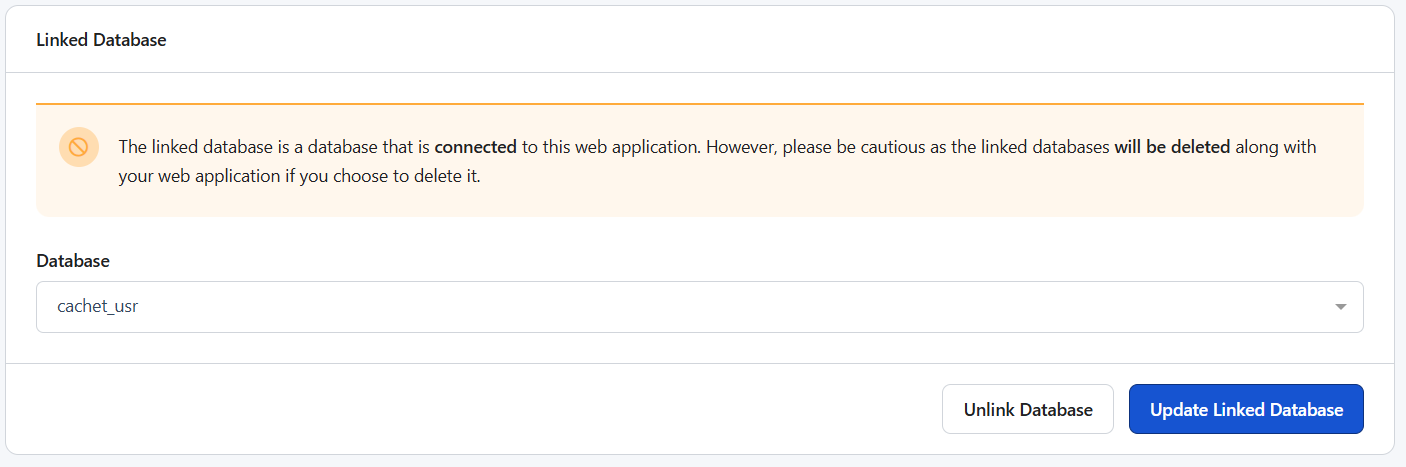
- Link the Database: In the Settings menu, find the Linked Database section. Select the database you created in Step 1 from the dropdown menu and save.
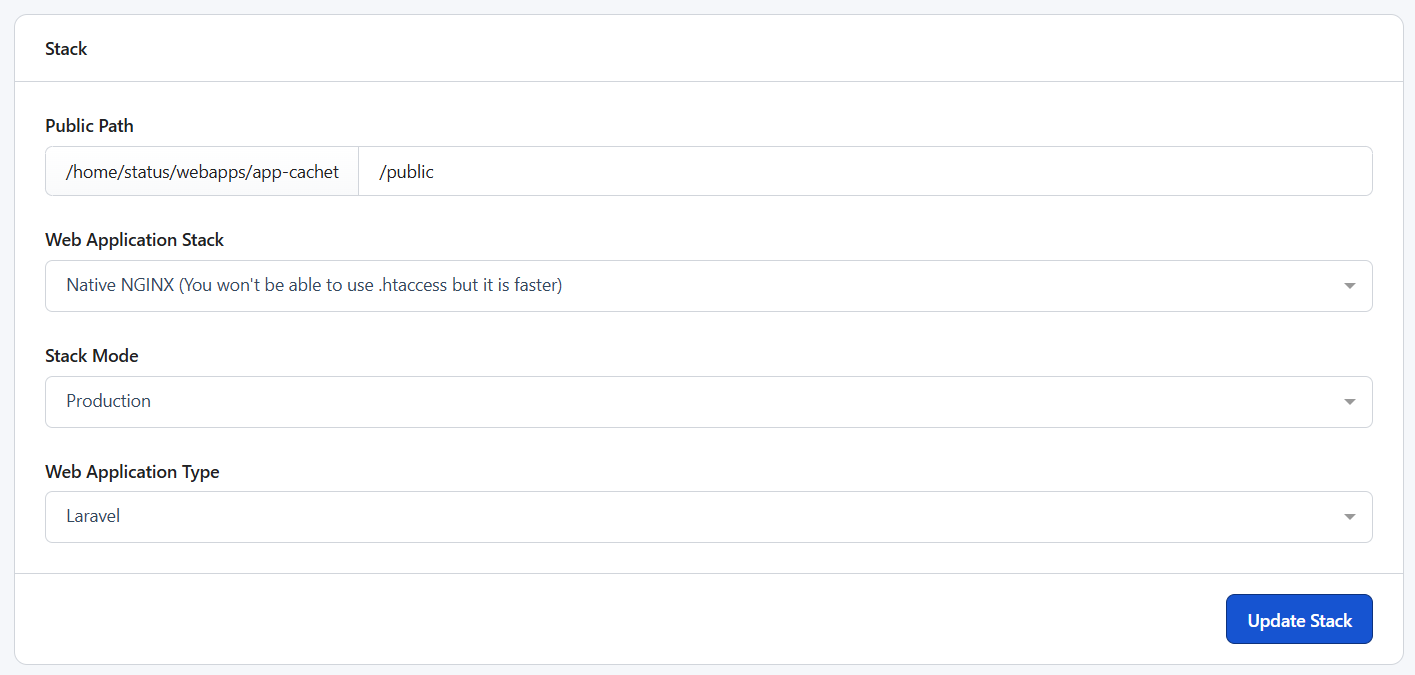
- Update Web Application Settings:
- Public Path: Set this to /public.
- Web Application Stack: For best performance, choose Native NGINX.
- Stack Mode: Select Production.
- Web Application Type: Set this to Laravel.
- Click Update to save the changes.
- Edit Environment Variables: Navigate to the Env Editor in the left-hand menu. This user-friendly interface is a fantastic RunCloud feature that prevents you from having to edit the .env file via the command line. Update the following database variables with the credentials you created earlier:
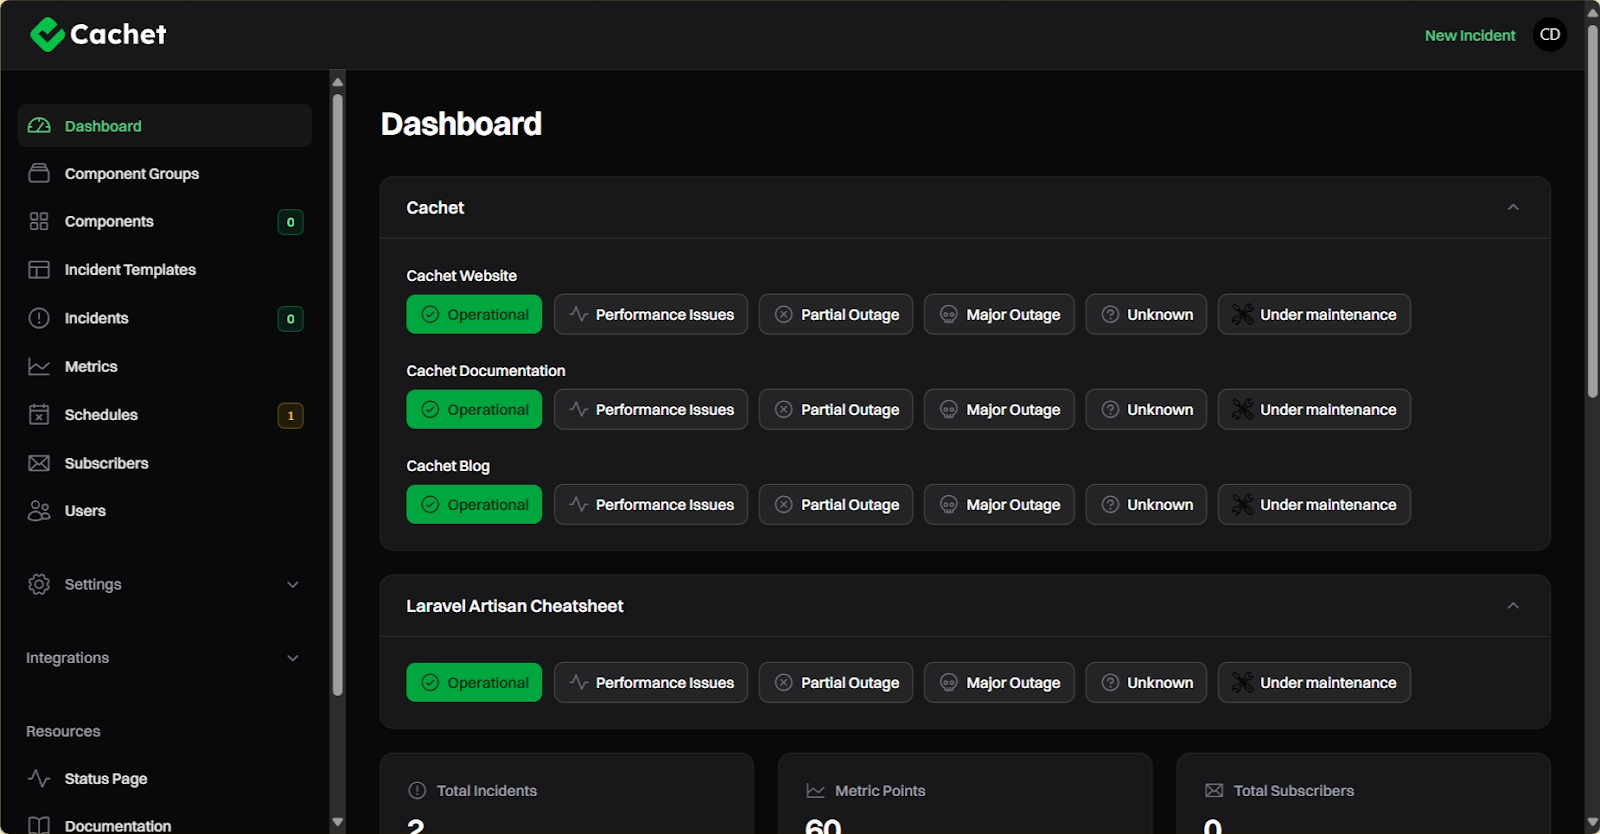
Run the following commands:Whether you’re looking to improve transparency, validate SLAs, or simply show your uptime status to customers, you’re in the right place. This guide will show you exactly how to create and set up a powerful status page for your business.Investing a small amount of time to set this up builds a more resilient and trustworthy relationship with your customers. While powerful open-source tools such as Cachet provide the features, platforms like RunCloud offer the seamless experience.By now, you should have a fully functional, self-hosted status page. Go ahead and visit your domain to see it live, and log in at the /dashboard to begin customizing components, scheduling maintenance, and transparently communicating with your users.In this tutorial, we will walk you through setting up a status page using Cachet, an open-source solution packed with features to make managing your downtime less stressful.
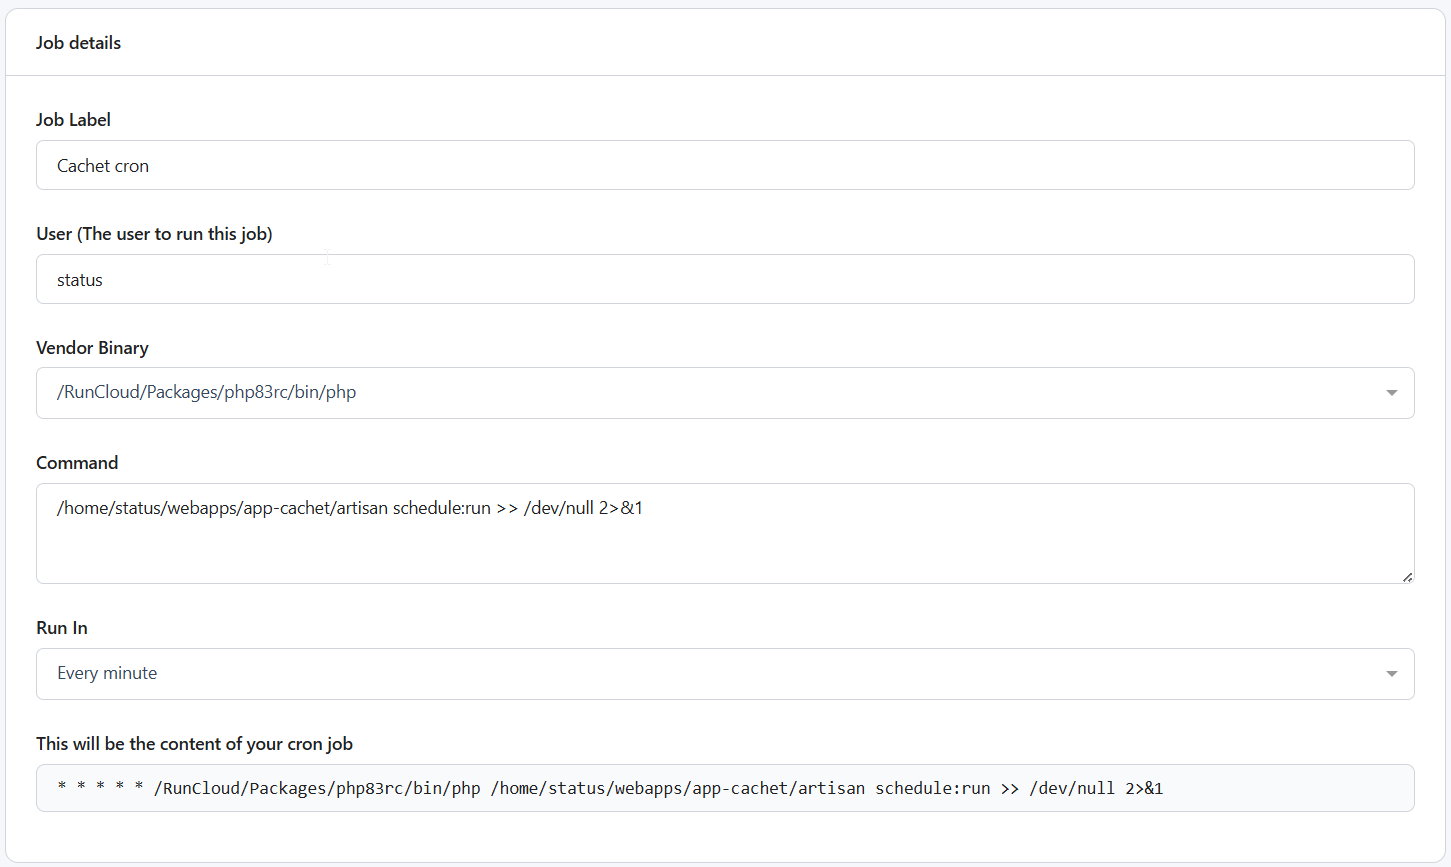
- In your RunCloud dashboard, go to Cron Jobs and click Add New Job.
- Fill in the details as follows:
- Job Label: Cachet Cron
- User: Your server user (e.g., runcloud)
- Vendor Binary: Select the correct PHP version binary (e.g., /RunCloud/Packages/php83rc/bin/php)
- Command:
/home/YOUR_USERNAME/webapps/YOUR_APP_NAME/artisan schedule:run >> /dev/null 2>&1 - Run In: Every minute
/RunCloud/Packages/php83rc/bin/php artisan cachet:make:user

Step 8: Set Up the Scheduler Cron Job
A key advantage of RunCloud is its support for multiple, isolated PHP versions per application. To ensure you’re using the correct one, you may need to specify the absolute path to the PHP version you assigned to this app.
DB_CONNECTION=mysql

DB_HOST=127.0.0.1

DB_PORT=3306

DB_DATABASE=your_cachet_database_name

DB_USERNAME=your_cachet_database_user

DB_PASSWORD=your_database_password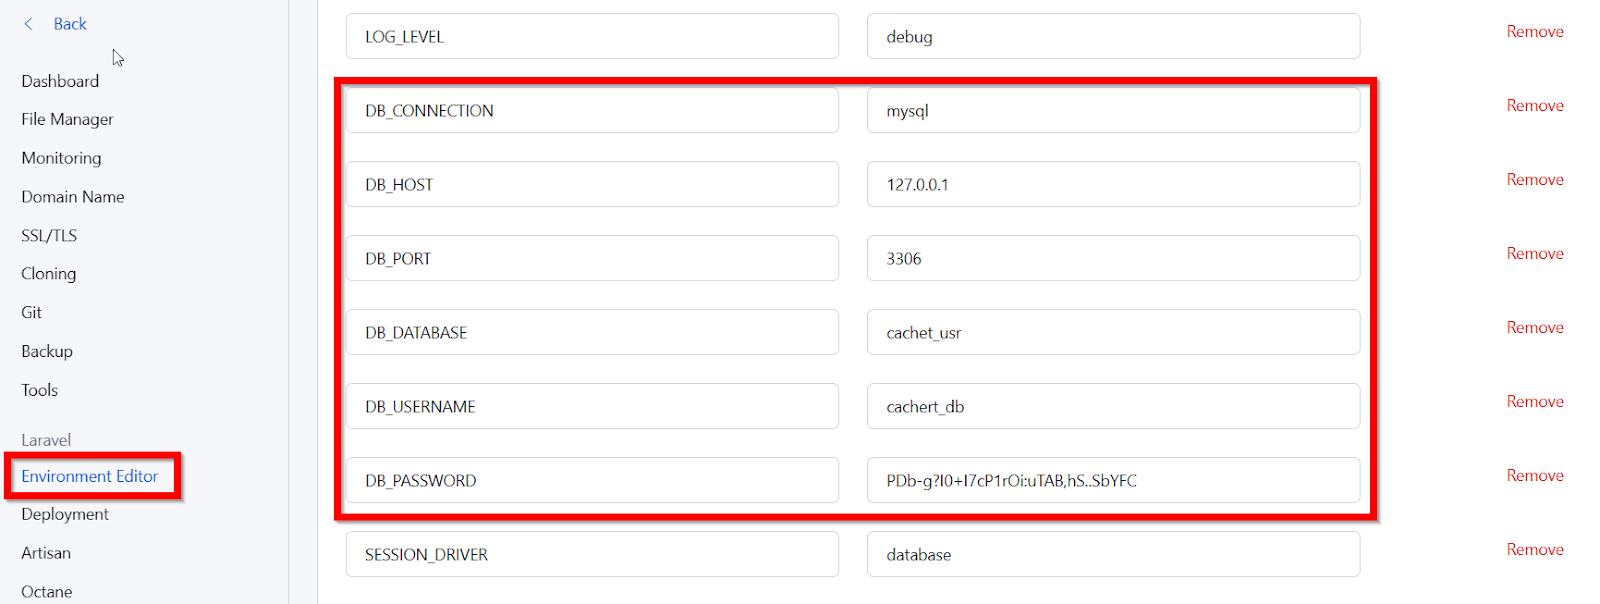
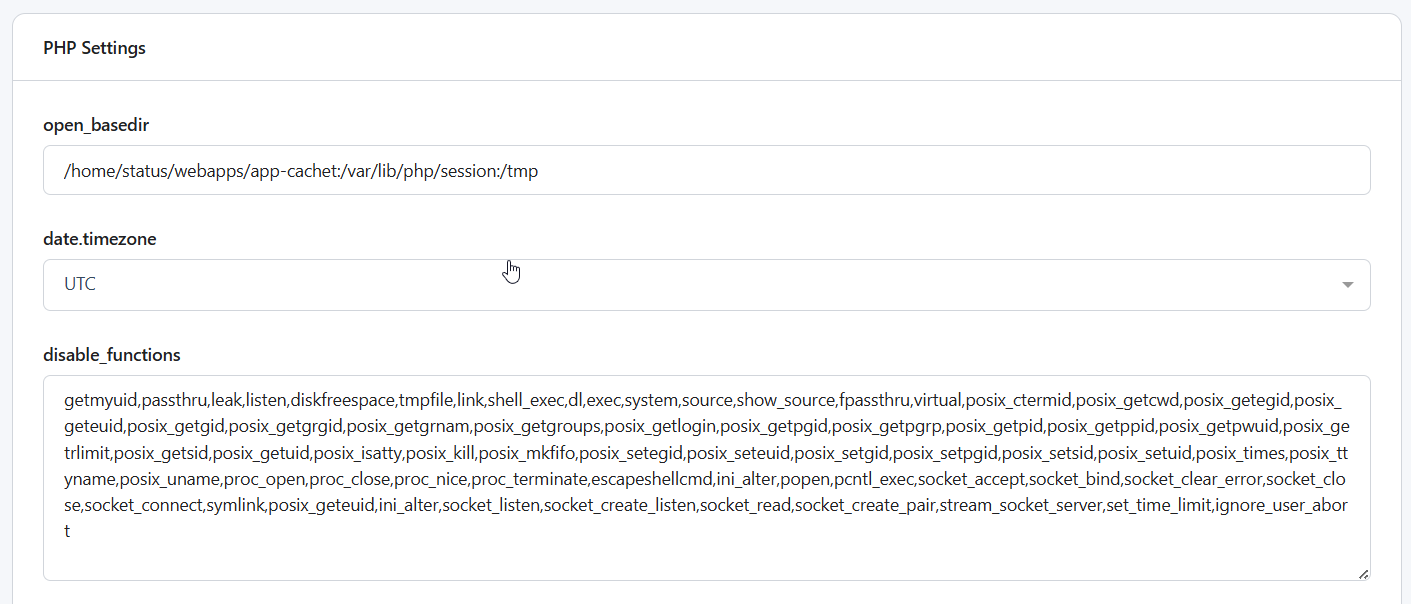
- Remove Disabled PHP function: Cachet requires the highlight_file function to be enabled to work properly. Navigate to your application settings and remove this function from the disabled list, then hit save.
Step 6: Finalize Installation
Absolutely, and this is a key advantage of self-hosting. Because you have full control over the application files on your server managed by RunCloud, you can modify the code, apply custom themes, and integrate it deeply with your other systems. This level of customization is simply not possible with restrictive hosted solutions like UptimeRobot or Statuspage.io.Let’s get started!
Frequently Asked Questions
Why not use a hosted service like Statuspage.io or BetterStack?
# Example for PHP 8.3
/RunCloud/Packages/php83rc/bin/php /usr/sbin/composer install --no-dev -o
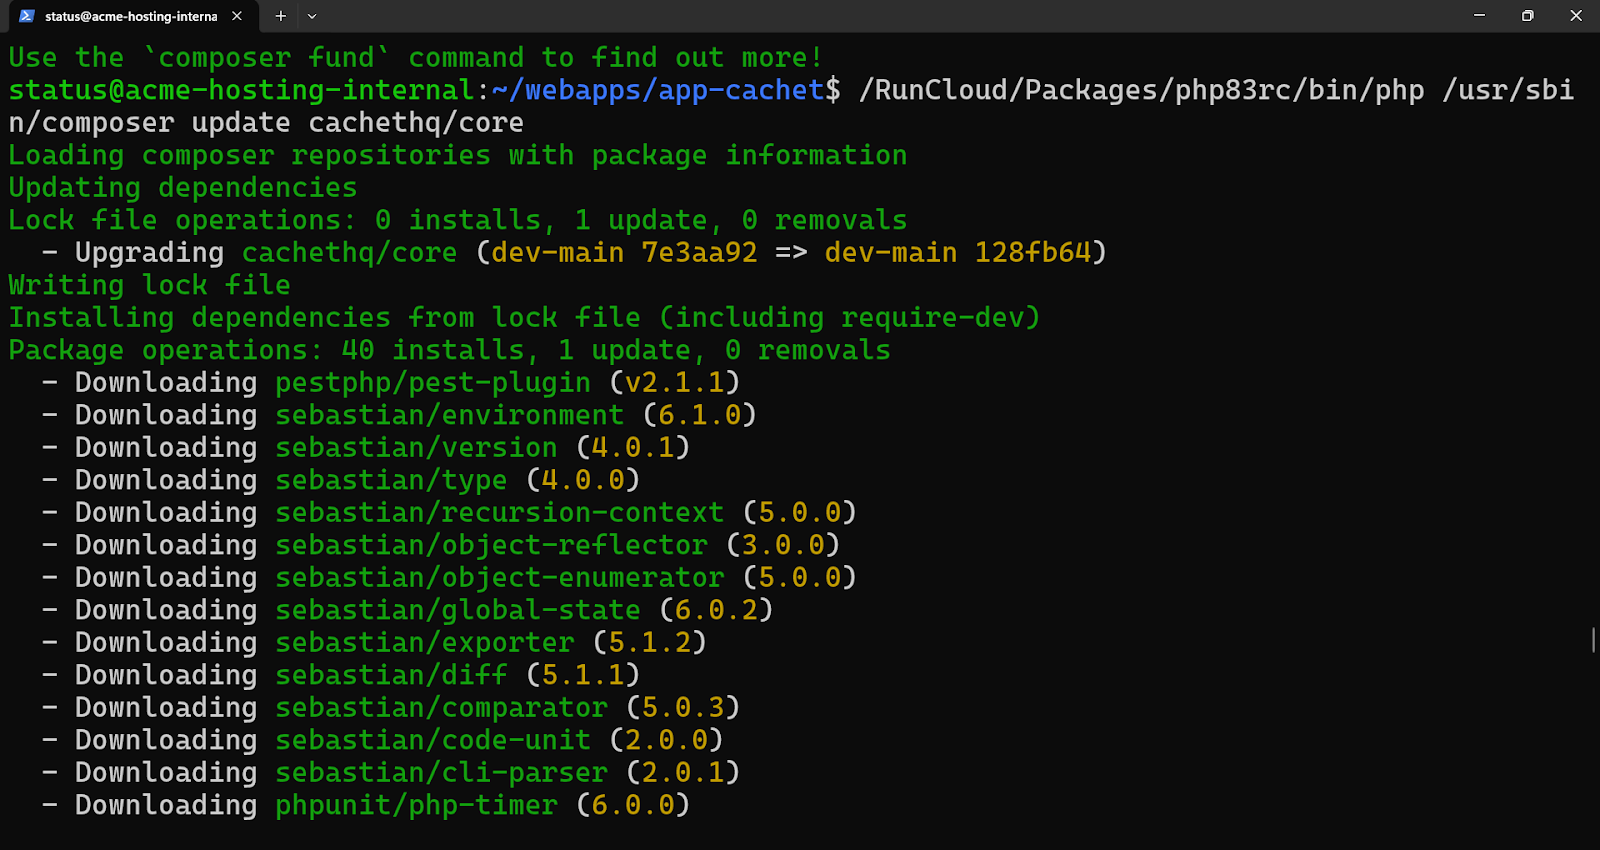
/RunCloud/Packages/php83rc/bin/php /usr/sbin/composer update cachethq/core
Step 4: Configure Your Environment
This is where a dedicated status page comes in.