SSH access should follow the zero-trust security model to address these challenges and threats. This means that every SSH connection should be verified and authorized based on the identity and security posture of the user and device, as well as the context and risk level of the request. Additionally, SSH access should be limited to the minimum required privileges and resources, monitored for anomalies and incidents, and audited for compliance and improvement.
Table of Contents
Explanation of the Zero Trust Security Model
SSH (Secure Shell) is a protocol that allows secure remote access to servers and other devices. It is essential for many IT operations, such as administration, maintenance, configuration, and troubleshooting. However, if not properly managed and secured, SSH access also poses significant security risks.The zero trust model is based on the following key concepts:This section will explain how to establish a Cloudflare Tunnel. This tunnel lets you connect securely to your server without publicly exposing its ports.
- Identify and protect the protected surface: This is the data, applications, assets, and services (DAAS) that are critical for the organization and need to be secured.
- Divide the network into segments: This is done to limit the access and movement of users and devices within the network and prevent attackers’ lateral movement.
- Create a single source of trust: This is a centralized system that collects and analyzes data from multiple sources, such as identity providers, endpoints, workloads, and network devices, to establish trust levels and enforce policies.
- Use dynamic policies: These are policies that adapt to the context and risk level of each connection and interaction, such as user location, device type, application sensitivity, and threat intelligence.
- Monitor and audit everything: This is done to detect and respond to anomalies and incidents and to measure and improve the effectiveness of the security controls.
What is Zero Trust SSH Access?
While setting up Zero Trust SSH access significantly enhances your server security, managing web applications and configurations can still be complex. This is where RunCloud comes into play.The Zero Trust security model is a framework for securing IT systems that assumes no one inside or outside the network should be trusted unless their identity is verified.
Why Zero Trust is Essential for SSH Access
By the end of this article, you’ll know how to establish a secure SSH tunnel and effectively safeguard your server from unauthorized access.In this guide, we have explained the importance of using a zero-trust architecture and provided steps to route all your traffic through Cloudflare’s network to leverage Cloudflare’s authentication measures. This significantly reduces the risk of unauthorized access.In today’s internet landscape, securing your server from constant threats is vital. It’s inevitable that servers will be frequently targeted by automated systems searching for vulnerabilities to exploit. These attacks often go unnoticed, but they still pose a significant risk to the security and integrity of your data.
- Reduced attack surface: By limiting SSH access to only authorized users and devices and only necessary resources, the attack surface is reduced, and the potential impact of a breach is minimized.
- Improved visibility: Monitoring and auditing every SSH connection and activity enhances visibility into the network, and anomalies and incidents can be detected and responded to faster.
- Enhanced compliance: Enforcing dynamic policies based on trust levels and risk factors can enhance compliance with internal and external regulations and standards.
How to Implement Zero Trust SSH Access
Creating a Cloudflare Tunnel
Once you’ve successfully established a Cloudflare Tunnel, you can securely access your server via SSH through Cloudflare’s robust network.This section will provide step-by-step instructions on enabling zero trust SSH access to your server through a web browser using Cloudflare Tunnel and Cloudflare Zero Trust.
- Enhanced Security: Cloudflare Tunnel eliminates the need for traditional port forwarding, meaning you don’t have to open up ports on your router directly to the internet. This drastically reduces the attack surface for potential malicious hackers.
- Cloudflare’s Protection: Routing traffic through Cloudflare’s network provides benefits such as DDoS protection, which helps safeguard your server from distributed denial-of-service attacks.
- Simplified Access: With Cloudflare Tunnel, you can access your services using a user-friendly domain name, removing the hassle of dealing with static IPs or complex network configurations.
Steps to Create a Cloudflare Tunnel
This happens because the Cloudflare Tunnel creates a secure connection between your local network and Cloudflare’s servers, eliminating the need for traditional port forwarding. By configuring a public hostname specifically for SSH and setting up an access policy, you direct traffic from your chosen domain to your server via the tunnel.
- Navigate to Cloudflare Zero Trust: Log in to your Cloudflare account and go to the Zero Trust dashboard.
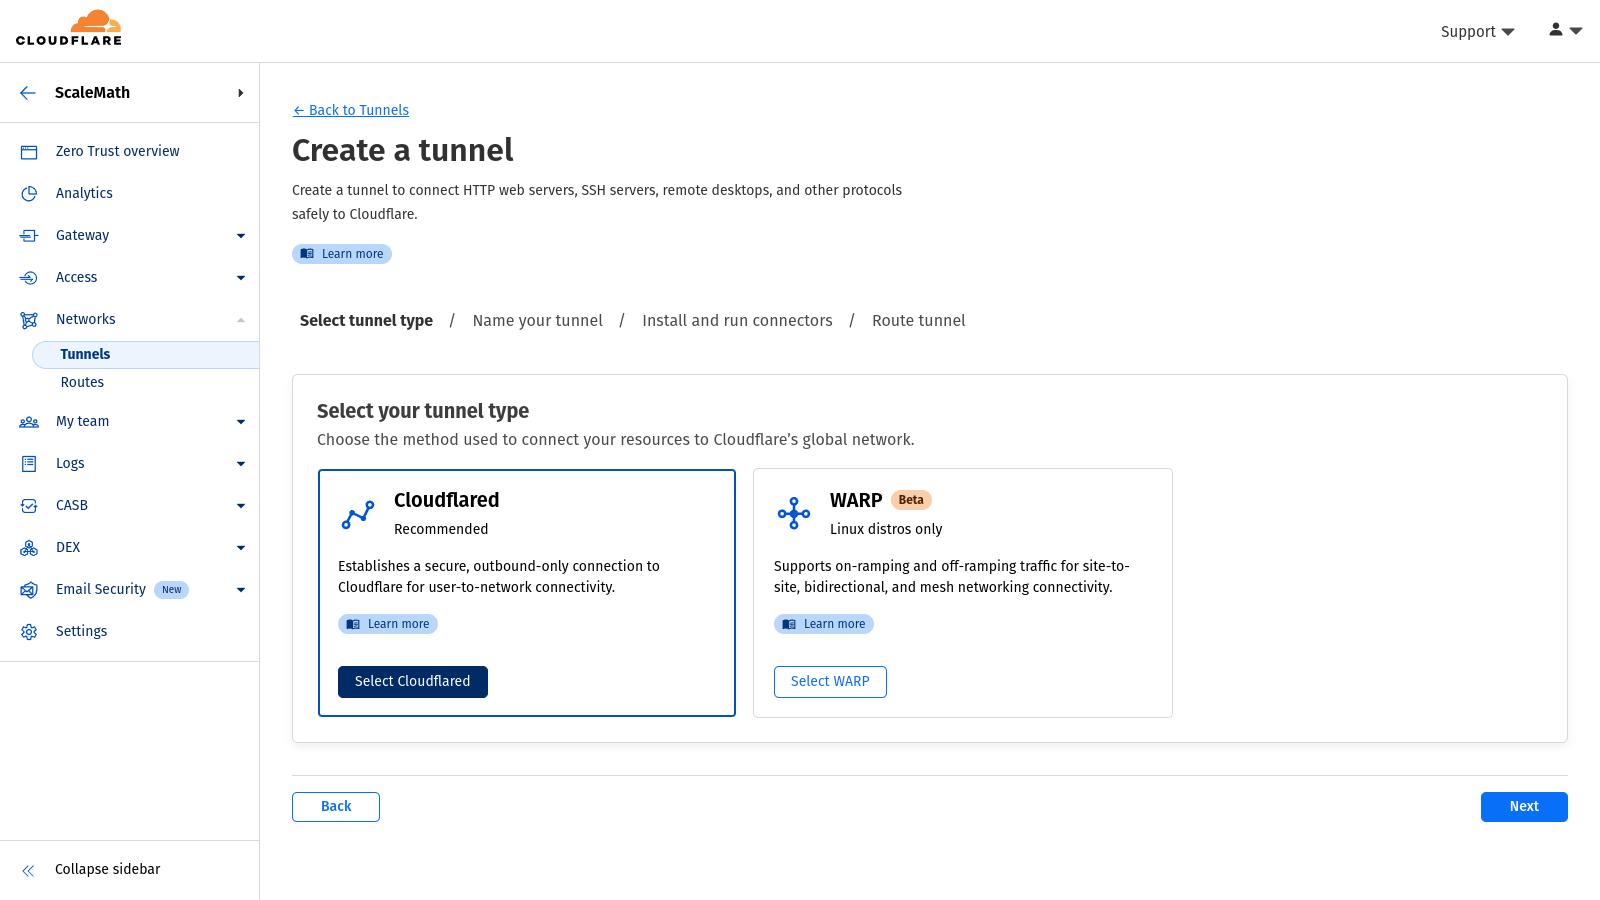
- Create a New Tunnel: Within the Zero Trust dashboard, locate and click on “Network > Tunnels“, then select “Add a tunnel“.
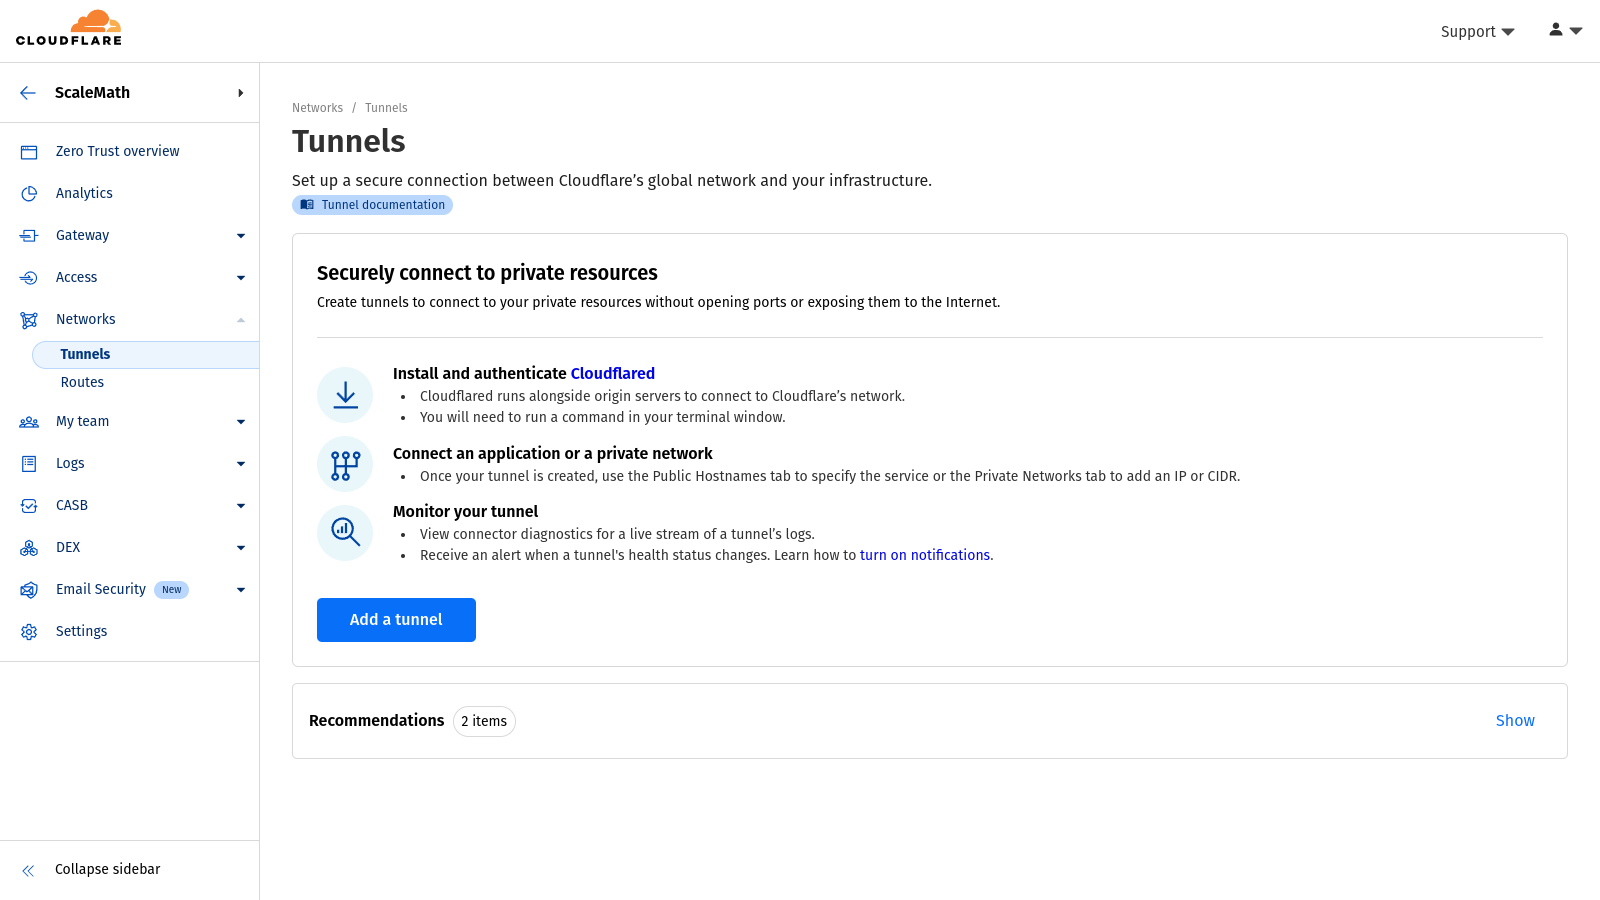
- Select Tunnel type: Select the “Cloudflared” method and click “Next”.
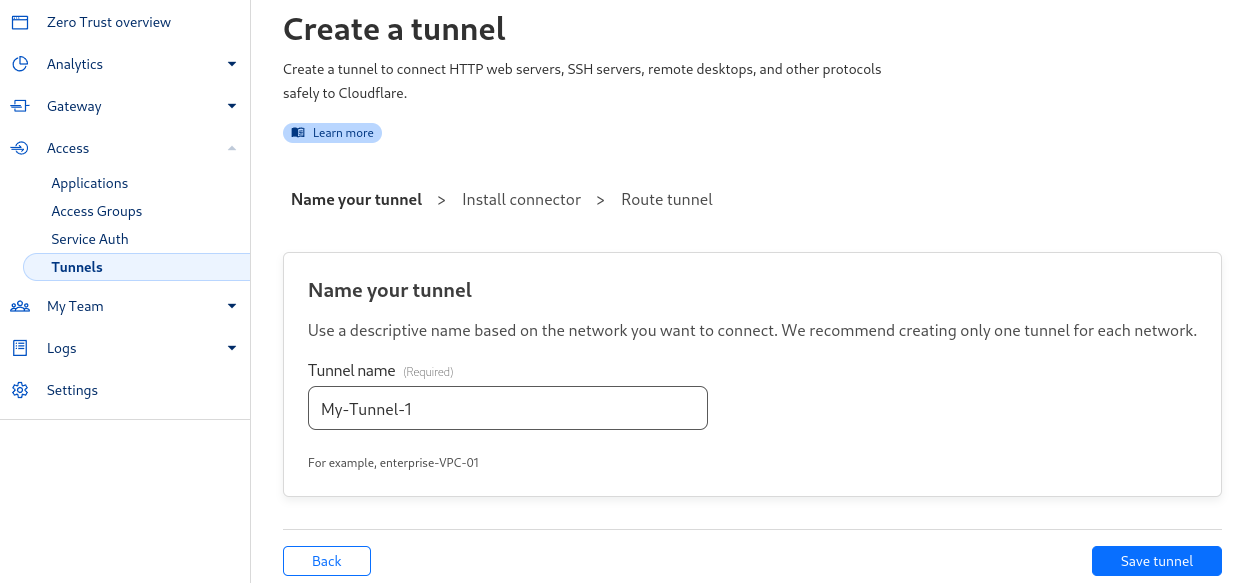
- Name Your Tunnel: Provide a descriptive name for your tunnel (e.g., “MyHomeServerTunnel”).
- Install the Tunnel Connector: After providing the name, you must install the Cloudflare binary on your server to establish a tunnel connection. You can do this easily by logging in to your server via SSH and executing the command on the screen.
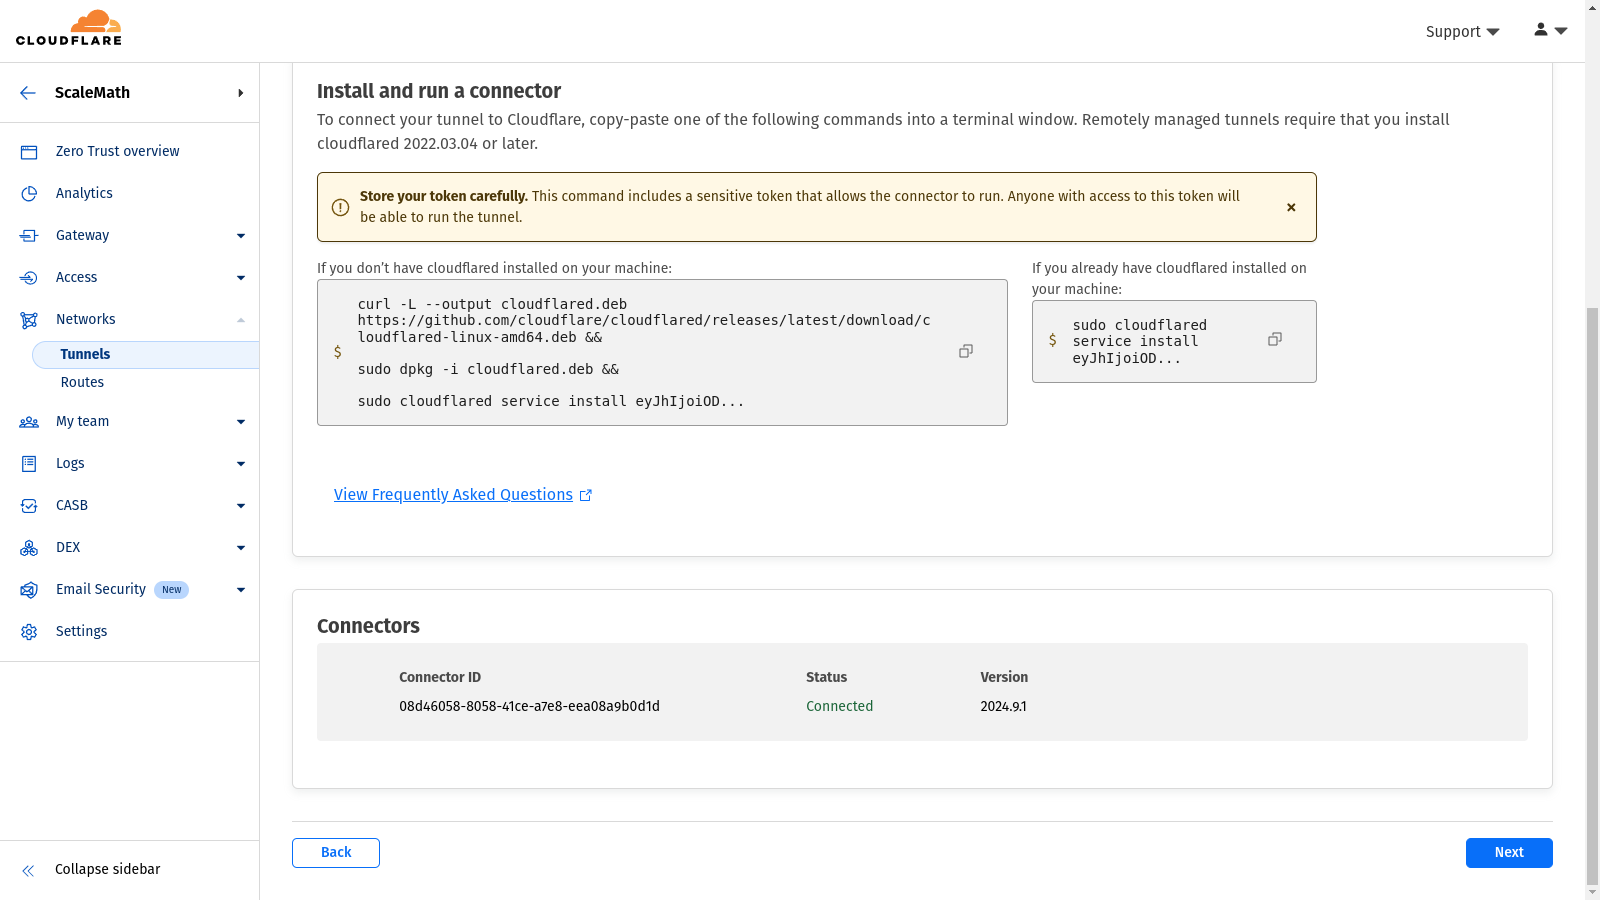
- Verify Tunnel Connection: After executing the command on your server, return to the Cloudflare Zero Trust dashboard. Your newly created tunnel should be listed at the bottom of the screen (as shown in the above screenshot), and its status should show as “Connected“.
Setting Up Zero Trust SSH Using Cloudflare
RunCloud offers a solution that complements your security efforts while simplifying server management.Once you can SSH into your server via Cloudflare Tunnels, you can close the default SSH port to keep your server secure.
Step 1: Add a New Public Hostname in Cloudflare Zero Trust
- Log in to your Cloudflare dashboard and navigate to the Zero Trust section.
- Go to “Tunnels” and select the tunnel you want for this setup.
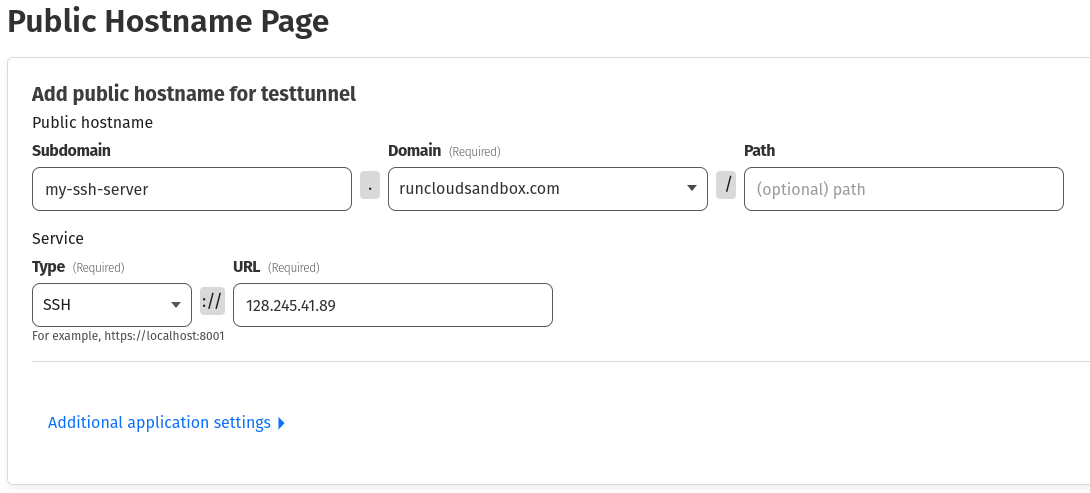
- Within the tunnel settings, go to “Public Hostname” and click “Add a new public hostname“.
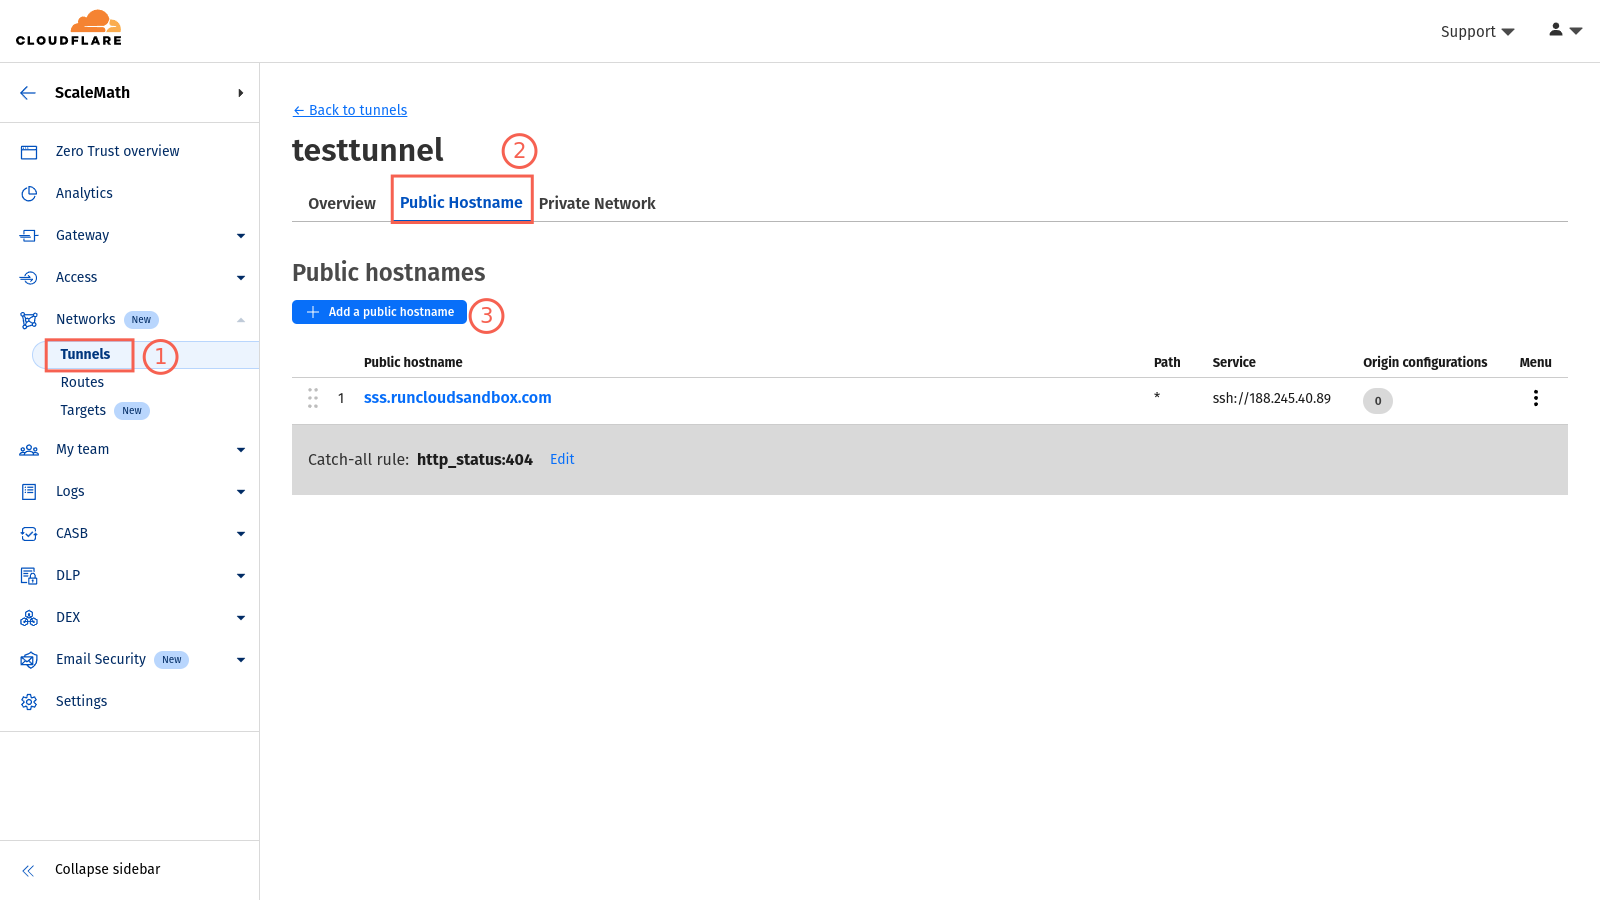
- Next, you need to enter your desired subdomain. This can be anything you like. For example, you can use something as simple as “ssh” or something a bit complex like “ssh-for-test-server.” Afterward, you must select your domain name from the dropdown menu.
- Under “Type,” choose “SSH” from the dropdown menu.
- In the “URL” field, input your server’s IP address and save your changes.
Step 2: Create an Access Policy for SSH
- While still in Cloudflare Zero Trust, navigate to the “Access” tab and click “Add an application“.
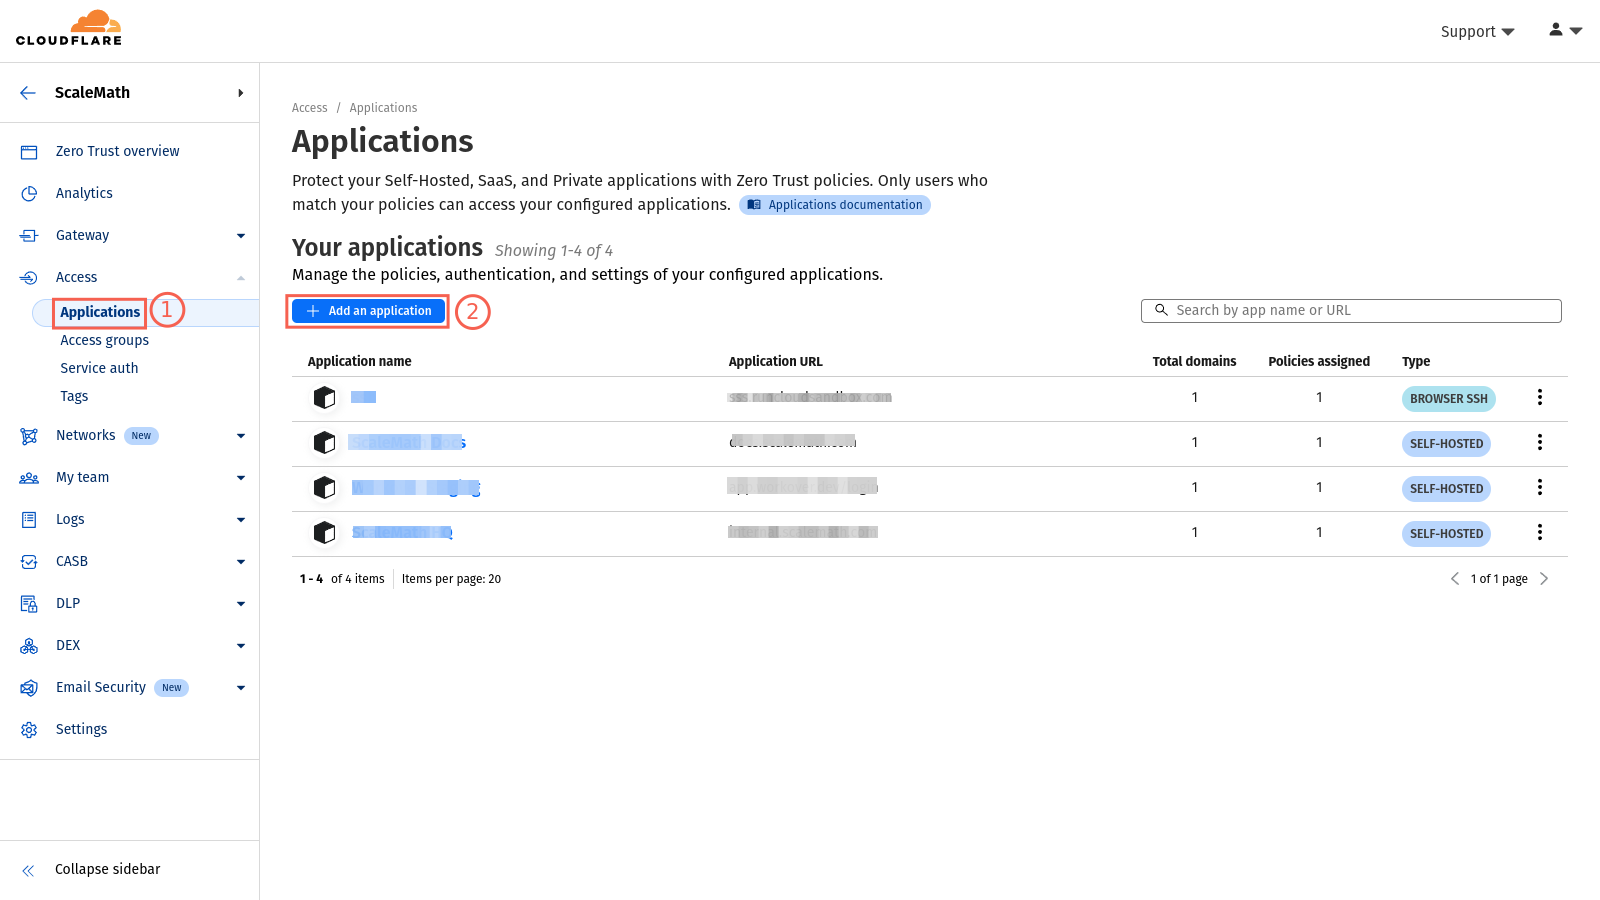
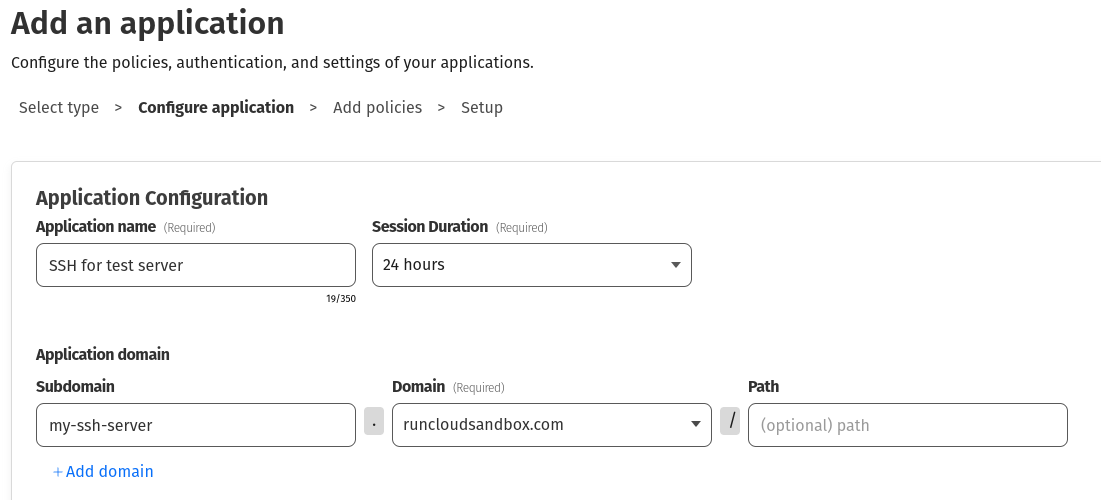
- Select “Self-hosted” and provide a name for your application (e.g., “SSH”).
- In the “Application domain” field, enter the subdomain and domain name you set up in the previous step (e.g., “ssh.example.com”).
- Next, scroll down to the “Identity Providers” section. Cloudflare supports multiple identity providers, and this section allows you to choose your preferred authentication method if you have configured it in your Zero Trust dashboard. In this tutorial, we will use the “One-time Pin“, the simplest authentication method.

- On the bottom of the page, click “Next” and define a policy name (e.g., “SSH”).
- Here, you have the option to set a session duration. This specifies how long the authentication remains valid. If you are unsure, you can leave it to its default value.

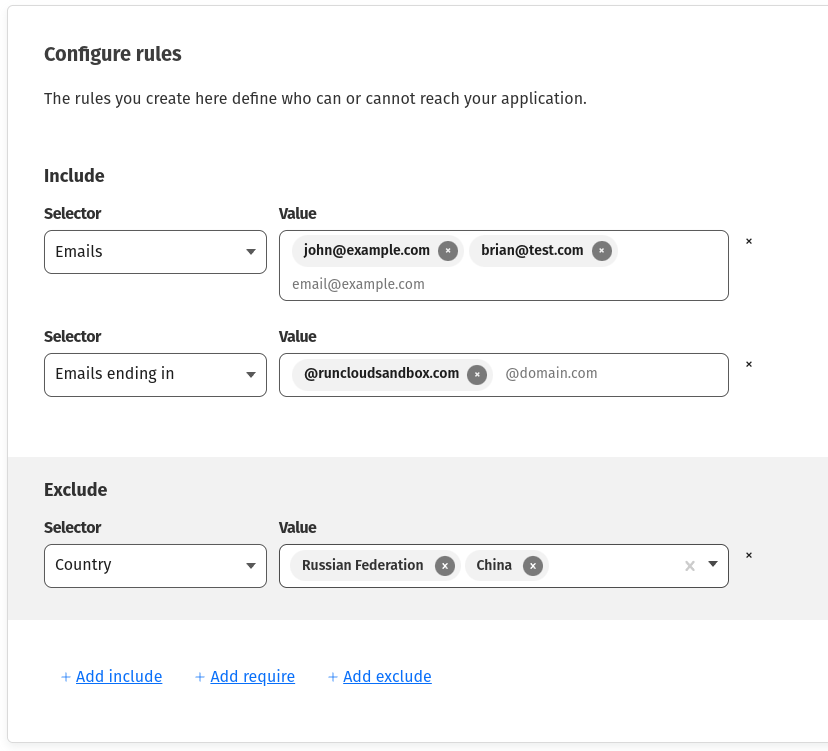
- Next, you need to specify which users will have access to this SSH tunnel. You can scroll down to the “Configure rules” section to include or exclude users. In the following example, we have created three rules:
- Our first rule grants access to two people, namely
[email protected]and[email protected] - Our second rule allows access to anyone who is using an email address that ends in
@runcloudsandbox.com - Our third rule blocks visitors from specific countries (Russian Federation and China) from accessing the server.
- After you have configured the rules, you can scroll to the bottom and click “Next“. This will take you to the setup page.
- On this screen, scroll down to the bottom, and under “Browser rendering,” select the “SSH” option to allow SSH access through the web browser.

- Finally, click on Add the Application to complete the configuration.
Step 3: Authentication and Access
- Open a new browser window or an incognito window to ensure you are logged out of Cloudflare.
- In the address bar, type the domain name you set up for SSH access (e.g., “ssh.example.com”). You’ll be redirected to the Cloudflare authentication page.
- Log in using your designated method on this page, which might involve a password, a hardware key, or any other configured authentication factor. In this example, we have configured a One-Time password, so we will enter the email address configured in the previous step and provide the OTP received at the email address.
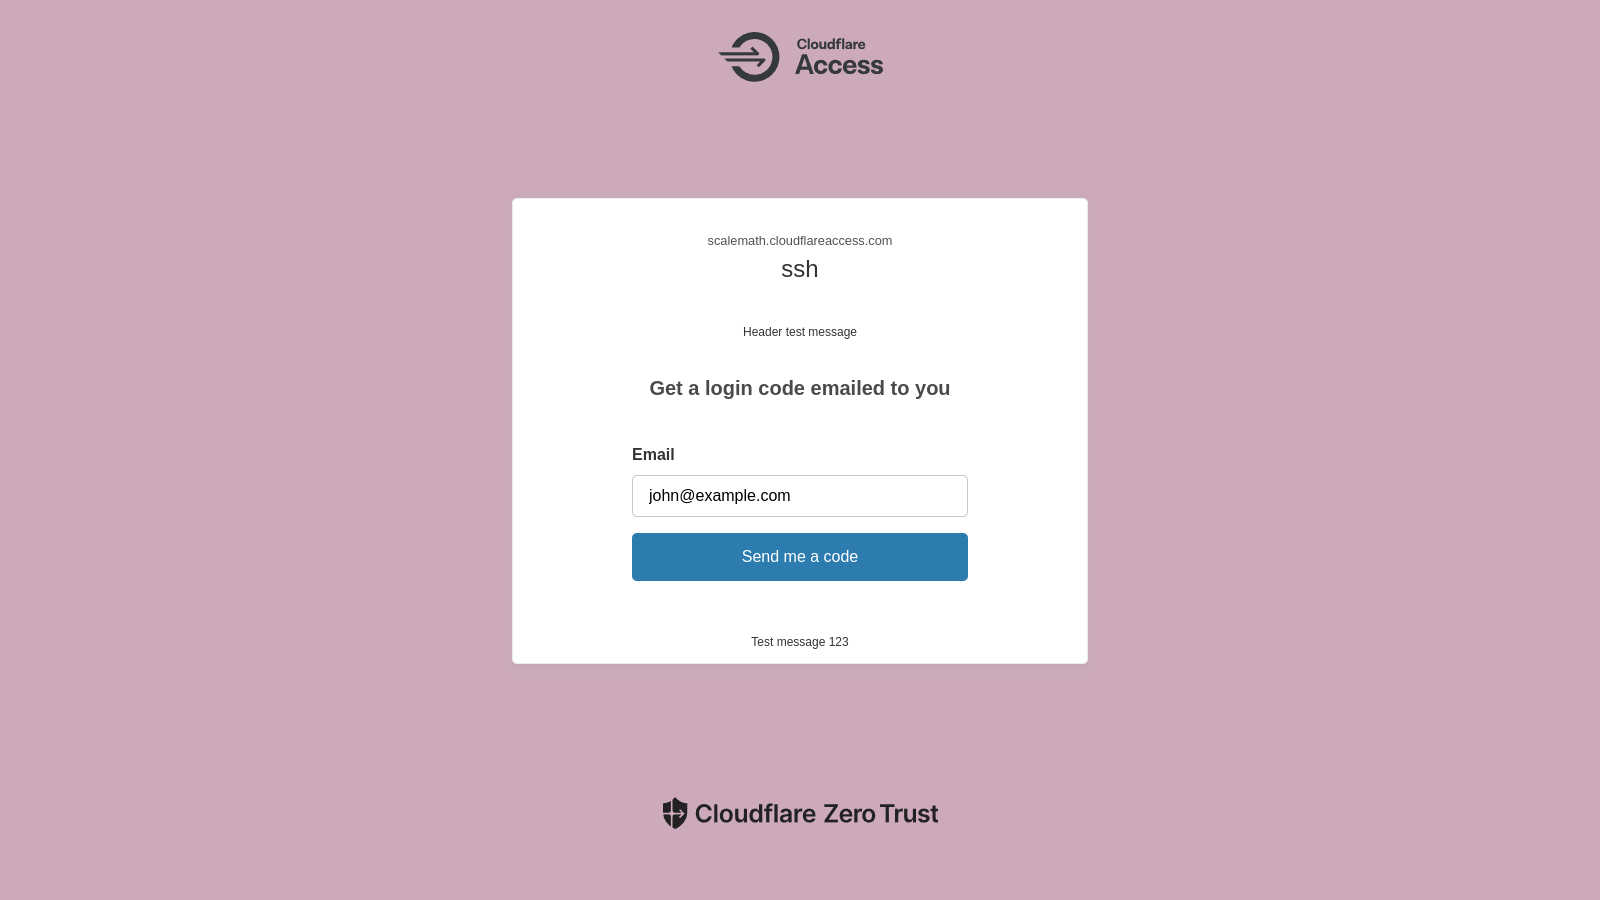
- Upon successful authentication, you’ll be directed to the SSH interface in your web browser, where you can log in to your server.
Step 4: Connecting to Your Server
- On the next screen, enter your server’s username in the provided field on the SSH interface. For example, if you log in to SSH using the
ssh [email protected]command, then you need to enterruncloud-userin this field.
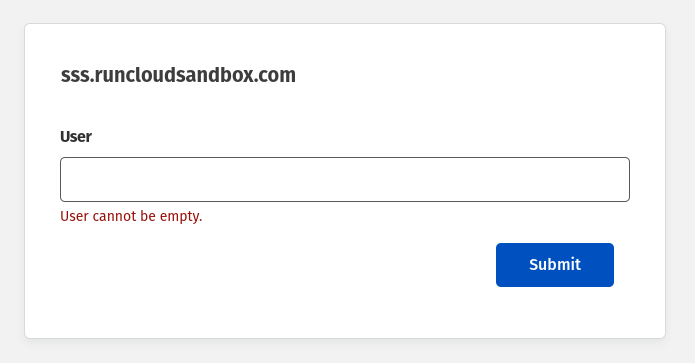
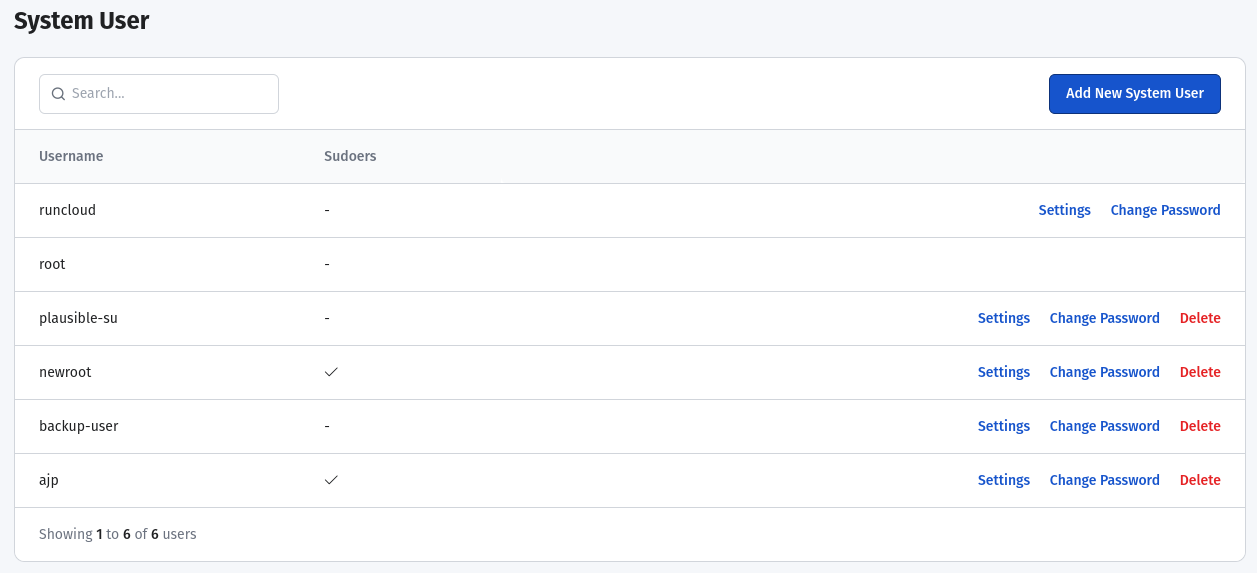
- If you are using RunCloud, you can easily find the list of system users on your server from the RunCloud dashboard.
- After entering the username, you must enter this user account’s password on your server. However, we strongly recommend using SSH keys instead of passwords for enhanced security, as passwords are vulnerable to brute-force attacks.
- If you haven’t already, you can configure SSH keys for your server by adding the public key to your server. Using RunCloud, you can add public SSH keys to your server from the RunCloud dashboard.
- Once you have added the public key to your server, you can switch to the private key tab and paste your server’s private key to log in securely.
Take the next step in your web hosting journey by signing up for RunCloud today.
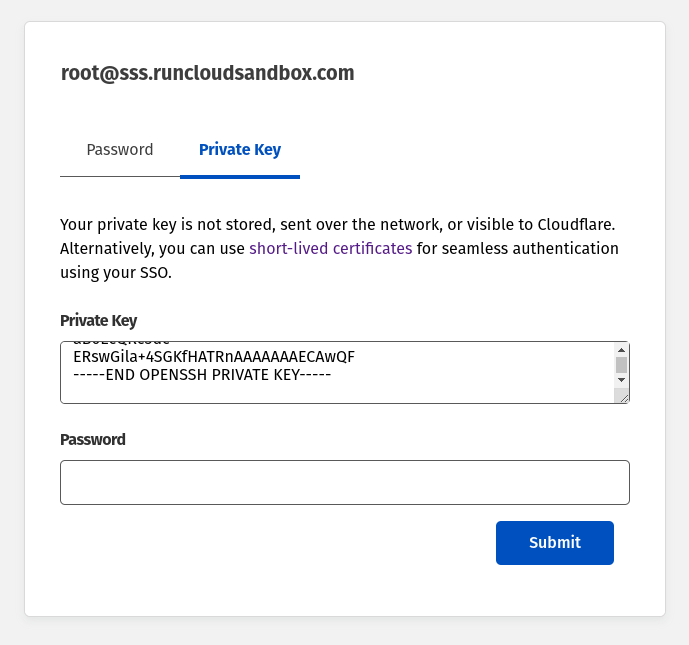
- After entering your password or the private key, click on “Submit” to log in to your server via SSH.
Step 5: Closing the SSH Port (Important)
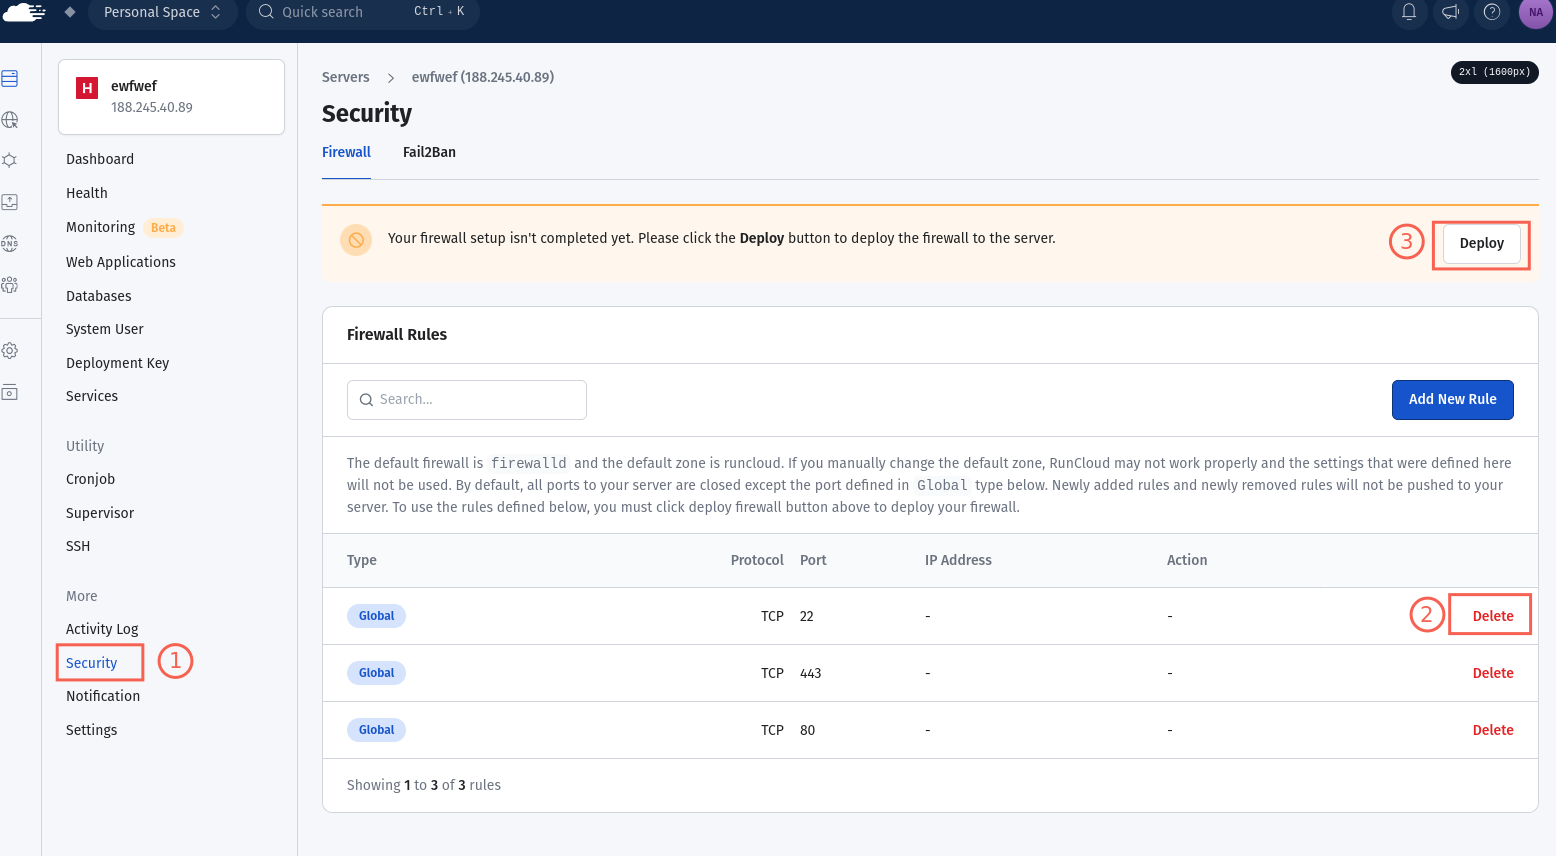
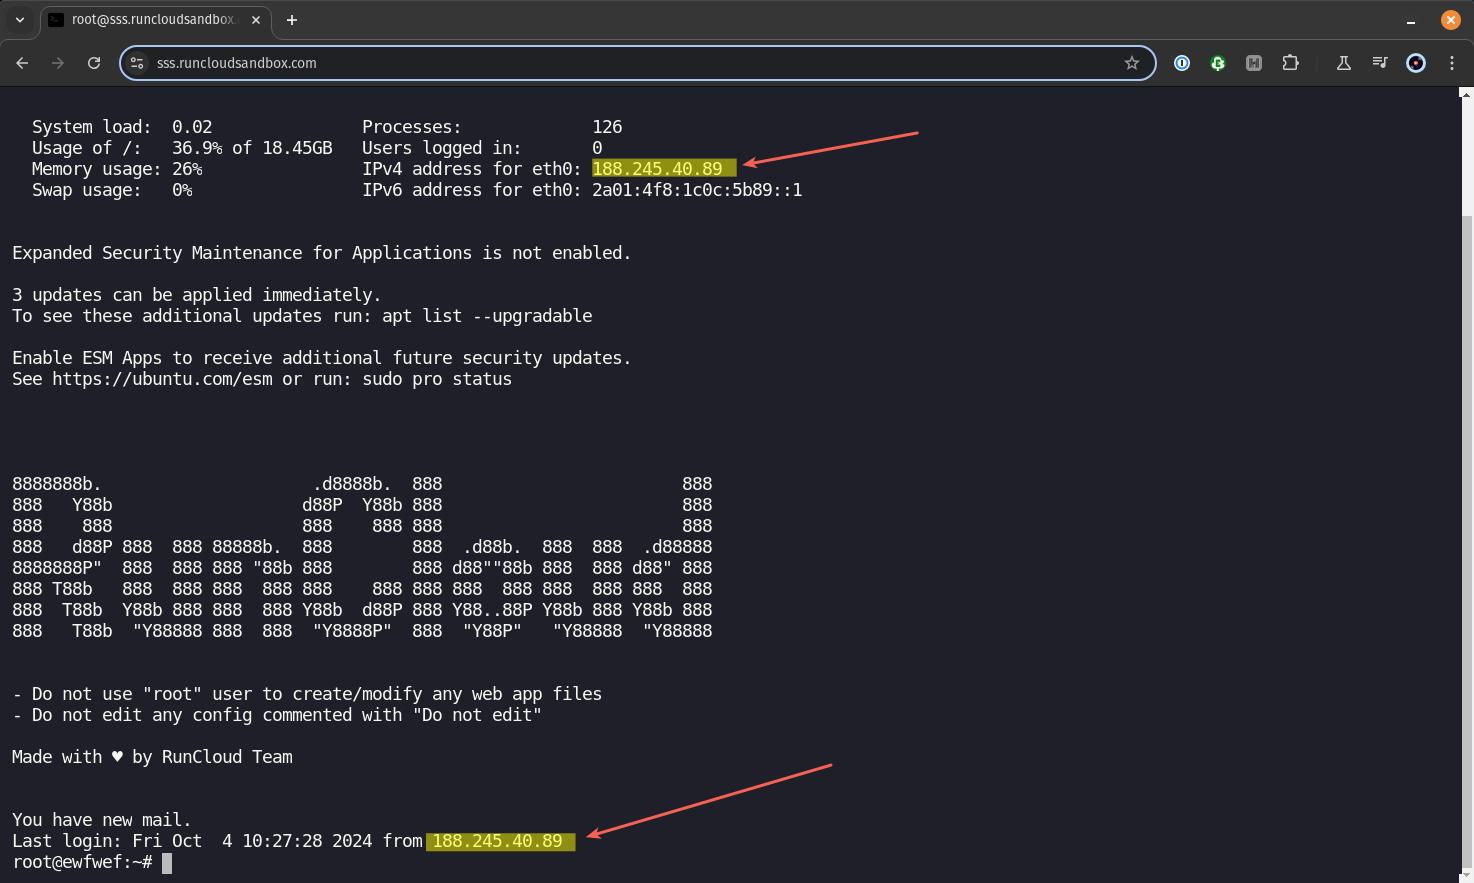
The exact steps to close the server port vary depending on the cloud provider. However, using RunCloud, you can easily open or close the ports directly from the RunCloud dashboard. To do this, simply navigate to the security section of your server, delete the firewall rule corresponding to your SSH port (22 by default), and then hit “Deploy”.Note: The password field in the Private key tab is meant to be the SSH password. Here, you need to enter the password that you configured when you generated the SSH key. You can leave this field blank if you did not configure your SSH key password.Alternatively, when you connect your server via Cloudflare Tunnel, you will see that the IP address used to log in to your server is the same as your server’s IP address.
Why Choose RunCloud?
Before going into the setup, it’s essential to understand why you might want to use a Cloudflare Tunnel:
In this guide, we will explore the zero-trust security model and demonstrate how you can implement it to enhance the protection of your server.
Final Thoughts on Zero Trust SSH Access
Let’s begin.Some of the benefits of applying zero trust to SSH access are:Zero-trust SSH access secures remote access to devices through the command line without opening inbound ports on the server. It relies on the principle of never trusting, always verifying, and requiring users to authenticate themselves at every access point.Before we proceed, you must have a domain name connected to your Cloudflare account. In this guide, we will use runcloudsandbox.com.
- Ease of Use: RunCloud provides an intuitive interface for managing your web servers, making tasks that once required extensive command-line knowledge accessible through a user-friendly dashboard.
- Built-in Security: RunCloud comes with built-in security features, including firewall configuration, SSL/TLS setup, and regular security updates.
- Scalability: As your needs grow, RunCloud makes it easy to manage multiple servers and applications from a single interface without compromising on security.
- Time-Saving Automation: Many routine tasks are automated in RunCloud, from backups to CI/CD application deployment, allowing you to focus on developing your applications rather than managing infrastructure.
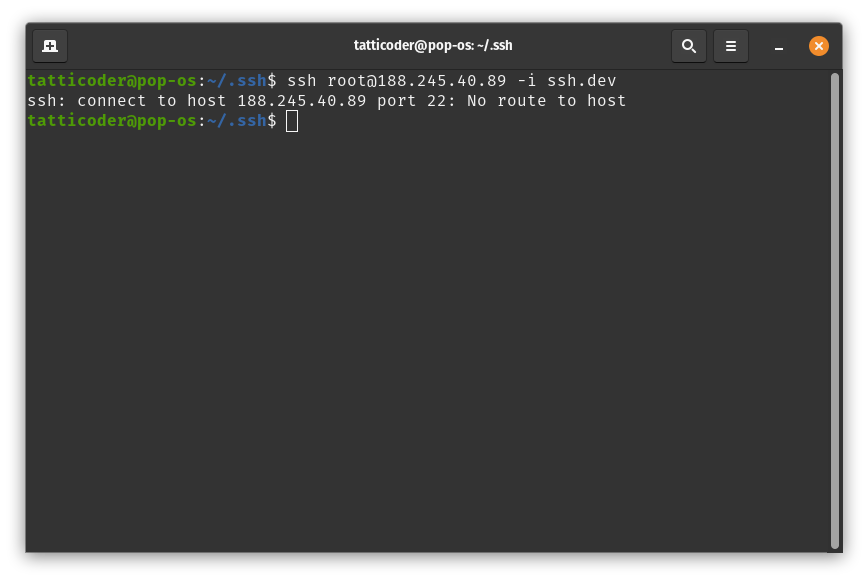
Once you have deleted the firewall rule, wait a few minutes and try logging in to your server via the old method. If you receive an error, then you executed this step correctly. In the following example, the SSH command fails:

