Important: If you see any existing text that starts with # or looks like a comment (such as the default WordPress rewrite rules), do not delete it; place your new code above or below the existing blocks.
Table of Contents
What Are “Expires Headers” and Why Do They Matter?
In this guide, we will break down exactly how “Expires Headers” work and why they are essential for a fast, responsive WordPress site. You will learn the differences between Expires and Cache-Control, how to implement these settings on NGINX and Apache servers, and how to troubleshoot common issues such as CDN conflicts or files that won’t update after a deployment.You may still see this warning because your web server configuration (like NGINX or Apache) is not correctly applying the rules, or your caching plugin needs to be cleared. Additionally, some tools flag the headers even if they are present but set for a shorter duration than their specific performance policy requires.
Expires vs. Cache-Control: What’s the Difference?
When an audit flags this as an issue, it means your server is telling the browser to check for new files too frequently, or to cache them not at all. Resolving this allows the browser to load your design elements directly from the user’s computer, dramatically increasing page speed.
- Cache-Control: This is the modern, preferred standard. It uses “max-age” to define a duration (e.g., “cache this for 30 days”).
- Expires: This is an older method that requires you to set a specific calendar date and time.
A long cache expiration value is good for performance, but can lead to deployment headaches. If you update a cached file, such as a CSS stylesheet or JavaScript script, a user’s browser will continue to display the “broken” or outdated version until its expiration date.Suggested Read: NGINX Caching for WordPress – Complete Guide & Tutorial
Caching Reference Table for Novices
When the file is updated, you simply change this version number. The browser interprets the new URL as a completely different file, forcing it to bypass the old, long-term cache and download your latest changes immediately, ensuring all users see the correct, up-to-date content.They can cause issues because the browser will continue to load the old version of the file until the expiration date passes. To fix this, developers use “versioning” or “cache busting” (adding a query string like style.css?ver=1.1 to the file name) to force the browser to download the updated version immediately.
| File Type | Recommended Duration | Why? |
|---|---|---|
| CSS & JS | 1 Year | These rarely change; cache busting handles updates. |
| Images (JPG, PNG) | 1 Year | Images are heavy; caching them saves massive bandwidth. |
| Fonts (WOFF, TTF) | 1 Year | Fonts don’t change and are essential for rendering design. |
| HTML Files | 0 to 12 Hours | HTML changes often; you want users to see new content quickly. |
| Favicon | 1 Week | A small file that rarely changes but is safe to update occasionally. |
| Third-Party Scripts | N/A | You cannot control external scripts (e.g., Google Analytics). |
For these static assets, it is best to set an expiration date for one year in the future. Because these files rarely change, a long duration significantly improves load speeds for returning visitors.By centralizing your server management through RunCloud, you can easily apply, reload, and manage your HTTP headers without worrying about complex syntax errors.
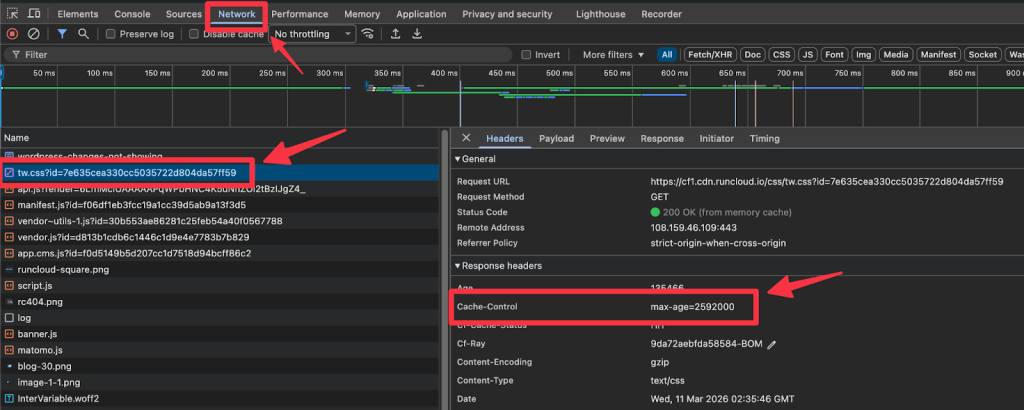
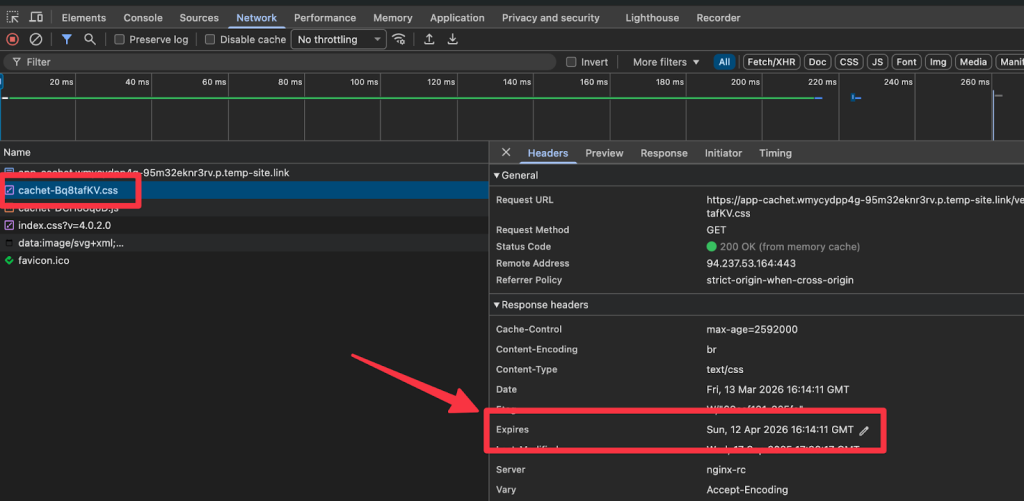
Step 1: Check what your server is sending right now
Suggested Read: Scaling RAM & CPU Cores – How They Affect WordPress Performance
- Open your website in Chrome or Firefox.
- Right-click anywhere on the page and select Inspect.
- Go to the Network tab at the top of the window that pops up.
- Refresh your webpage (F5).
- Click on any file in the list (like a .jpg or .css file).
- Look for a sub-tab called Headers and scroll down to Response Headers. If you see Cache-Control or Expires, your site is already configured.
You can set headers for Google Fonts if you host them locally on your own server. However, for files hosted on third-party servers, such as Google or analytics providers, you cannot control their headers because those settings are managed exclusively by the external service.For an even smoother experience, pair this with the RunCache plugin to automatically implement the best caching rules for your WordPress site. Together, these tools ensure your site follows modern best practices, allowing you to focus on your content while your server handles the speed optimization automatically.Adding Expires headers is a simple way to speed up your site, but it requires modifying your server settings. If you aren’t sure which web server you use (Apache or Nginx), ask your hosting support team before proceeding.Note: If you are using RunCloud, you can apply HTTP headers in just a couple of clicks directly through the RunCloud dashboard (no SSH or command-line experience required).
- Log in to your server: Use an SSH client (like PuTTY on Windows, or the built-in Terminal on macOS/Linux) and connect to your server.
- Locate your NGINX configuration file: It is usually found within your site’s NGINX configuration block (located at in /etc/nginx/sites-available/). You will need administrative access to your server to edit these files.
- Identify the correct server block: Open the configuration file for your specific domain. Ensure you are editing the file that handles your primary website traffic.
- Define the cache duration for file types: Inside your server block, create location rules for the specific file types you want to cache. For example, to cache images for one year, you would add:
If you use a Content Delivery Network (like Cloudflare or BunnyCDN), the headers you set on your server might be ignored or overwritten by the CDN’s own settings. Check your CDN dashboard’s “Caching” or “Rules” section; it often includes its own “Browser Cache TTL” settings that act as a global override. You may need to adjust the CDN panel settings to match your desired expiration policies.
- Locate the .htaccess file: Log in to your hosting provider’s File Manager (or use an FTP client like FileZilla). Navigate to your WordPress “root” directory (this is the folder that contains your wp-config.php and wp-content folders). If you do not see a file named .htaccess, ensure your File Manager is set to “Show Hidden Files.”
- Create the file (if necessary): If you truly do not have an .htaccess file, create a new text file in the root directory and name it exactly .htaccess (ensure there is no .txt extension).
- Backup your current file: Before making any changes, right-click your existing .htaccess file and download it to your local computer. If you accidentally make a mistake and your site displays a “500 Internal Server Error,” you can simply upload the original file to instantly restore your site.
- Edit the file: Right-click the .htaccess file on your server and select Edit or Code Editor.
- Insert the Expires code: Scroll to the very top of the file. Paste the following configuration snippet.
“Expires Headers” are instructions sent by your web server to a visitor’s browser that define how long the browser should keep a file in its local cache.Is your WordPress site failing performance audits like Google PageSpeed Insights or GTmetrix? One of the most common (yet easiest to fix) reasons for a low score is the “Add Expires Headers” warning.<IfModule mod_expires.c>
ExpiresActive On
ExpiresDefault "access plus 1 month"
# Cache static assets for 1 year
ExpiresByType image/jpg "access plus 1 year"
ExpiresByType image/jpeg "access plus 1 year"
ExpiresByType image/gif "access plus 1 year"
ExpiresByType image/png "access plus 1 year"
ExpiresByType text/css "access plus 1 year"
ExpiresByType text/javascript "access plus 1 year"
ExpiresByType application/javascript "access plus 1 year"
ExpiresByType application/x-javascript "access plus 1 year"
ExpiresByType application/font-woff2 "access plus 1 year"
</IfModule>
- Save and Verify: Save your changes and visit your website. Refresh your page a few times. If the site loads normally, your headers are now active. If you see an error page, delete your changes and restore the backup file you created in Step 3.
When this is missing, your server fails to tell visitors’ browsers which files (like images, CSS, and fonts) should be saved locally, forcing them to re-download your entire design every single time they visit a new page. This not only destroys your page speed but also eats up your bandwidth and hurts your SEO rankings.
Cache-Control is overriding Expires
If you added the code but don’t see the headers, your server might not have loaded the new configuration yet.If you are configuring this manually, follow these steps:Suggested Read: How To Use NGINX FastCGI Cache (RunCache) To Speed Up Your WordPress Performance
Third-party resources still failing the audit
No, they are different methods for controlling browser caching. Cache-Control is the modern standard that uses duration (e.g., “cache for 30 days”), while Expires is an older method that requires a specific calendar date and time.
Changes apply, but files do not update after deploy
Tools like PageSpeed Insights will always flag third-party scripts (such as Facebook Pixels or Google Analytics) because you do not have permission to modify headers on external servers. This is expected behavior; you cannot fix it, and it generally does not significantly affect your site’s actual performance score to warrant concern. Focus only on the files hosted on your own domain.To overcome this caching conflict without reducing your expiration times, you can use a technique called “cache busting.” You can do this by appending a unique version parameter to the file URL in your theme’s code (e.g., changing style.css to style.css?ver=1.1).It is common for these two headers to “compete.” By web standards, Cache-Control (specifically max-age) takes precedence over the Expires date. If your server is configured to set both, but they conflict, the browser will ignore the Expires header entirely. To resolve this, ensure your configuration rules are consistent so that both headers dictate the same expiration duration.By correctly setting expiration rules for your static assets, we can ensure that returning visitors experience lightning-fast load times, as their browsers won’t need to re-download elements like CSS, images, and fonts.
Suggested Read: How To Use Redis Object Cache To Speed Up A Dynamic WordPress Site
Wrapping Up
Start using RunCloud today.Before you change anything, see if your site already has these headers.To remove the manual guesswork from this process, we highly recommend using RunCloud to effortlessly manage your NGINX configurations.NGINX handles headers through server configuration blocks rather than a simple file edit, which makes it very fast but slightly more technical to set up.Suggested Read: Server Cache vs. Browser Cache vs. Site Cache: What’s the Difference?
What is a good Expires value for CSS, JS, images, and fonts?
location ~* .(jpg|jpeg|png|gif|ico|svg)$ {

expires 365d;

access_log off;

}
- Add rules for CSS and JavaScript: In the same way, add a separate block for your static code files to ensure they are also cached for the long term:
Generally, no. Since Cache-Control is the modern and preferred standard, you typically only need to set that one. However, there is no harm in including both Cache-Control and Expires. Modern browsers will use Cache-Control and ignore Expires, but including Expires provides a fallback for very old browsers that may not support Cache-Control.