DNS propagation usually completes within a few minutes, but can take up to 24 hours depending on your domain registrar or DNS provider.
You can track progress using a DNS-checking tool to confirm that the MX, SPF, and DKIM records have fully updated.
Table of Contents
- 1 Why Use a Dedicated Email Host Like Greatmail
- 2 How to Set Up a Professional Email with Greatmail
- 3 Wrapping Up: Host Professional Email the Easy Way
- 4 Frequently Asked Questions About Hosting Email with Greatmail
- 4.1 Can I use Greatmail with my existing Gmail or Outlook account?
- 4.2 Does Greatmail support both IMAP and POP3?
- 4.3 How long does DNS propagation take after adding Greatmail records?
- 4.4 Can I host multiple domains under one Greatmail account?
- 4.5 How secure is Greatmail compared to self-hosting email?
- 4.6 What happens to my email if I move my website to another host?
- 4.7 Does Greatmail work with RunCloud servers directly?
Why Use a Dedicated Email Host Like Greatmail
SSL / TLS
- Cost efficiency: Greatmail is considerably more affordable than enterprise platforms such as Google Workspace or Microsoft 365, especially if you only need core email functionality.
- Professional image: An address that matches your domain instantly builds trust and brand credibility.
- Simplified management: You don’t need to install or maintain your own mail server, which avoids deliverability, security, and spam blacklisting problems.
- Improved reliability: Keeping your email separate from your website hosting ensures that email continues to function even if your web server experiences downtime.
How to Set Up a Professional Email with Greatmail
Choose IMAP to sync mail across multiple devices or POP3 to download messages to one device.
Step 1: Sign Up and Add Your Domain to Greatmail
Using a dedicated email hosting provider like Greatmail offers several clear benefits:
- Navigate to the Greatmail website and sign up for an account.
- Once you are logged into your new Greatmail admin dashboard, the first step is to add your domain name. For this, you will need to contact Greatmail support via their contact form or email. During normal business hours, they typically provision domains within 2 hours.
- Once it is configured, Greatmail will provide you with a specific set of DNS records. These records tell the Internet where to send your domain’s email. You’ll need these records in the next step.
Step 2: Configure DNS Records
SSL / TLS or STARTTLSServer Type
- MX (Mail Exchanger) Records: Direct incoming email for your domain to Greatmail’s mail servers. These records tell other mail servers where to deliver messages for addresses like [email protected].

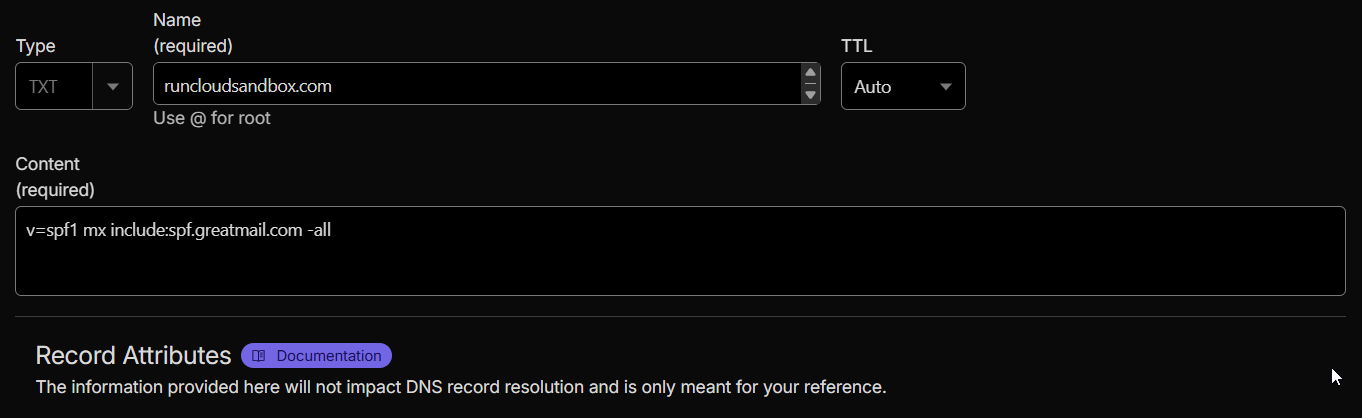
- SPF (Sender Policy Framework) Record: Add a TXT record authorizing Greatmail’s servers to send mail on your behalf. This helps prevent spoofing and improves deliverability.
- DKIM (DomainKeys Identified Mail) Record: Add the unique TXT record string provided by Greatmail to authenticate outgoing mail. This confirms to recipient servers that messages sent from your domain are genuine.
Your email will continue to function normally as long as your DNS MX records still point to Greatmail’s servers.
Keeping email hosting separate from web hosting ensures continuous email service, even if your website is migrated or temporarily offline.
Step 3: Manage Email from the Greatmail Admin Panel
POP3 downloads emails to a single device and removes them from the server after retrieval.
IMAP is recommended for most users who access their email from multiple devices.
List Your Domains
Server Name
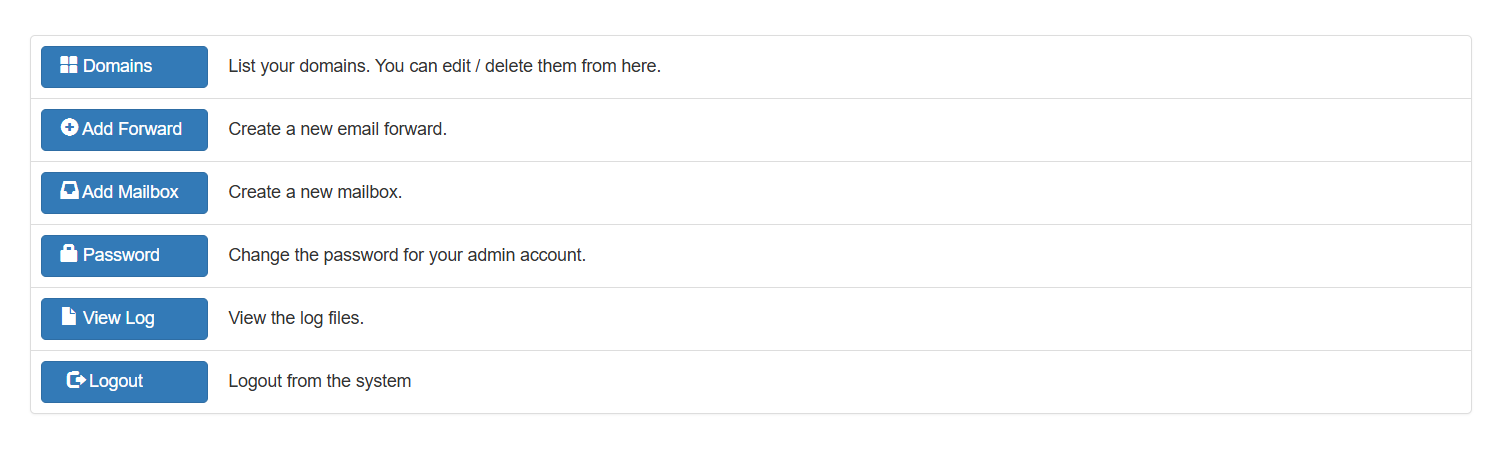
Create a New Email Forward
No matter which application you choose, the setup process follows the same basic principle. During a manual setup, you will simply need to enter the core server details for your account.
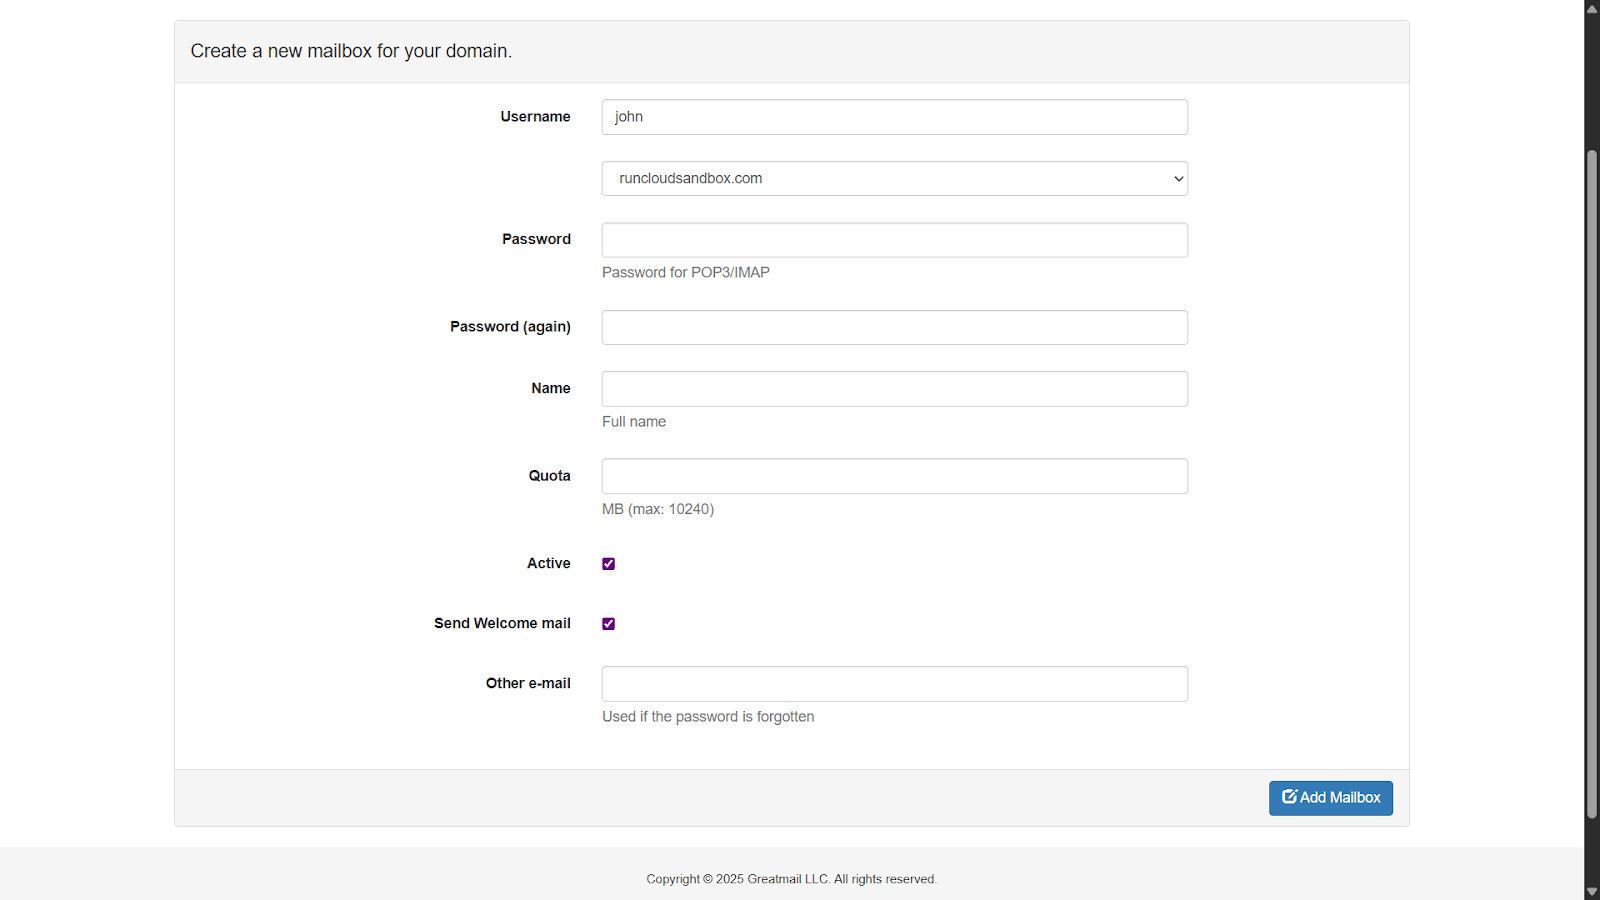
Create a New Mailbox
Once these records are added, allow DNS propagation time (typically a few minutes to several hours) before proceeding.Save the configuration and allow your client to verify the connection. Your client will test the connection, and once verified, your mailbox will be ready to use.
- Username: Enter only the part before the @ symbol (e.g., john).
- Domain: Choose your domain (e.g., example.com).
- Password: Enter a strong, unique password. This will be used for both webmail and email client access.
- Name: The display name shown in recipients’ inboxes (e.g., John Doe).
- Quota: Specify mailbox storage in MB (1000 MB = 1 GB; maximum 10240 MB).
- Active: Keep checked to enable the account immediately.
- Send Welcome Mail: Recommended. Sends a setup guide and server details to your alternate email.
- Other Email: Add a recovery address for password resets (e.g., [email protected]).
SMTP (Outgoing Mail)
Step 4: Access and Use Your Email
Encryption
- Connect to Desktop & Mobile Apps: For a seamless, native experience, you can integrate your account directly into email clients like Microsoft Outlook, Apple Mail, Thunderbird, and various mobile mail apps on iOS and Android.
- Integrate with Your Existing Gmail Account: If you love the Gmail interface, you can configure it to both send and receive emails from your new professional address, keeping everything in one place.
How to Connect Your Account
465 or 2500, 587, 2525You are now fully equipped to host your own email solution, sending and receiving messages from a credible address that builds trust with your customers and strengthens your brand. With this setup, you’re ready to grow your business without worrying about expensive per-user email fees.
- Outlook: File → Add Account
- Apple Mail: Mail → Add Account
- Gmail: Settings → Accounts and Import
Before we touch anything in RunCloud or your DNS settings, you need to tell Greatmail that you want it to handle your email.
- Choose Manual Setup, Advanced Setup, or Add Other Account instead of provider presets.
- Enter your full email address and password.
- Use the following server settings provided by Greatmail:
| This guide shows how the right tools can simplify even complex technical workflows. | Once your DNS is set up and verified by Greatmail, you can manage everything from their easy-to-use admin panel. Here’s a tour of the main features: | Let’s walk through the steps to configure your Greatmail instance. | 995 | ||
|---|---|---|---|---|---|
| Port | As a RunCloud user, you already know how to manage high-performance websites and servers efficiently. | As a RunCloud user, you already know how to manage high-performance websites and servers efficiently. | As a RunCloud user, you already know how to manage high-performance websites and servers efficiently. | Next, you will need to edit the DNS records for your domain to connect it to Greatmail’s servers. You can do this at the company where you registered your domain (e.g., Namecheap, GoDaddy, Google Domains) or a service like Cloudflare if you use one. | secure.greatmail.com |
Yes. Greatmail supports both protocols.
IMAP keeps your messages and folders synced across all devices.Then follow these steps:
Wrapping Up: Host Professional Email the Easy Way
While services such as Google Workspace and Microsoft 365 offer robust email solutions, their per-user costs can be high for small teams or side projects.A mailbox is a full email account with its own username, password, and storage space. You can access it via webmail or connect it to an email client like Outlook, Apple Mail, or Thunderbird.Yes. You can continue managing your domain, web applications, and SSL certificates in RunCloud while Greatmail handles all mail delivery. They operate independently, which keeps your email reliable and unaffected by any changes to the web server.You’ll need to add or update the following DNS records exactly as provided in your Greatmail dashboard.