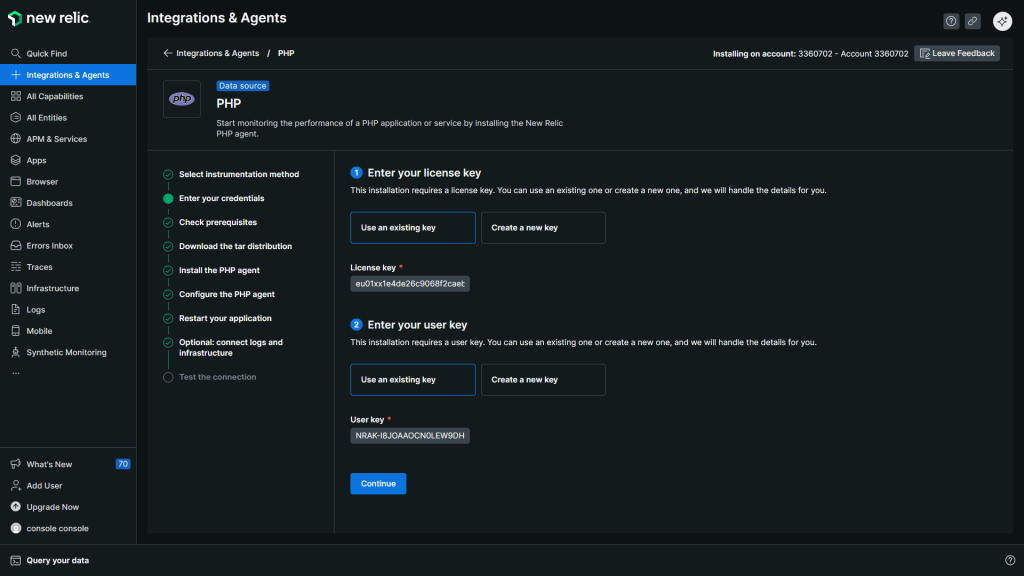
You will need to provide your New Relic license key and user key. These keys link the monitoring agent to your account. Enter the required keys in the respective fields to proceed. If you don’t have the keys, click the “Create a new key” button.
Table of Contents
- 1 Steps to Integrate New Relic on Ubuntu Servers to Monitor PHP Applications
- 1.1 Prerequisite: Sign Up For a New Relic Account
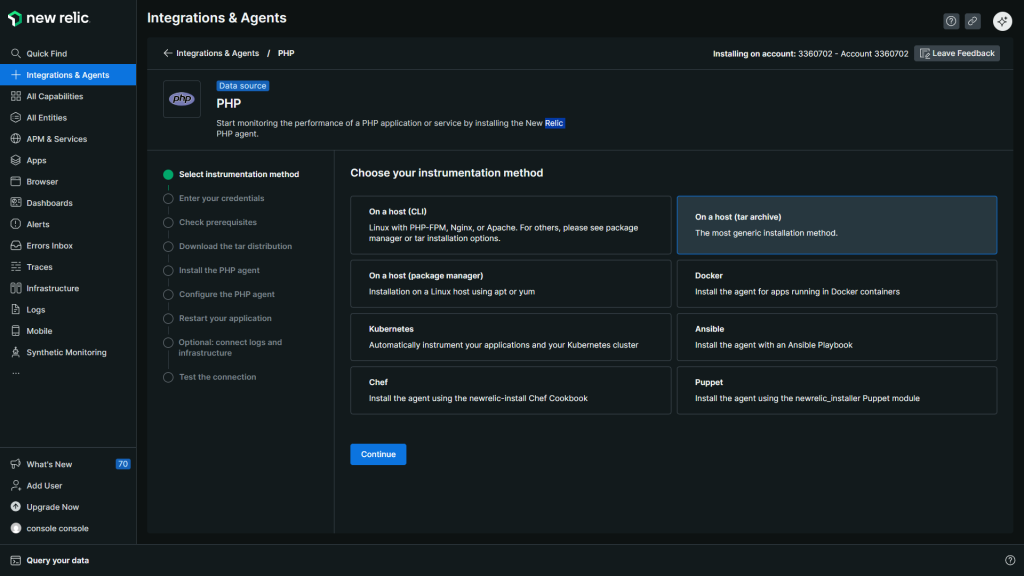
- 1.2 Step 1: Select Monitoring Method
- 1.3 Step 2: Enter Your Credentials
- 1.4 Step 3: Check Prerequisites
- 1.5 Step 4: Download the Tar Distribution
- 1.6 Step 5: Install the PHP Agent
- 1.7 Step 6: Configure the PHP Agent
- 1.8 Step 7: Restart Your Application
- 1.9 Step 8: Optional – Connect Logs and Infrastructure
- 1.10 Step 9: Test the Connection
- 2 Reviewing New Relic Dashboard
- 3 After Action Report
- 4 New Relic and RunCloud FAQs
- 4.1 How do I restart the correct PHP-FPM service on my RunCloud server?
- 4.2 Where can I find my New Relic license and user keys?
- 4.3 Do I need to connect infrastructure and logs if I only want to monitor my application’s performance?
- 4.4 How can I confirm that the New Relic agent installation was successful?
- 4.5 Why should I use New Relic to monitor my RunCloud server?
Steps to Integrate New Relic on Ubuntu Servers to Monitor PHP Applications
You must restart your web server services for the configuration changes to take effect.
Prerequisite: Sign Up For a New Relic Account
In this section, we will provide step-by-step instructions for RunCloud users to manage and monitor their server infrastructure, logs, and data using New Relic.
Step 1: Select Monitoring Method
You can connect infrastructure metrics and logs to get a comprehensive view of your server. Run the provided curl command to install the necessary components. If you have already performed this step for another web application on the same server, you can skip it.
Step 2: Enter Your Credentials
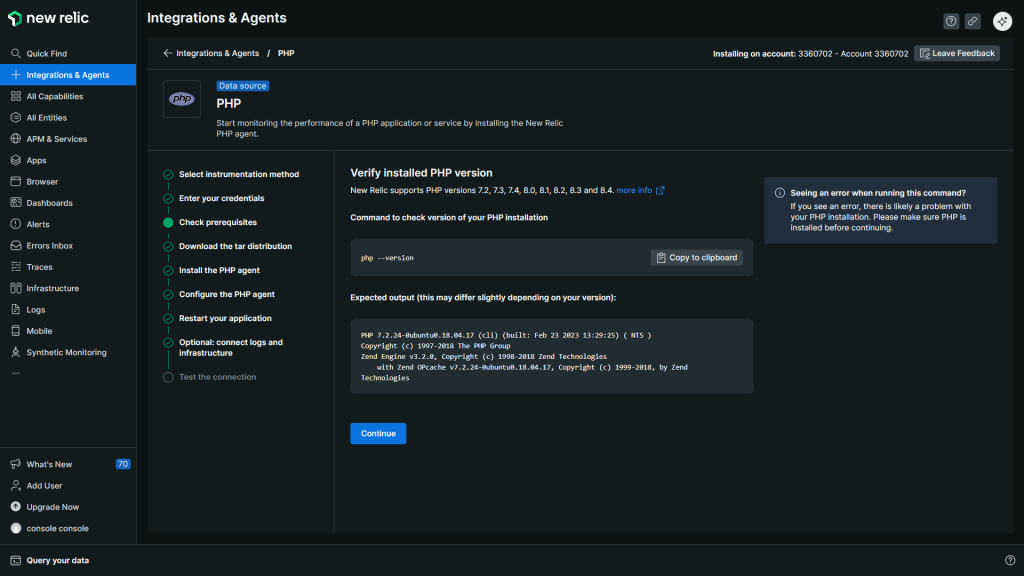
Before installation, verify your server’s installed PHP version, as New Relic supports multiple versions. Run the provided command to check your PHP installation and ensure compatibility. RunCloud servers support multiple PHP versions, and you can find the location of your PHP installation by reading the PHP Cheat Sheet.
If you are running a website then you can take advantage of “Browser” monitoring functionality, which tracks your website’s Core Web Vitals.
Step 3: Check Prerequisites
This is exactly why we built RunCloud.
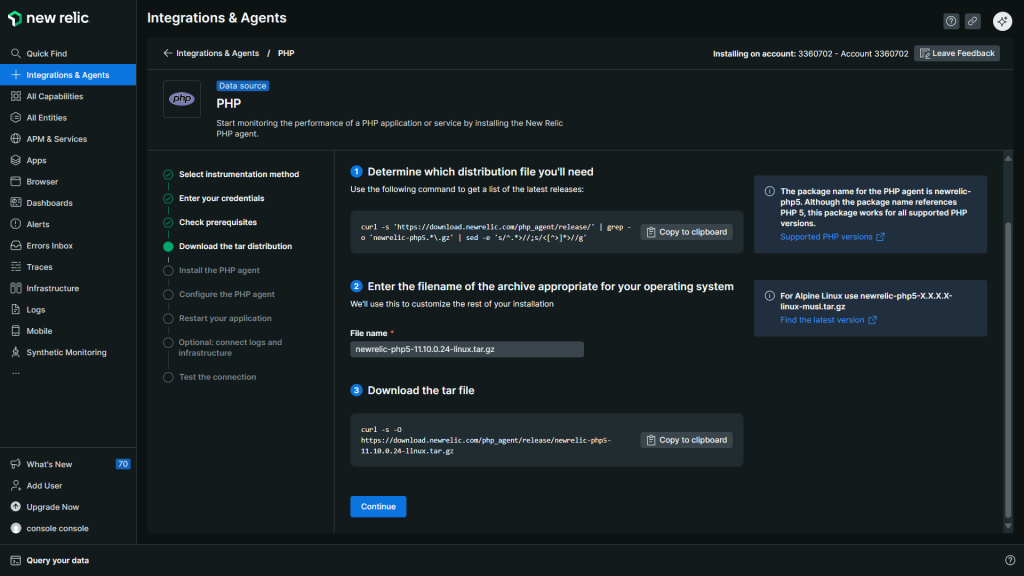
Step 4: Download the Tar Distribution
Using a server monitoring platform such as New Relic will allow you to quickly identify and resolve issues that affect your website’s performance. You can set up real-time monitoring and alerts to proactively assess potential problems that can cause downtime.Enter the file’s name in the provided textbox, which will automatically generate a curl command that you can execute on your server to download the file.
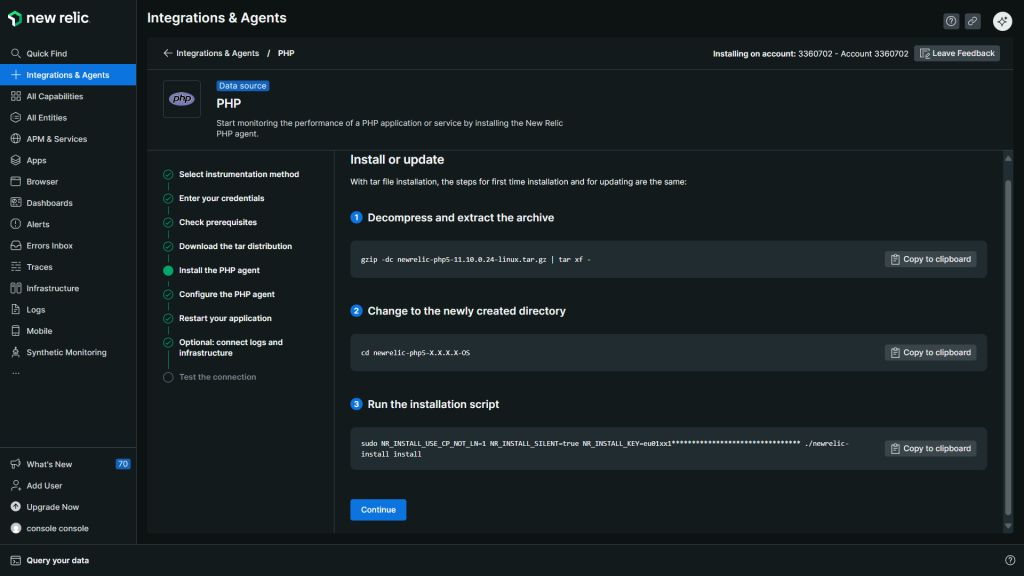
Step 5: Install the PHP Agent
Let’s dive right in!
- Decompress the downloaded tar archive.
- Change the directory to the newly created folder.
- Run the installation script with your New Relic credentials.
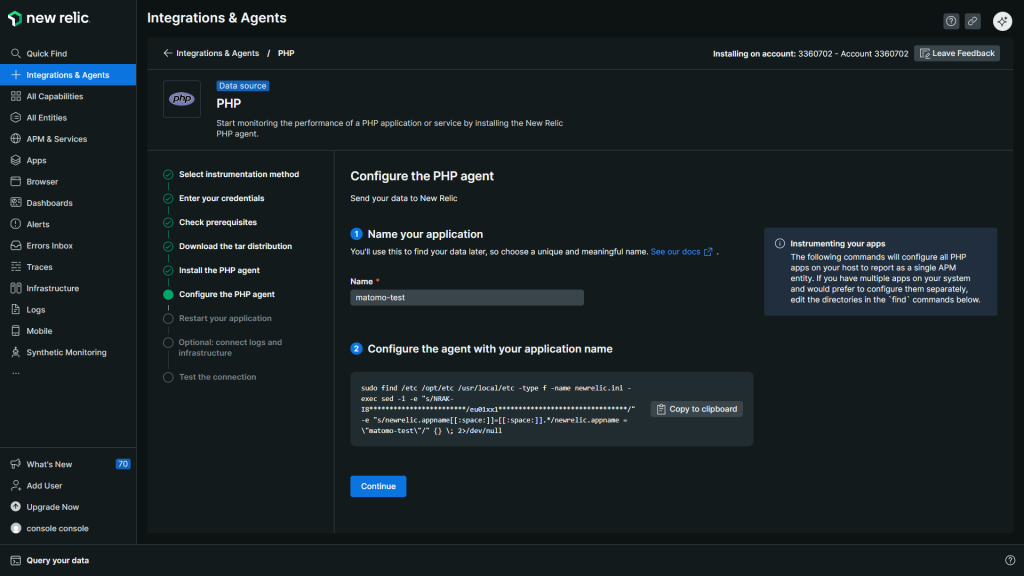
Step 6: Configure the PHP Agent
Integrating New Relic with RunCloud can provide you with invaluable insights into your server’s performance and help you optimize it for better speed and reliability. By following the above steps you can easily set up New Relic to monitor your server’s metrics, including CPU usage, memory consumption, and network traffic.
- Name your application: Use the same name as your web application. This allows New Relic to automatically find the correct php-fpm process.
- Configure the agent: Run the provided newrelic-install script with your application name. This command will configure all PHP apps on your host to report to a single APM entity unless you configure them separately.
Step 7: Restart Your Application
Run the provided command in your SSH terminal to find the appropriate tar archive for your server’s operating system. The file should be named something like newrelic-php5-11.10.0.24-linux.tar.gz.
- Restart your services: Use the appropriate command for your server setup, for instance,
systemctl restart php82rc-fpmfor PHP 8.2 FPM. - Send data to New Relic: To manually initialize the agent and ensure it starts sending data, run the command
php -r 'phpinfo(INFO_GENERAL);'.
Step 8: Optional – Connect Logs and Infrastructure
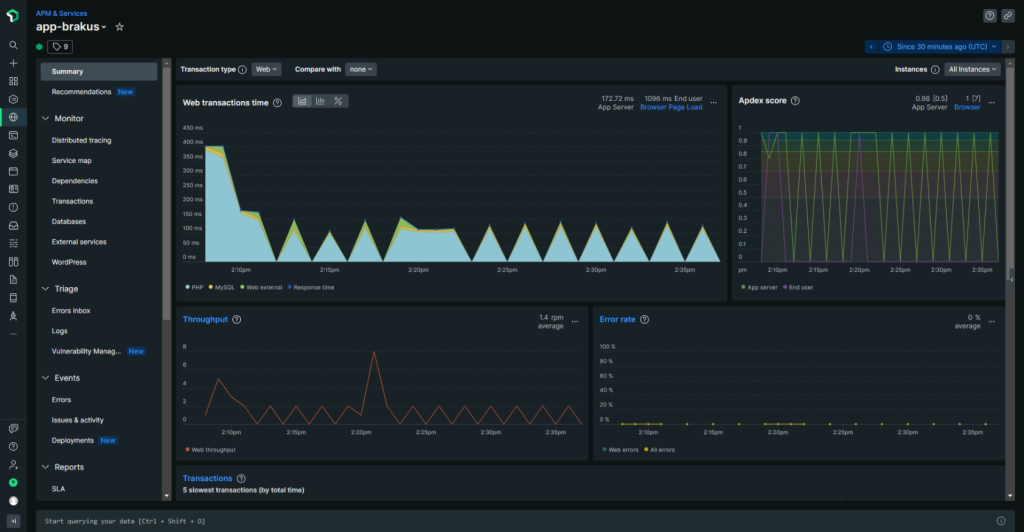
And that’s it – you’re all set! Your New Relic account will now be collecting data and monitoring your server. You should be able to see your server metrics, along with any additional monitors that you have installed in the New Relic dashboard.
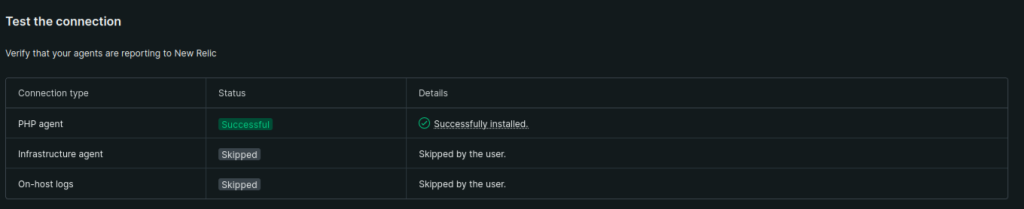
Step 9: Test the Connection
Before we can install New Relic on your server, you’ll need to create a New Relic account. Don’t worry about any paid plans, the free plan is perfectly sufficient for the purposes of this tutorial.
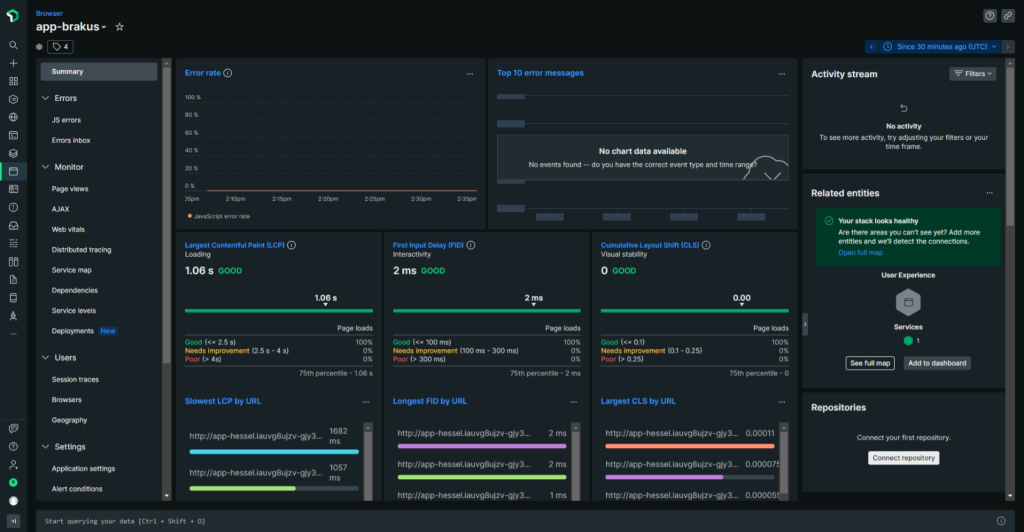
Reviewing New Relic Dashboard
New Relic provides powerful performance monitoring and observability for your applications and server infrastructure. Integrating it with your RunCloud-managed server lets you gain deep insights into your PHP application’s performance, track down errors, and monitor server health to ensure optimal operation.Have any other questions, or already using New Relic to monitor your web applications? Let us know & join the conversation by leaving a comment below. 💬
Suggested read: How to monitor web app and CPU UsageWhat if you could spot and fix critical errors in your PHP application before your users even notice?
After Action Report
On a RunCloud server, PHP-FPM services are named according to their version, such as php82rc-fpm for PHP 8.2. To restart the correct service, use the command sudo systemctl restart phpXXrc-fpm, replacing XX with your specific PHP version number.And then, once you’ve successfully logged in – run the installation command provided in New Relic’s dashboard which will look something like this:Your New Relic license and user keys are provided during the guided installation process within your New Relic account. You can also find your license key under ‘API keys’ in your account settings.If you manage a PHP application on a RunCloud server, integrating a powerful monitoring tool is the fastest way to identify performance bottlenecks and eliminate bugs. New Relic provides an all-in-one solution for both server and application monitoring that offers a single dashboard to view resource usage, analyze logs, and track application health. To properly link your application with New Relic, you must configure the agent:After completing the installation and configuration, test the connection to verify that your agents are reporting correctly to New Relic. The status for the PHP agent should show “Successful,” which indicates that the agent is installed correctly.