Choose based on your budget, location, and technical comfort. RunCloud works seamlessly with all of them.
Table of Contents
Why Migrate From cPanel to RunCloud?
📖 Suggested read: What is DNS & How Does It Work? Everything You Need to Know. Before diving into the “how“, let’s address the “why” and “if“.
- RunCloud gives you complete control over the underlying cloud server infrastructure, unlike some cPanel hosts that might limit your access. You are not locked into a specific provider’s way of doing things and have the freedom to manage your server directly. This level of control allows for deeper customization and optimization specific to your needs.
- Creating a testing version of your WordPress website, known as a WordPress staging environment, is incredibly simple with RunCloud’s one-click feature. This allows you to safely test updates, plugins, or design changes without affecting your live visitors.
- Changing your website’s PHP version is very easy within the RunCloud dashboard. This allows you to upgrade for better performance or switch versions for compatibility testing with themes and plugins.
- RunCloud provides a secure method to run websites requiring older, outdated PHP versions without jeopardizing the security of other sites on the same server. This is possible using the RunCloud Docker stack, which has built-in isolation that allows legacy applications to function safely alongside modern, secure websites.
- RunCloud includes built-in integration with Cloudflare and simplifies how you manage your website’s DNS records. This connection lets you handle DNS updates and configurations more efficiently directly through the RunCloud panel, making linking your domain via Cloudflare much smoother.While we strongly recommend using a dedicated, external email hosting provider for the above reasons, we understand that some users may wish to explore other options or have specific needs for services like transactional email.
- RunCloud uses modern, high-performance stacks (e.g., Nginx + PHP-FPM, support for caching like Redis or Memcached) that can significantly improve load times and Core Web Vitals.
- RunCloud allows you to conveniently manage websites hosted on servers with different processor types, like ARM and x86, all from one central dashboard. This is useful if you use different kinds of cloud servers for cost or performance reasons.
- RunCloud supports both widely used database systems, MySQL and MariaDB, giving you flexibility in choosing the right one for your web applications.
- Managing multiple users or client sites within a single cPanel account can be insecure or inefficient. Granting specific, limited access to developers or team members is often not granular enough, leading to over-sharing of credentials or cumbersome separate accounts. RunCloud is built with teams and agencies in mind, giving you the ability to:
- Invite team members and assign them specific roles and access to particular servers. Developers can manage their projects without needing full server admin rights.
- Manage all your servers and client websites from a single, intuitive dashboard, regardless of the underlying cloud provider (AWS, DigitalOcean, Vultr, etc.).
- Maintain clear separation of duties and access logs to enhance security and make it easier to track changes.
- On traditional shared cPanel hosting, your site’s performance is often at the mercy of “noisy neighbors” and pre-defined server configurations that may not be optimal for your specific application. Therefore, scaling resources can be limited or require a complete account upgrade. RunCloud provides flexibility in how you manage and upgrade your server resources:
- When you manage your cloud server with RunCloud, you have the option to use a dedicated server. This means its CPU, RAM, and storage are exclusively allocated to you. It will ensure that your website’s performance is consistent and not affected by other users, a common issue on traditional shared hosting.
- As your website traffic grows or your application needs change, you can easily scale up or down your cloud server’s resources (CPU, RAM, storage). Most cloud providers (like DigitalOcean, AWS, Vultr, etc.) allow these adjustments with minimal or no downtime.
- RunCloud ensures you retain full root access to your underlying cloud server. This gives you the ultimate freedom to install custom software, fine-tune configurations, and manage your server environment precisely as your projects require, far beyond the limitations of typical shared hosting panels.
Is Migrating From cPanel the Right Move for You?
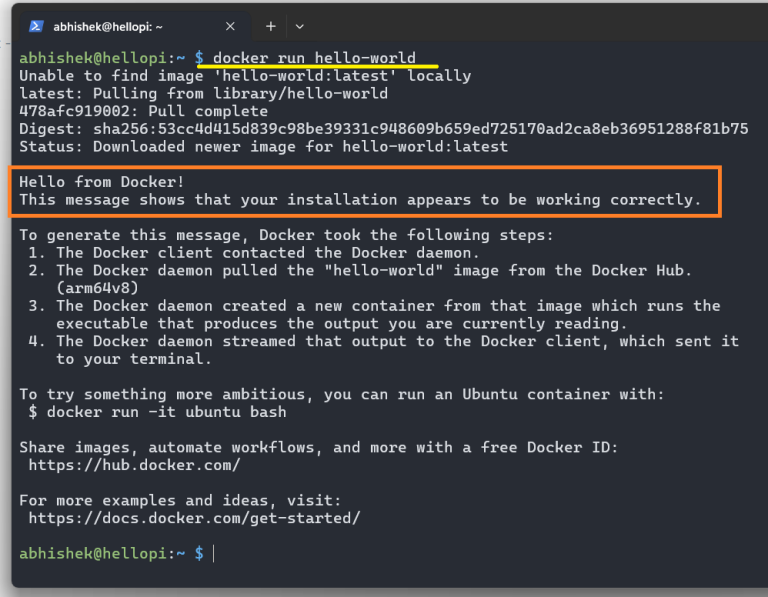
Follow the on-screen prompts and proceed when ready. The plugin will warn you that it’s about to overwrite the site.RunCloud Manages Your Web Server, Not Your Email Server.In this section, we’ll guide you through using the popular “All-in-One WP Migration” plugin, known for its ease of use. However, this plugin has file size restrictions in its free version, potentially requiring a paid extension for larger websites.
- You manage just one or a few simple websites with stable traffic.
- You have no immediate plans to host additional sites or require complex server configurations.
- You don’t need advanced developer tools, deep server customization, or the specific performance benefits of a dedicated cloud environment.
- You prefer an all-in-one solution that includes email hosting directly within your web hosting panel (even if you don’t always use it).
Congratulations! If you followed along, you’ve successfully navigated the migration process and moved your WordPress site from cPanel to your new RunCloud-managed server. Take a moment to appreciate the smoother, faster experience and the powerful control you now have over your hosting environment. While it might seem convenient to try to set up an email server on your new cloud instance, it’s strongly discouraged for several reasons:
- Rising Licensing Costs: Per-account cPanel licensing fees can add up, especially if you manage multiple sites or offer hosting to clients. RunCloud’s pricing model, combined with affordable cloud servers, can offer better value at scale.
- Bundled Services & Bloat: You might be paying for services bundled with cPanel (like integrated email hosting, specific site builders) that you don’t use or prefer to handle with specialized third-party providers.
- Lack of Modern Automation & Developer Workflows: If you’re struggling with manual deployment processes, limited or clunky Git integration, insufficient API access for custom workflows, or restrictive SSH access, RunCloud offers a more developer-centric environment.
- Performance Bottlenecks & Control: If your site is outgrowing shared hosting resources, or you need fine-grained control over server software (specific PHP versions, Nginx vs. Apache, caching mechanisms like Redis/Memcached), a cloud server managed by RunCloud provides this power.
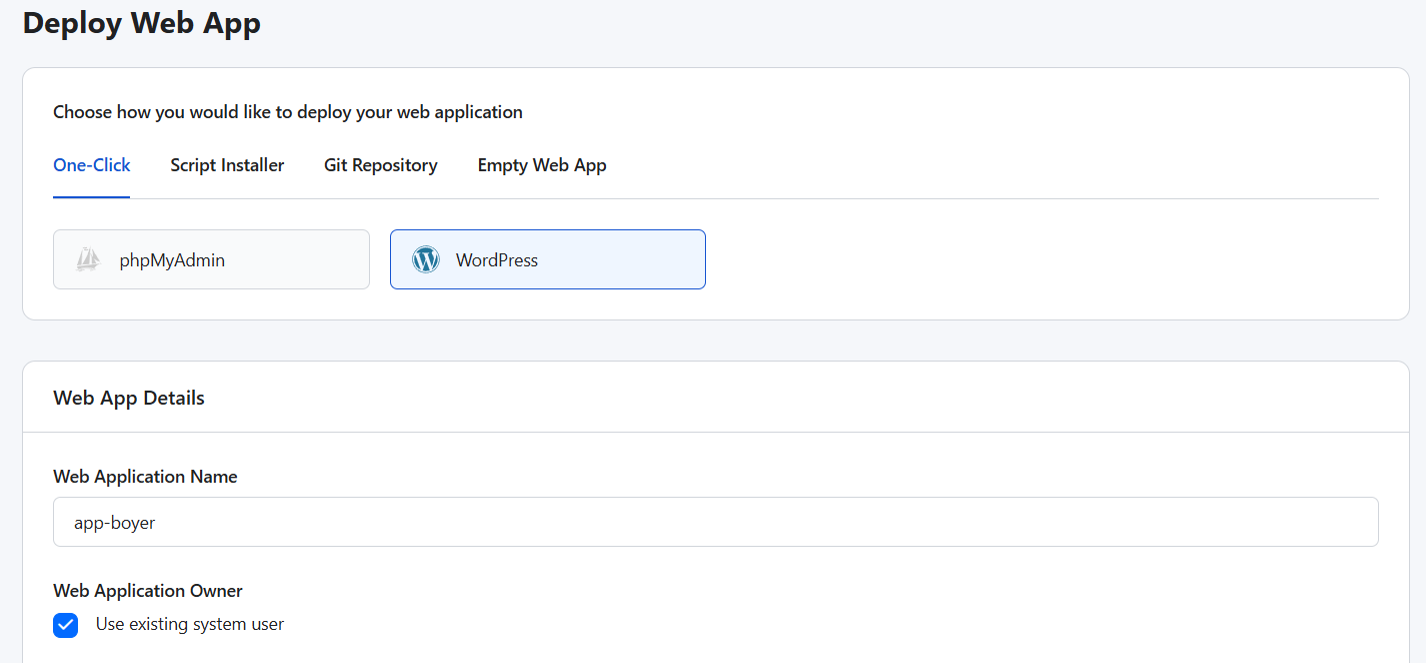
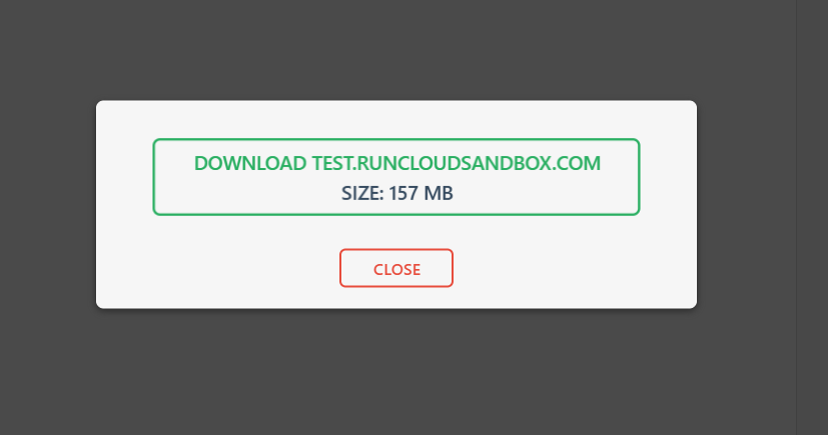
For now, you don’t need to use your real domain name. RunCloud provides a free test domain that you can use for testing purposes. If you want, you can use this test domain for the migration process. You’ll find this domain listed in your Web Application settings, and can use it to preview your site before making DNS changes.Once your server is ready in RunCloud, go to the “Web Application” section and click “Create Web Application”.
- Comfort with Cloud Infrastructure (Basic): You’ll choose a server from a cloud provider (like DigitalOcean, Vultr, AWS, Linode, etc.). RunCloud makes managing it easy, but you’re still responsible for the underlying server instance.
- DNS Management: You will be responsible for pointing your domain’s DNS records (A records, CNAMEs, MX records for email) to your new cloud server’s IP address and your external email provider. This is typically managed at your domain registrar or a specialized DNS hosting service (like Cloudflare).
What Happens to Your Email After Migrating?
For reliable email hosting, we recommend:If you are using Cloudflare, you can also use RunCloud’s built-in DNS manager to set up and update records without leaving the dashboard. Developers using cPanel can find themselves constrained. Switching PHP versions for specific projects, installing necessary extensions (like imagick or redis), or fine-tuning web server configurations (Nginx vs. Apache) can be slow, require support tickets, or simply be unavailable. This friction slows down development cycles and innovation.Select the correct PHP version (try to match your old cPanel site if possible). RunCloud will set up the necessary folders and configuration for your site.However, if you prefer expert assistance for your initial migration or manage multiple sites and value a streamlined process, you can use the RunCloud migration support. Our team can manage your first web application migration for free, ensuring a smooth start to your RunCloud experience. This allows you to see the benefits firsthand with professional guidance.After the migration, open the RunCloud test domain in your browser. Click around your website to check pages, posts, images, forms, and special features. Make sure everything looks and works exactly like your old site, and fix any small issues you find.
Why Self-Hosting Email on Your Web Server is Discouraged
Before moving your website files, let’s talk about email.
- Deliverability Issues: Maintaining a good sender reputation to avoid your emails landing in spam folders is a complex, ongoing task. Dedicated email providers have teams and infrastructure focused solely on this.
- Security Risks: Email servers are frequent targets for attackers. Managing their security requires specialized expertise.
- Maintenance Overhead: Running an email server involves updates, blacklist monitoring, spam filtering configuration, and troubleshooting, which divert focus from your website.
- Resource Consumption: An email server can consume significant server resources that are better allocated to your website.
On the next screen, use RunCloud’s “Script Installer” within the Web Application settings to install a fresh, clean copy of WordPress on this new space.However, consider migrating if you’re experiencing these cPanel pain points:
- Zoho Mail (free for personal domains)
- Google Workspace (business-grade email and tools)
- MXRoute (affordable plans for bulk or agency use)
As an alternative, especially for sites exceeding the free upload limit, refer to our post on 3 Free Ways to Migrate WordPress from Shared Hosting To Cloud Server. This post offers more flexibility and handles larger migrations effectively, although with a slightly more technical process.If this describes your situation, your current cPanel setup might still be the most straightforward and cost-effective solution.
Moving Your WordPress Site From cPanel to RunCloud: A Step-by-Step Guide
Before You Begin
- DigitalOcean & Vultr: Great for beginners. Easy setup, predictable pricing.
- AWS & Google Cloud: Ideal for larger, complex projects but slightly more advanced.
- Linode & UpCloud: Balance of performance and affordability with strong global coverage.
Manage your server with less hassle – and more power. Try RunCloud today.
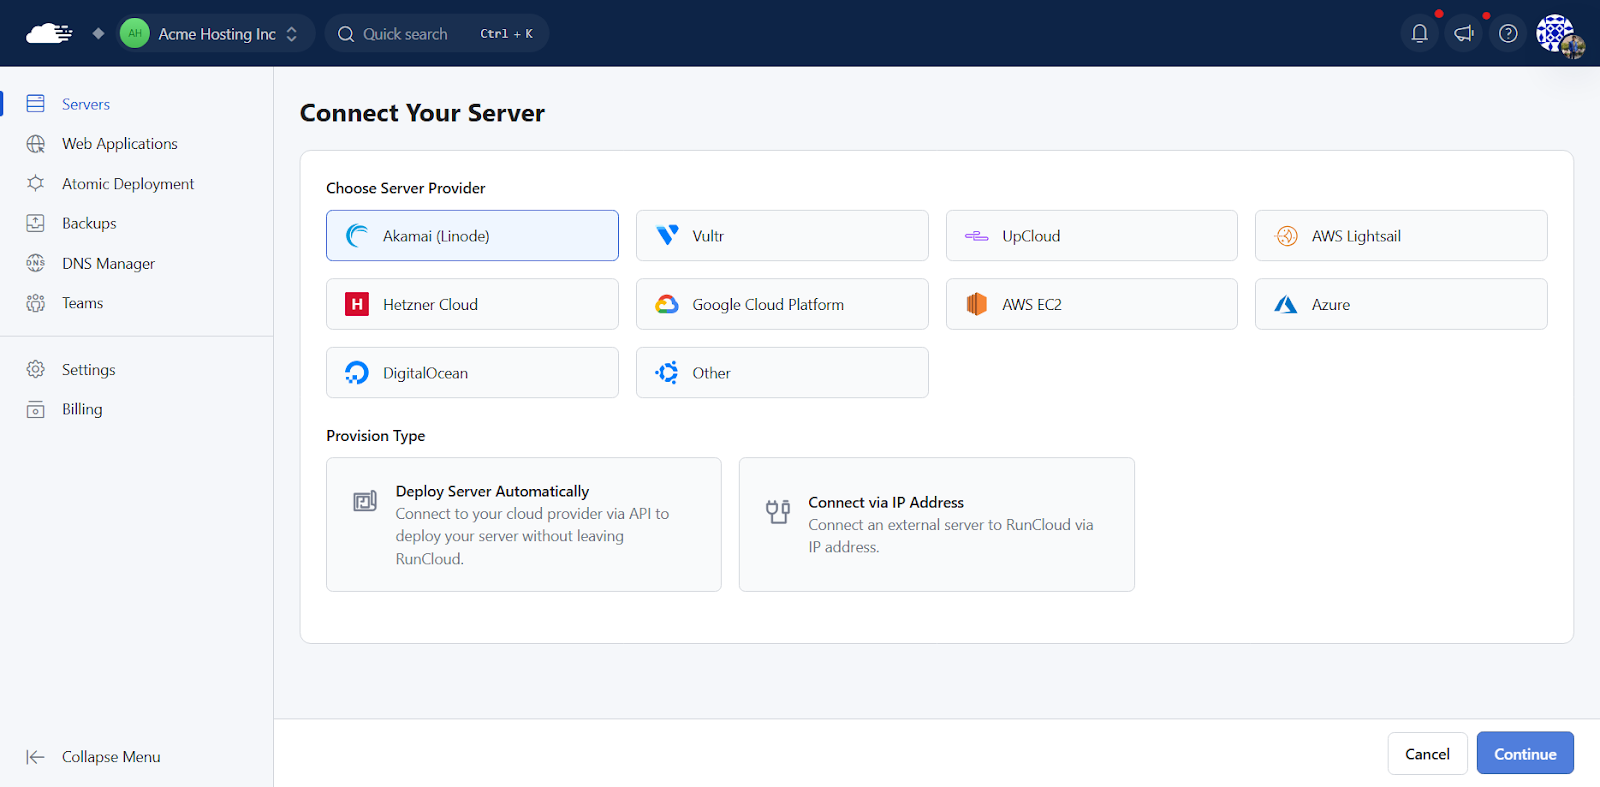
- Lower Your DNS TTL: TTL stands for “Time To Live”. It tells servers how long to store your website’s DNS information. Lowering this before you migrate (e.g., to 300 seconds or 5 minutes) means the change will happen much faster across the internet when you finally switch your domain name to point to the new server. You change this where your domain’s nameservers are pointed (your domain registrar or a service like Cloudflare).If you haven’t already done so, create a RunCloud account. Inside your RunCloud dashboard, connect to your chosen cloud provider (like DigitalOcean, Vultr, etc.) using your API key. RunCloud has a simple process for launching a new server directly from its dashboard. It will automatically install and configure the necessary software (like Nginx, Apache, MySQL/MariaDB, PHP). Before we go any further, planning for potential issues and having a strategy to minimize disruption during your migration is essential. While the goal is a seamless transition, some downtime during the DNS propagation phase is often unavoidable; however, you can reduce this by lowering your domain’s DNS TTL (Time To Live) values well before the switch and flushing DNS cache immediately after.
Step 1: Set Up Your New Server with RunCloud
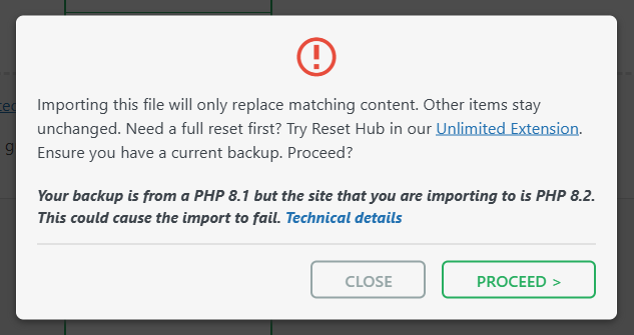
Note: If you’re migrating between different MySQL or MariaDB versions (e.g., MySQL 5.7 to 8.0), some plugins or exports may throw errors. If you run into issues during import, try exporting only content (not plugins/themes) and manually reinstall them post-migration.
Read our blog post on How to Speed Up DNS Propagation to learn more.
Step 2: Create Your Website Space in RunCloud
Moving to RunCloud means managing your cloud server instance. While RunCloud dramatically simplifies this, it’s a different paradigm than traditional cPanel shared hosting:Note: If you’re not confident handling the migration yourself, RunCloud offers free expert migration for your first site. You’ll find more details at the end of this guide.
RunCloud is the next step.When you switch your domain’s DNS records to point your website to your new RunCloud-managed server, any email accounts hosted on that same cPanel server will stop receiving new emails. Your old emails might still be on the cPanel server (until decommissioned), but new mail will not arrive.

Tired of cPanel’s limits? You’re not alone.
Step 3: Migrate Your Website Content
Whether you take advantage of the free offer or handle it yourself using this guide, moving to RunCloud opens up a world of better performance, tighter security, and simpler server management. Our dedicated paid migration service is also available for subsequent migrations or more intricate setups, starting from 0 per site. Simply provide your site details to receive a quote, and our team will handle the rest, allowing you to focus on your core business.This integration allows you to manage DNS records from within the RunCloud dashboard – no need to switch between tools. It also speeds up record updates and helps prevent misconfigurations when pointing your domain to your server.
- On Your OLD cPanel Site:
- Log in to your WordPress dashboard and navigate to Plugins > Add New. Next, search for “All-in-One WP Migration”, install it, and activate it.
- Find “All-in-One WP Migration” in the left-hand menu and click “Export“.
- Click “Export To” on the next screen and choose “File“.
- Wait for the plugin to bundle your entire site (files, database, plugins, themes) into a single
.wpressfile. - Once the file has been generated, download this
.wpressfile to your computer.
- On Your NEW RunCloud Site (using the test domain):
- Log in to the fresh WordPress installation you created in Step 2.
- Go to Plugins > Add New, then search for “All-in-One WP Migration”, install it, and activate it (the same plugin).
- Find “All-in-One WP Migration” in the left-hand menu and click “Import“.
- Click “Import From” and choose “File“.

- Select the .wpress file you downloaded from your old site.
- The plugin will start uploading and then processing the file. Free versions of this plugin might have upload size limits. If your site file is too large, you might need the plugin’s paid extension or explore other methods, like manually migrating files/databases or using a different plugin.
Key Considerations Before Choosing RunCloud & Cloud HostingBefore making the final DNS change, thoroughly test your migrated site on the new RunCloud server using its IP address or by modifying your local hosts file to ensure everything functions correctly.
However, you should remember that when you update your email server, it’s best to set up your new email hosting and configure the necessary DNS records (MX, SPF, DKIM, etc.) with your DNS provider before or at the same time you update the A records that point your website to the new RunCloud-managed server. This careful timing is key to minimizing the chance of losing any incoming emails during the transition period.
Step 4: Test Your Migrated Site
If you’re interested in learning more about the complexities of email servers or related services, RunCloud has published several articles that cover these topics:
Step 5: Point Your Domain to the New Server
📖 Suggested read: 10 Best Self-Hosted Email Server Platforms to Use in 2025
📖 Suggested read: The Best Email Marketing Plugins for WordPress in 2025 After reading this guide, you’re now equipped with the knowledge to migrate your WordPress site from cPanel to a RunCloud-managed cloud server. We’re confident that these detailed steps will help you successfully transition.
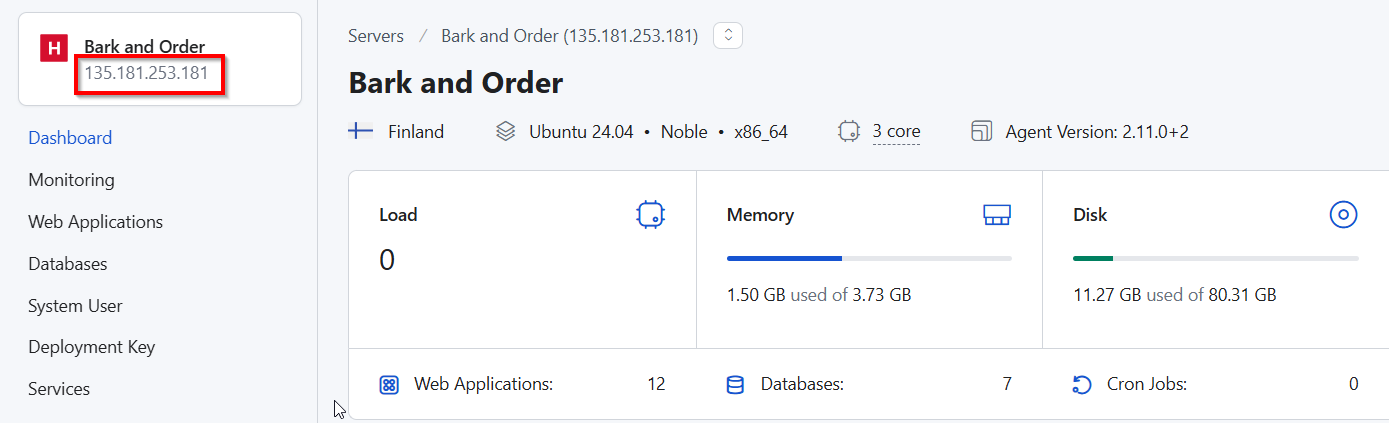
- Find Your Server IP Address: In your RunCloud dashboard, go to your server details. Your server’s public IP address will be listed there. Copy it.
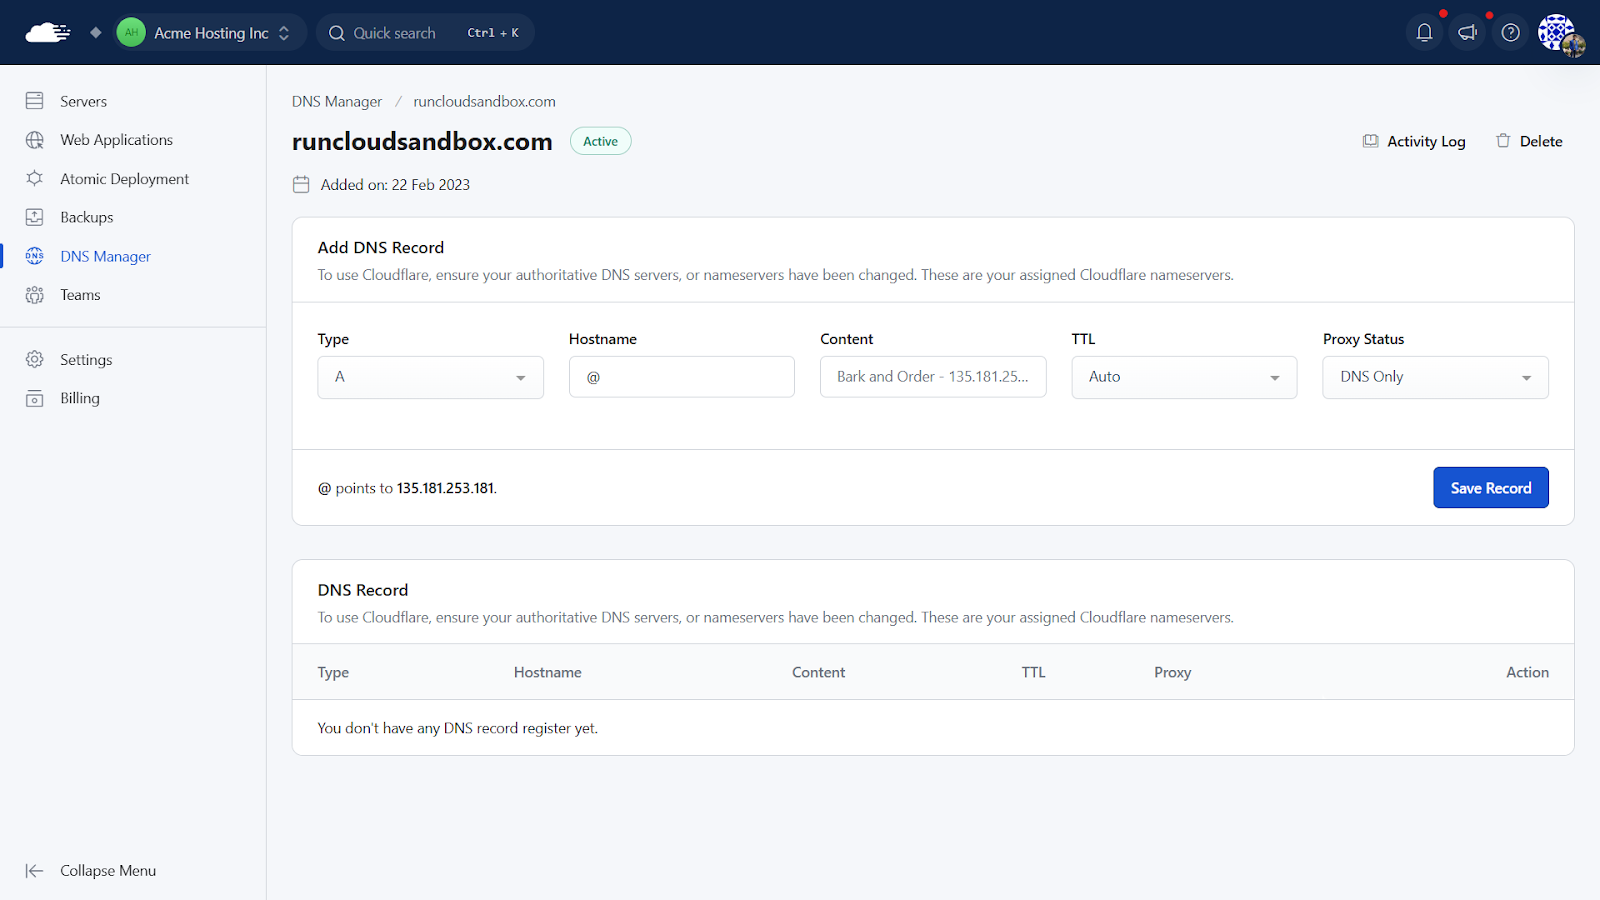
- Update DNS Records:
- Log in to your Cloudflare/Namecheap/Porkbun account (or wherever your domain’s DNS is managed) and find the DNS settings for your domain.
- You’ll need to update the ‘A’ record for your main domain. Change its value (the IP address) to the new IP address you copied from RunCloud.
- If you use ‘www’ (e.g., www.example.com), check its record too. You don’t need to change it if it’s a CNAME pointing to your main domain (yourdomain.com). If it’s another ‘A’ record, update its IP address as well.
- Save the changes.
- Review Imported Records: Double-check all the DNS records in Cloudflare to ensure they are correct and that no old IP addresses are present for your web traffic.
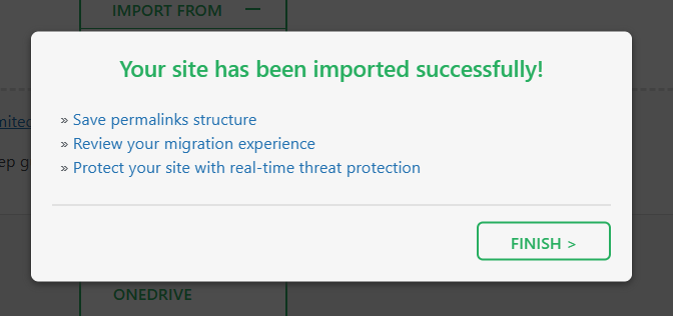
Once the import is finished, the plugin will ask you to save your permalink structure. Log in using your old site’s username and password and rebuild your site’s URL structure.
- Wait for DNS Propagation: DNS changes can take a few minutes to several hours (though usually faster if you lowered the TTL earlier). You can use online tools like whatsmydns.net to check the progress.
This guide walks you through exactly how to migrate your WordPress site from a traditional cPanel setup to a cloud server managed by RunCloud. Step by step.
Step 6: Final Checks and Configuration on RunCloud
One of the most significant differences is moving from an all-in-one cPanel environment to a cloud server managed by RunCloud.
- Final Website Test: Browse your live website using your actual domain name. Here’s what to review carefully before going live:
- Forms (contact, login, checkout)
- Plugin functionality (especially caching, security, and SEO tools)
- Theme-specific features and widgets
- Custom post types or shortcodes
- License activation for premium plugins/themes
- Review Robots.txt and Sitemap: Make sure your robots.txt file (e.g., yourdomain.com/robots.txt) isn’t blocking important pages from search engines. Check that your XML sitemap is working correctly. You might need to resubmit it to Google Search Console.
- Enable Caching: Use the RunCloud Hub dashboard for your Web Application to enable server-level caching (like Nginx FastCGI cache). This will significantly speed up your site.
- Enhance Security:
- Fail2Ban: RunCloud configures fail2ban out of the box. Ensure it’s active for services like SSH and WordPress login attempts to block brute-force attacks.
- Security Headers: Consider adding security headers (like HSTS and Content Security Policy) for better protection. RunCloud provides ways to add custom Nginx configs, and you can use it to manually configure these records in your web server configuration.
- Check Cron Jobs: If your WordPress site relies on scheduled tasks (like publishing, updates, or backups), confirm that cron jobs are working after the migration. You can:
- Use the WP Crontrol plugin to view/edit scheduled events.
- Disable WP-Cron and set up a real server-level cron job in RunCloud for better reliability. To do this, go to the RunCloud dashboard and navigate to Server Settings > Cron Jobs.
- Secure Your Site with an SSL Certificate (HTTPS): RunCloud makes it incredibly easy to install a free Let’s Encrypt SSL certificate for your domain(s) with just a few clicks, or you can deploy a custom SSL certificate if preferred. Once the SSL certificate is active, you can also force HTTPS with a single toggle inside the RunCloud dashboard to ensure all traffic uses the secure version.
- Configure Automated Backups: Use RunCloud’s built-in backup features to schedule automated daily or weekly backups of your web application files and databases to an off-server location (like S3, DigitalOcean Spaces, etc.).
- Monitor Server Health and Performance: RunCloud provides server health monitoring tools directly within its dashboard. You can track key metrics like CPU load, memory usage, and available disk space, and set up alerts to catch problems early.
Read our documentation on connecting to cloud providers via API to get instructions for your cloud provider.
Final Thoughts
Once DNS has updated, your domain should load the site from your new RunCloud server.📖 Suggested read: How to Install & Set Up FreeScout on Your Personal Server Once you’re happy with the migrated site on the test domain, it’s time to make your real domain name point to the new RunCloud server.If Your Email is Currently Hosted on your cPanel AccountLet’s get started.You might be satisfied with your current server management platform, but RunCloud solves problems that you may not even know you have.