After implementing IP restrictions, test the configuration by attempting to access the WordPress admin area from an IP address that is not allowed. If you are blocked, the restriction is working correctly.location /wp-admin/ {
allow YOUR_IP_ADDRESS;
allow ANOTHER_IP_ADDRESS;
deny all;
}
location /wp-login.php {
allow YOUR_IP_ADDRESS;
allow ANOTHER_IP_ADDRESS;
deny all;
}
- Save and Apply: In RunCloud, simply save the changes you’ve made to the Nginx configuration within the editor. RunCloud automatically checks the configuration for errors before applying it, preventing common mistakes that could break your website.
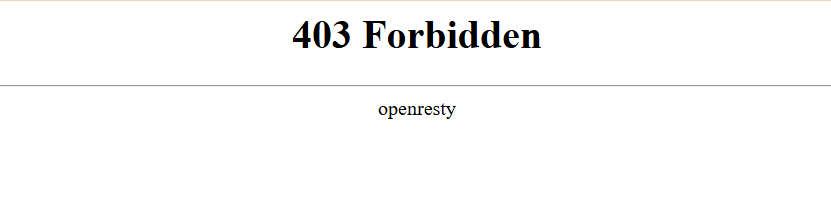
- Test: As with the .htaccess method, test access from both allowed and disallowed IP addresses to ensure it works correctly. Any attempt to access the website from a disallowed IP address should result in the following message being displayed:
This WordPress tutorial will show you how to restrict WordPress admin access by IP address by either editing the .htaccess file directly, applying Nginx configurations, or using a security plugin.
Table of Contents
- 1 What is IP Address Restriction?
- 2 How To Restrict WordPress Admin Access by IP Address
- 3 Wrapping Up: Who Should Restrict Admin Access by IP Address?
- 4 FAQs on Restricting WordPress Admin Access by IP Address
- 4.1 Can I restrict access to multiple IP addresses?
- 4.2 What happens if my IP address changes?
- 4.3 Is it safe to edit the .htaccess file?
- 4.4 What security plugins work best for IP restriction?
- 4.5 How do I know if my site is secure after making changes?
- 4.6 What are the risks of not restricting admin access?
- 4.7 How can I temporarily allow access from another location?
What is IP Address Restriction?
You can restrict access to the WordPress admin area (/wp-admin) to multiple specific IP addresses by adding multiple Allow from lines in your .htaccess file. This allows trusted team members or developers from different locations to access the backend. RunCloud’s robust server management features and built-in web firewalls can complement this by providing additional layers of security beyond IP restrictions.<Files wp-login.php>
order deny,allow
deny from all
allow from YOUR_IP_ADDRESS
allow from ANOTHER_IP_ADDRESS
</Files>
<Directory /wp-admin>
order deny,allow
deny from all
allow from YOUR_IP_ADDRESS
allow from ANOTHER_IP_ADDRESS
</Directory>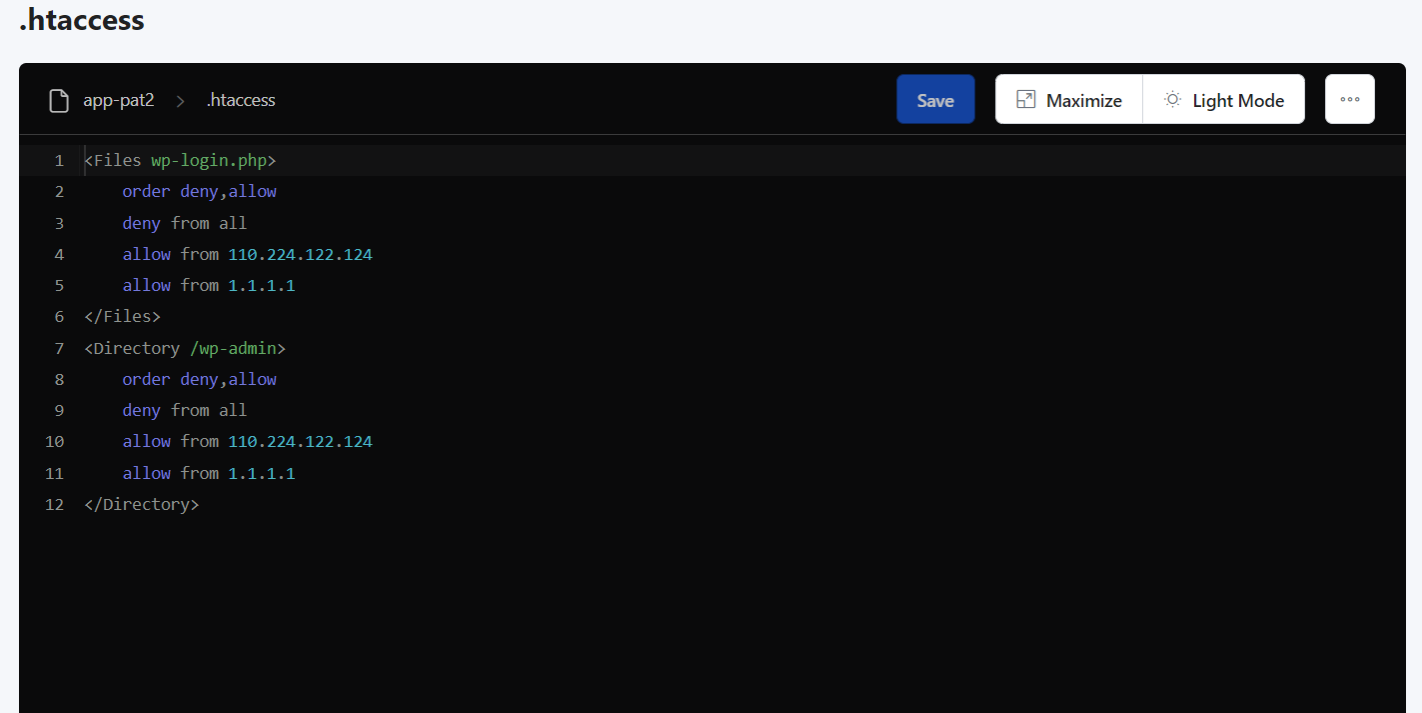
If you use an Nginx web server, you’ll need to modify the Nginx configuration file instead of using .htaccess. RunCloud significantly simplifies this process.Additionally, brute force attacks involve repeatedly attempting to guess login credentials. Limiting access to only trusted IP addresses reduces the possibility of brute-force attacks originating from other locations. Although you can also use security plugins to stop brute force attempts, IP restriction stops them before they even start. If rate limiting is in place, this significantly reduces the load on your server and prevents potential account lockouts for legitimate users.To temporarily allow access from another location, you can add appropriate rules to whitelist the new IP address in the .htaccess file. Remember to remove it when access is no longer needed to maintain security.Speaking of performance, RunCloud’s optimized server configurations, combined with the added security of IP restriction, can lead to a faster, more responsive website. By blocking malicious traffic before it even reaches your server, you reduce the load on your resources, which improves page load times and enhances the overall user experience.
How To Restrict WordPress Admin Access by IP Address
If your IP address changes, you will be locked out of your WordPress admin area. You’ll need to update the .htaccess file with your new IP address. Consider using a static IP address or a dynamic DNS service if your IP changes frequently to avoid constant updates.
Method 1: Using .htaccess File
Failing to restrict access to your WordPress admin area significantly increases the risk of brute-force attacks, unauthorized access, and potential website compromise. Hackers can exploit vulnerabilities or use stolen credentials to gain control of your site, leading to data breaches, malware injection, and reputational damage. RunCloud’s web application firewall helps mitigate some of these risks, but IP restriction adds a crucial layer of defense.
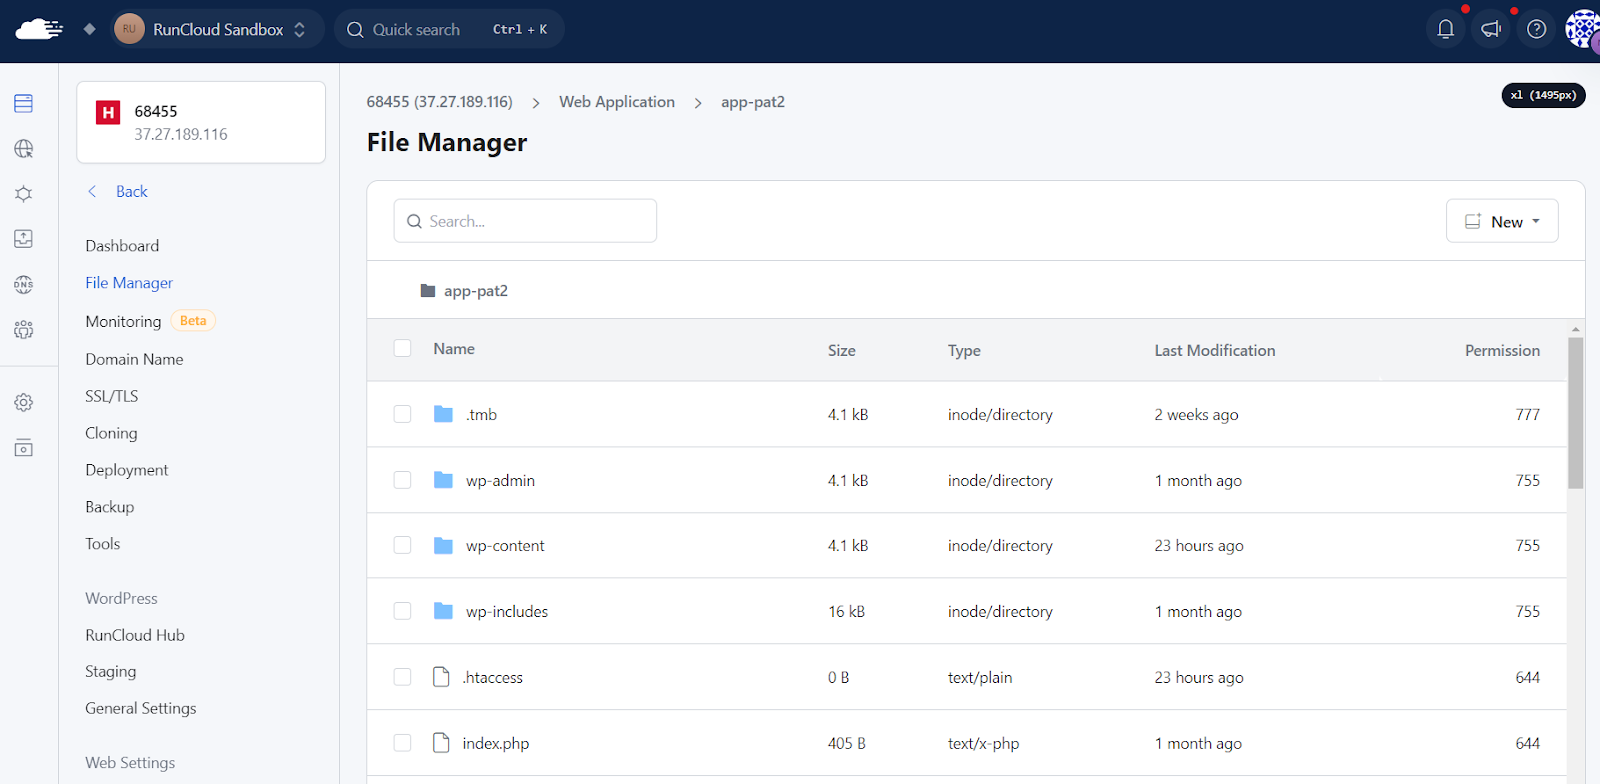
- Access the .htaccess file: The .htaccess file is usually located in the root directory of your WordPress installation (the same directory where wp-config.php resides). RunCloud provides convenient access to your server’s filesystem. Log in to your RunCloud dashboard, select your server, and then the web application you want to modify. Here, you’ll find a “File Manager” in the left menu that you can use to edit files.
- Edit the .htaccess file:
Important: Before making any changes, always download a copy of your .htaccess file to your computer and make a backup.
- In the RunCloud File Manager, click on the .htaccess file to open the file in a text editor.
- Add the following code block to the beginning of the file but after the “# BEGIN WordPress” section (if it exists). If there is no WordPress section, place it at the beginning:
Open access to your wp-admin directory and wp-login.php makes it a prime target for brute-force attacks and unauthorized access.
- Save and Upload: Save the changes to the .htaccess file by clicking the Save button on the top right.
- Test: Try accessing /wp-admin or /wp-login.php from an IP address on the allowed list. You should be able to log in. After that, try accessing it from an IP address not on the list. You should be denied access.
Whether you use Nginx, Apache, or rely on a managed server provider, this guide will teach you how to whitelist (and blacklist) specific IP addresses.
Method 2: Using Nginx Config
Restricting admin access by IP address adds another layer of security to your WordPress site. By default, the admin login page is accessible to anyone on the internet, which makes it a prime target for malicious actors.
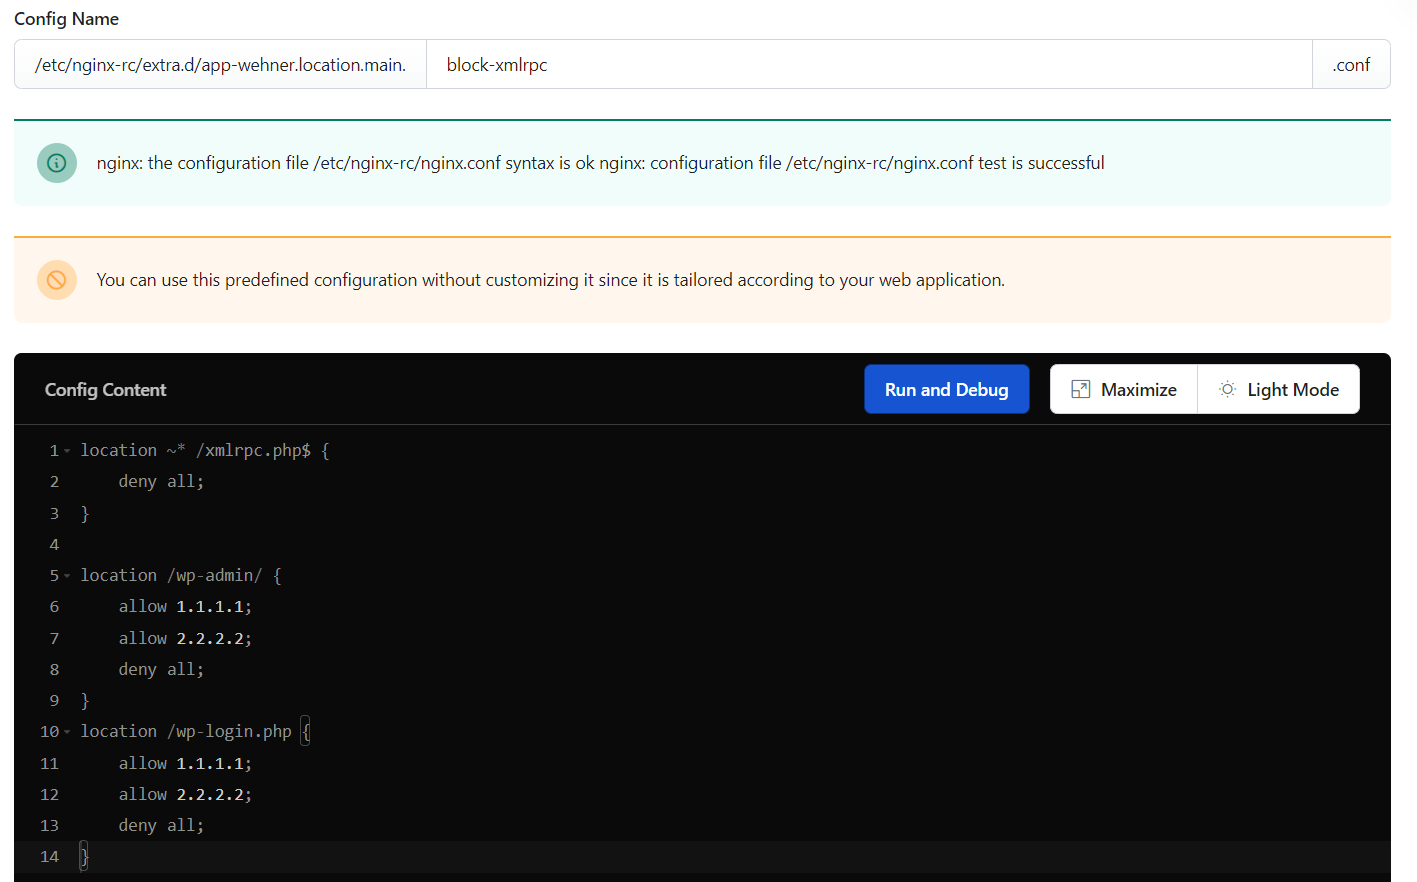
- Access the Nginx Configuration: Log in to your RunCloud dashboard, select your server, and then the web application you want to modify. You should see “Nginx Config” in the left menu on this screen.
- Edit the Nginx Configuration: RunCloud provides a user-friendly interface for editing Nginx configurations, eliminating the need for SSH access and manual configuration. On the next screen, click “Create a New Configuration”, and select “Block XML-RPC” from the dropdown menu. This predefined configuration isn’t necessary, but it is recommended as it automatically fills most fields and makes it harder for novice users to make mistakes.

- Add configuration: Copy the code snippet below and paste it into the text field in your RunCloud dashboard. Replace YOUR_IP_ADDRESS and ANOTHER_IP_ADDRESS with the actual IP addresses you want to allow. You can add multiple allow lines as needed. The deny all line ensures that any IP address not explicitly allowed is blocked.
There are several ways to restrict access to your WordPress admin area, each with advantages and disadvantages. Here are three common methods:
Method 3: Using a WordPress Security Plugin
Simply put, it is like a digital security guard that allows only those with the correct “address” to enter. It says, “Only connections from these specific IP addresses are allowed to access this website area”.
- Install and Activate Patchstack: Install and activate the Patchstack security plugin from the WordPress plugin repository. You can do this directly through your WordPress dashboard by navigating to “Plugins” > “Add New“, searching for “Patchstack“, and clicking “Install Now“, followed by “Activate“.
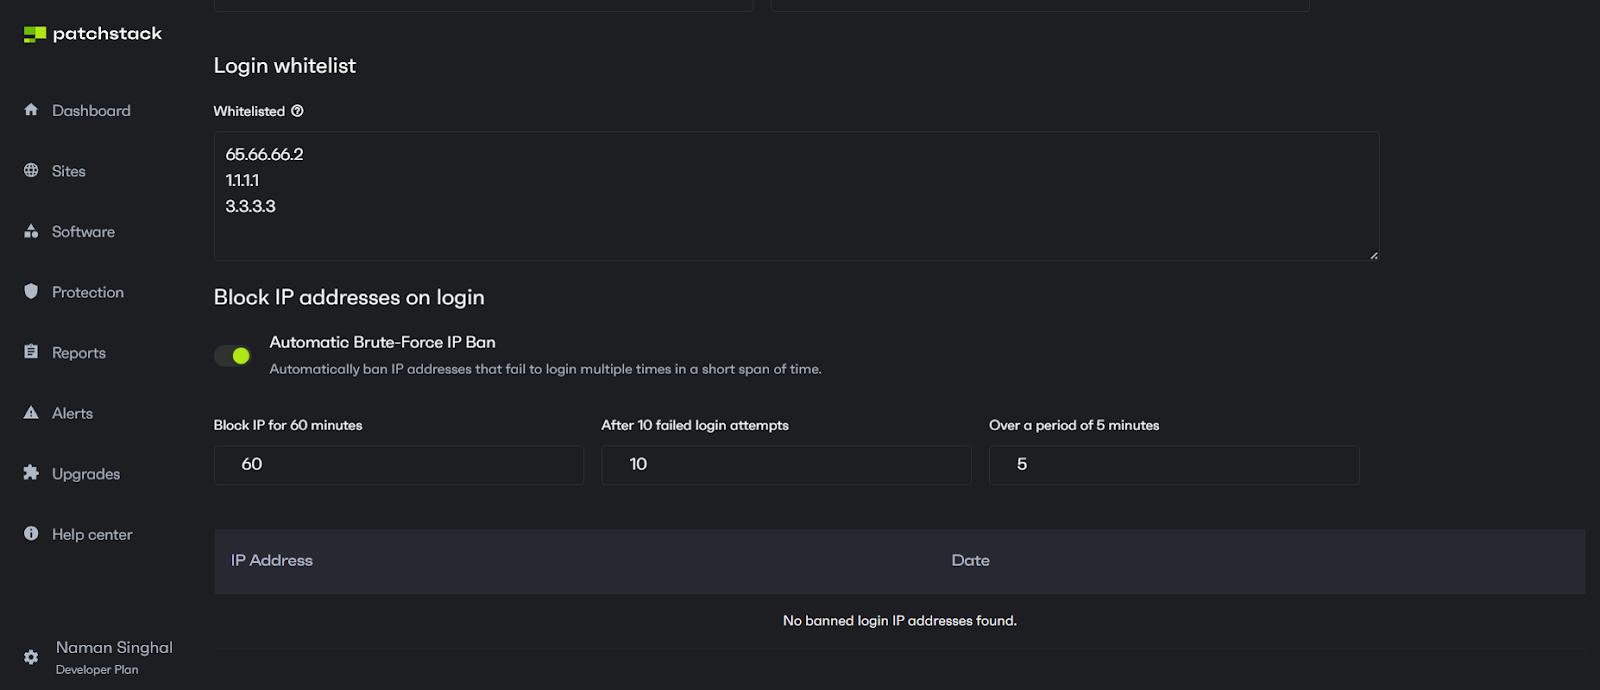
- Access Patchstack Options: Once activated, you must integrate your WordPress website with your Patchstack account. In your Patchstack dashboard you can access the Patchstack configuration options by navigating to “Hardening” > “Login Protection” within your Patchstack dashboard. This section provides various settings related to login security, including the IP whitelisting feature.
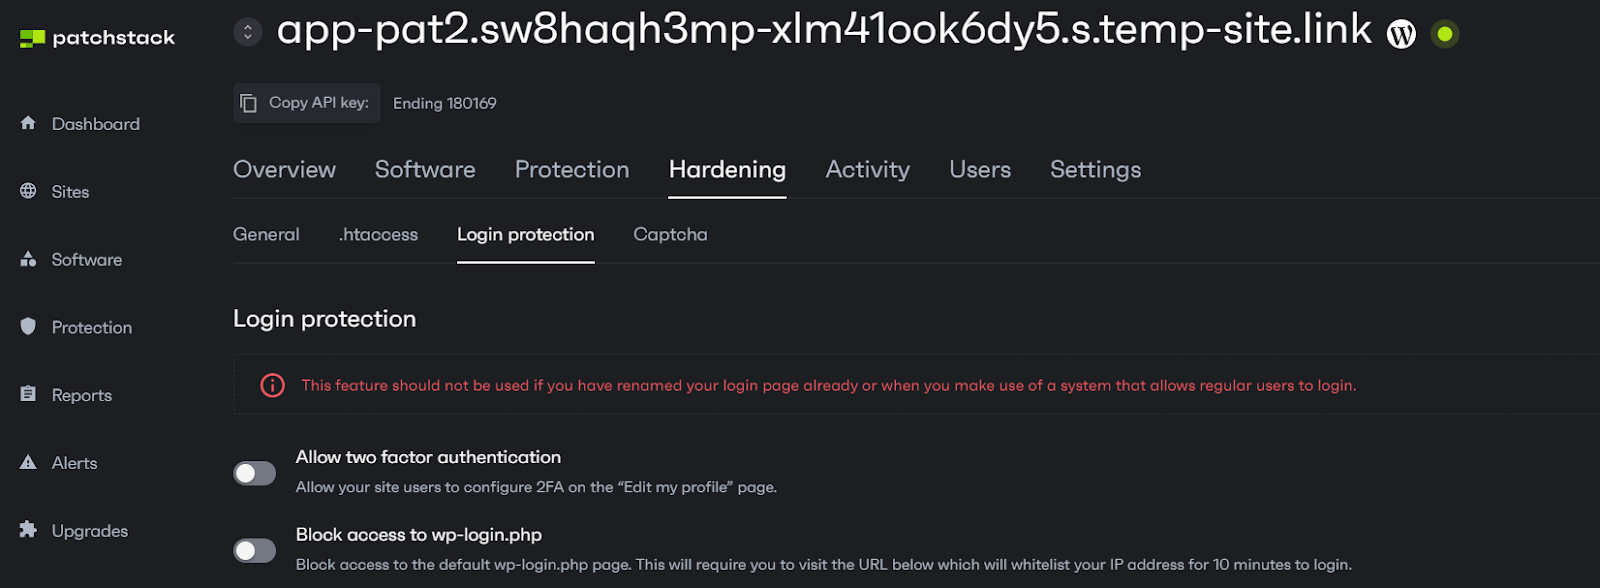
- Add IP Addresses to Whitelist: Within the “Login Protection” settings, locate the section dedicated to whitelisting IP addresses. Here, you can enter the IP addresses you wish to allow access to your WordPress admin area, ensuring they are never blocked due to failed login attempts or other security measures. Each IP address must be entered on its own line, and Patchstack supports several formats for defining IP ranges.
The following formats are accepted:127.0.0.1: A specific IP address.127.0.0.*: A wildcard, allowing all IP addresses within the 127.0.0 range.127.0.0.0/24: CIDR notation specifies a range of IP addresses (in this case, 127.0.0.1 to 127.0.0.255).127.0.0.0-127.0.0.19: An IP range using a hyphen to define the start and end of the range.
- Save Changes: After adding the desired IP addresses to the whitelist, click the “Save Changes” button at the bottom of the page. This action will save your configurations and activate the IP whitelisting, ensuring that only the specified IP addresses can access your WordPress admin area without being subject to blocking rules.
By whitelisting specific IP addresses and implementing WordPress admin access control, you can effectively stop hackers, block automated bots, and significantly reduce failed login attempts.
Wrapping Up: Who Should Restrict Admin Access by IP Address?
IP restriction makes it exponentially more difficult for attackers to access the WordPress backend. Even if an attacker obtains valid login credentials (through phishing, malware, or other means), they will still be blocked if their IP address is not on the approved list. This is especially useful if you and your team work from fixed locations with static IPs.Suggested Read: How to Unban IP Address in Fail2Ban? (Step-By-Step Guide)Sign up for RunCloud today.IP Address Restriction, also known as IP whitelisting, is a security measure that limits access to a specific resource, such as your WordPress admin area (/wp-admin), to only a pre-approved list of IP addresses.Compared to restrictive hosting panels, RunCloud offers limitless flexibility. You have complete control over your server environment, and RunCloud allows you to optimize your WordPress site for maximum security and performance.Suggested Read: How to Block IP Address Using WordPress .htaccess File to Stop Bad Visitors
FAQs on Restricting WordPress Admin Access by IP Address
Can I restrict access to multiple IP addresses?
What happens if my IP address changes?
Is it safe to edit the .htaccess file?
What security plugins work best for IP restriction?
.htaccess file can be risky if done incorrectly, as it can potentially cause website errors or make it inaccessible entirely.