The Domain transfer process is governed by ICANN (the organization that manages domain policies) to protect you from domain theft, which is why it isn’t instant and can take anywhere from a couple of days to a few minutes.
Table of Contents
Why Your Domain Registrar Shouldn’t Handle Your DNS
For this, we recommend using Cloudflare. Their free tier is more than enough for most users and offers world-class performance, security, and reliability. This strategy works regardless of which registrars you are moving between.
- A Domain Registrar is the company you pay to register and renew your domain name (e.g., yourbusiness.com). They are like the city hall that holds the deed to your property.
- A DNS Host (or Provider) is the service that holds your domain’s records. It acts as the internet’s phonebook, directing browsers to your website, email servers, and other services. This is the GPS that directs traffic to your property.
Your domain is now safely at its new home. Let’s do a quick final checkup at your new registrar.You may want to consider transferring for better pricing, a cleaner user interface, improved support, or to consolidate your domains. Whatever your reason, choosing a reputable registrar is very important. We recommend one of the following DNS registrars for their fair pricing, excellent features, and developer-friendly approach:Before you start a transfer, you must first confirm that your new registrar supports your domain’s specific extension (TLD), such as .io, .store, or .ai.Once your domain transfer is complete, make sure the rest of your setup is just as dependable.These official guidelines allow the current registrar a period to process the request and give the domain owner time to cancel it if it was initiated fraudulently.
Best Domain Registrars to Use
The solution is to move your DNS to a dedicated, high-performance DNS provider before you start the transfer. This allows your registrar to be interchangeable without affecting live traffic.
- Cloudflare Registrar: The best choice if you’re already using their DNS. They offer wholesale pricing (with no markup on domain registration), making them one of the most affordable options.
- Porkbun: A community favorite known for its incredibly competitive pricing, clean UI, and excellent set of free features like WHOIS Privacy and email forwarding.
- Spaceship: A modern registrar with a fantastic user experience, competitive pricing, and a strong focus on making domain management simple and intuitive.
- Namecheap: A long-standing, reliable option known for its good support, frequent promotions, and a solid feature set, including free WHOIS privacy.
Before You Transfer: Check Registrar Compatibility
Once you have obtained your EPP code and transferred your DNS to a new DNS provider, it’s time to initiate the transfer.Often, the registrar from which you buy a domain also provides DNS hosting by default. This is convenient but creates a single point of failure.
How Long Does a Domain Transfer Take?
Your transfer request can be denied if:We strongly recommend that you not wait until your domain is close to its expiration date to begin this process. Initiating a transfer at the last minute introduces significant risks, as potential issues like a locked domain, outdated contact information, or other delays could cause the transfer to stall within the 5-7 day window. If your domain expires while the transfer is pending, it will likely fail, causing your website and email services to go offline as it enters a costly and complicated redemption period. To ensure a smooth transition, it is highly recommended to initiate the domain transfer at least two weeks before its expiration date.RunCloud makes managing servers and domains effortless. If you’re using Cloudflare, RunCloud automatically syncs DNS records whenever you create or update an application – so your sites stay online without manual work.If you transfer your domain while the old registrar still manages your DNS records, those records are often deactivated or deleted, which can cause immediate downtime.
Why Your Domain Transfer Might Be Denied
No. This process only changes your domain registrar. Your hosting provider, where your website’s files are stored, is completely unaffected.In this guide, RunCloud’s team shares the exact process we use to transfer domains smoothly and confidently.
- The Domain is Locked: You must disable the “Registrar Lock” at your current registrar before proceeding with the transfer, as described below.
- The Domain is Too New: A domain cannot be transferred within the first 60 days of its initial registration.
- The Domain Was Recently Transferred: A domain cannot be transferred again within 60 days of a previous transfer.
- You Have an Unpaid Bill: The transfer can be denied if there’s an outstanding balance for a previous registration period.
- There’s an Identity Dispute: If there is reasonable evidence of fraud or a legitimate dispute over who the true owner of the domain is.
- There is an active legal dispute: The domain is subject to a court order or a formal domain dispute proceeding.
- It’s under the “60-Day Change of Registrant” lock: If you have recently changed the First Name, Last Name, Organization, or email address of the official domain registrant, ICANN rules require a mandatory 60-day lock on transfers.
Step-by-Step: How to Transfer a Domain Safely
Stories of websites disappearing and emails bouncing around during transfers make that fear understandable – but downtime isn’t inevitable.
Phase 1: Setting Up DNS Server for Zero Downtime
Some registrars offer excellent pricing, but only for a few common TLDs, such as .com. Others, with features like premium DNS, may be more expensive. If your new registrar doesn’t support your TLD, the transfer will fail, so always conduct thorough research to avoid a dead end.
- Sign up for a Third-Party DNS Provider: In this tutorial, we will use Cloudflare for this process. Go to Cloudflare and sign up for a free account to follow along.
- Add Your Domain to the New DNS Provider: Cloudflare will prompt you to add a site. Enter your domain name. It will scan your existing DNS records from your current registrar.
- Verify All DNS Records Have Been Copied: This step is crucial. Cloudflare’s scan is good, but you must manually double-check that every single record has been imported.
- Open a new tab and log in to your current registrar’s DNS management panel.
- Compare the records side by side with what Cloudflare has imported. Pay close attention to:
- A and AAAA records (your website’s IP address)
- CNAME records (aliases, like www pointing to your main domain)
- MX records (your email servers)
- TXT records (for things like SPF, DKIM email authentication, and site verification)
- Any other custom records you may have.
- Manually add any missing records in the Cloudflare DNS dashboard.
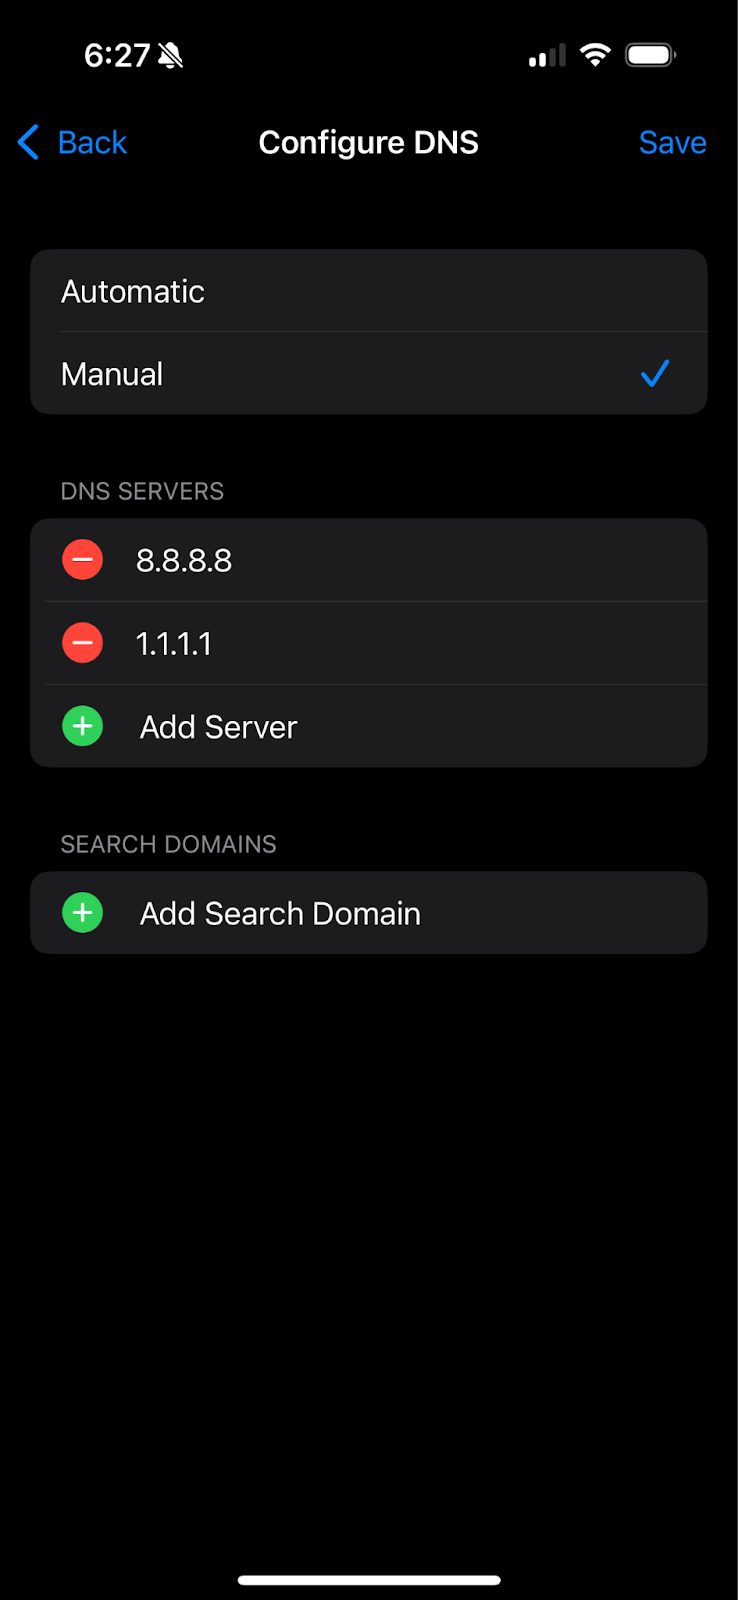
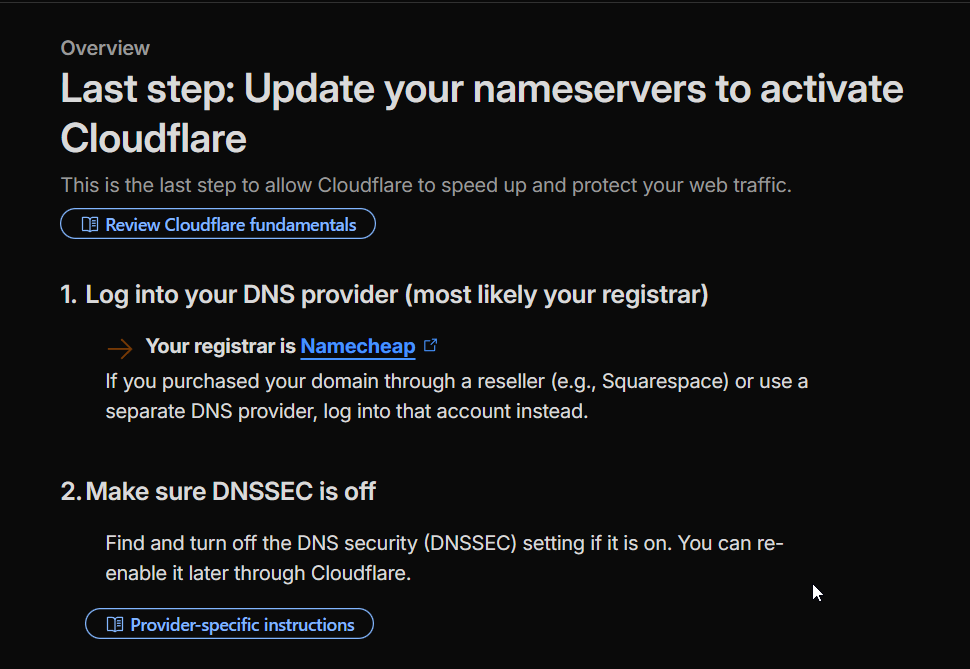
- Update Your Nameservers at Your Current Registrar: Cloudflare will provide you with two nameserver addresses (e.g., aragorn.ns.cloudflare.com and daphne.ns.cloudflare.com).
- Go to your current registrar’s domain management panel.
- Find the section for “Nameservers” or “DNS Servers”.
- Select the option to use “Custom Nameservers”.
- Delete the existing nameservers and replace them with the two provided by Cloudflare.
- Save your changes.
- Wait for DNS Propagation: It can take anywhere from a few minutes to 24 hours for this change to be recognized across the internet. You can monitor the progress using a tool like DNSChecker.org. Enter your domain name and select “NS” from the dropdown to see the nameserver propagation status. Once you see the new nameservers that you configured in the previous step, you’re all set.
Not if you follow this guide. By moving your DNS to a third-party provider before starting (Phase 1), you decouple your live services from the registrar transfer. Your traffic never misses a request.
Phase 2: The Pre-Transfer Checklist (At Your CURRENT Registrar)
The transfer itself typically takes 5-7 days, as dictated by ICANN rules. However, if your old registrar allows you to explicitly approve the transfer, it can be completed in under an hour.
- Verify Admin Contact Info: Ensure the administrative contact email address listed for the domain is current and accessible. The transfer approval link will be sent to this address.
- Disable WHOIS/Domain Privacy: You’ll need to temporarily disable any privacy protection service. This allows the new registrar to see the official contact information. You can re-enable it after the transfer is complete.
- Unlock Your Domain: Domains are locked by default to prevent unauthorized transfers. Find the “Registrar Lock” or “Domain Lock” setting and disable it.
- Get the EPP/Authorization Code: This is a unique password for your domain. Look for an option like “Get EPP Code,” “Auth Code,” or “Transfer Code.” Copy this code to a safe place.
Phase 3: The Transfer Process
Now, prepare the domain itself for the move. Log in to your current registrar and complete the following:
- Sign Up at Your NEW Registrar: Create an account with your new Domain registrar.
- Initiate the Transfer: Find the “Transfer Domain” section and enter the domain name you wish to transfer.
- Provide the EPP Code: You will be prompted to enter the Authorization/EPP code you got from your old registrar.
- Complete the Purchase: A domain transfer almost always includes a one-year renewal of your domain registration. Complete the checkout process.
- Approve the Transfer via Email: Check the admin contact email inbox for an email from your registrar. It will contain a link to approve or deny the transfer; approve the transfer request to finalize the transfer.
- Wait for Confirmation: You will receive a final “Transfer Complete” email from your new registrar once the process is finished.
Phase 4: Post-Transfer Cleanup
Before transferring the domain to a new registrar, we will migrate our DNS server to a third-party DNS provider. Do not skip these steps, as this will guarantee a smooth transfer.
- Verify Nameservers: Double-check that your domain’s nameservers are still pointing to Cloudflare (or your chosen DNS provider). They should have carried over, but it’s always a good idea to check.
- Re-enable Registrar Lock: Lock your domain at the new registrar to prevent unauthorized transfers.
- Re-enable WHOIS Privacy: Turn your domain privacy protection back on.
- Check Auto-Renewal: Ensure auto-renewal is set to your preference to avoid accidentally losing the domain next year.
Final Checks and Next Steps
Many website owners stay with their first domain registrar for years, assuming that moving a domain will break everything.Shortly after initiating the transfer with your new registrar, your old registrar will typically send a verification email or display a notification in your account dashboard asking you to explicitly approve the “transfer out”; by confirming this request, you can speed up the transfer process.ICANN, the governing body for domains, imposes a 60-day “Transfer Lock” on any domain that has been newly registered or recently transferred. You must wait for this period to end.