sudo fail2ban-client status
Beyond static rules, Fail2Ban dynamically adapts to real-time scenarios. You can configure it to lift bans on IP addresses after specified durations automatically. This ensures that legitimate users regain access if they were accidentally blocked. For repeat offenders, Fail2Ban can escalate ban durations to strengthen security measures. Additionally, you can synchronize the list of offending IPs across multiple servers to enhance the overall protection of your network.Implementing strict Fail2Ban rules is necessary for protecting your servers from potential threats. A properly configured Fail2Ban instance can help you defend against various attacks. However, it’s essential to recognize that even well-configured systems can sometimes produce false positives, potentially blocking legitimate traffic.Chances are, your Fail2Ban rules might have blocked them. Don’t worry, we’ve all been there!However, there’s an even better way to do this.
Table of Contents
What is Fail2Ban?
The default block time varies but is often set to 10 minutes or 1 hour. In RunCloud, you can check and modify this setting in the Fail2Ban configuration section.RunCloud provides a user-friendly interface to manage Fail2Ban, making it easier to unban IPs. Here’s how you can do it:
- It prevents brute-force attacks
- It reduces server load from persistent attack attempts
- It protects multiple services (SSH, web servers, mail servers)
- It allows for custom rule creation to address specific threats
- It integrates with existing firewall systems
How Does Fail2Ban Work?
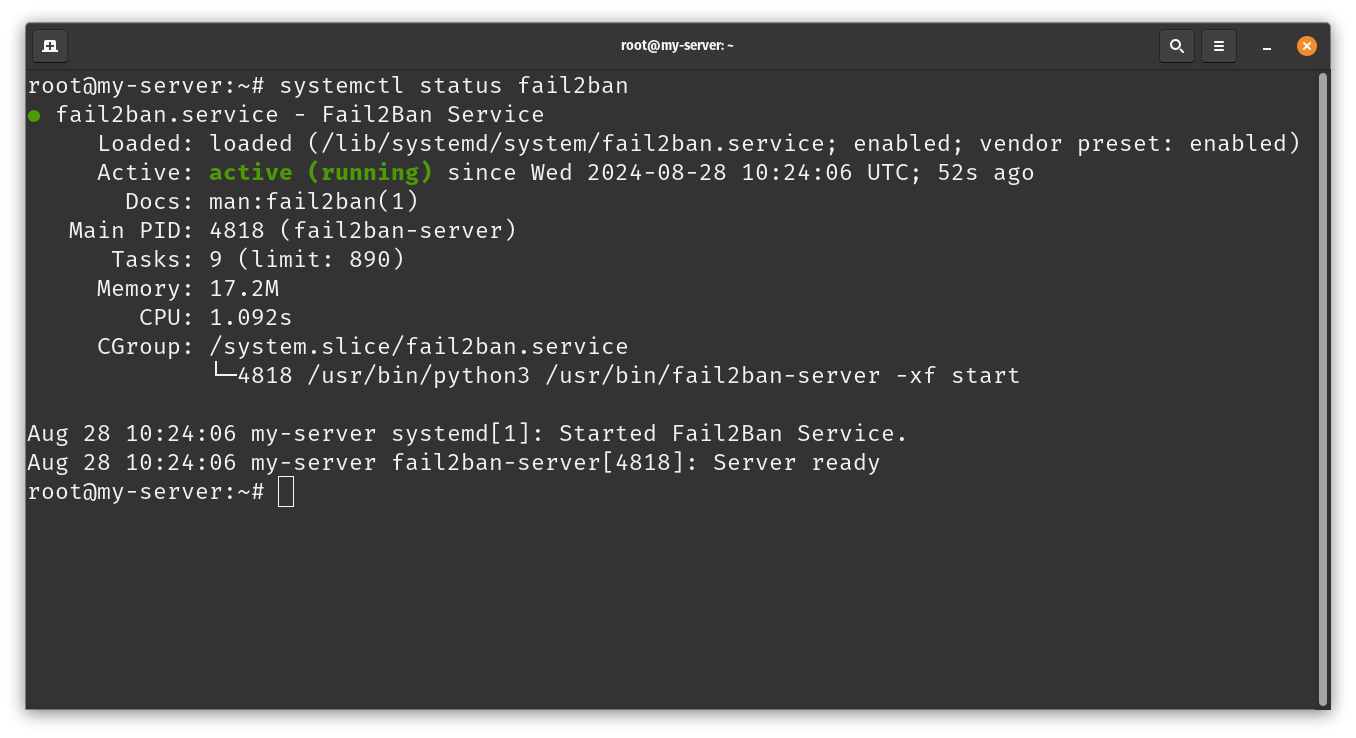
systemctl status fail2ban
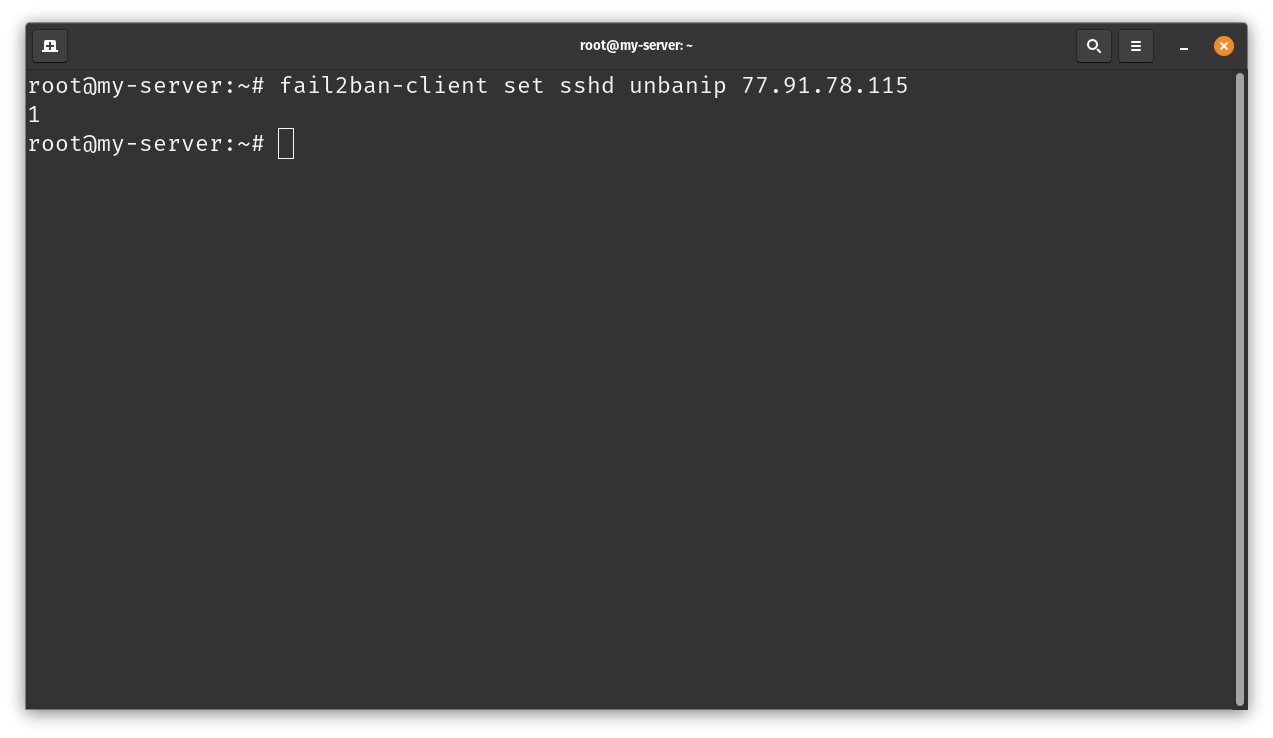
sudo fail2ban-client set sshd unbanip 192.168.1.100
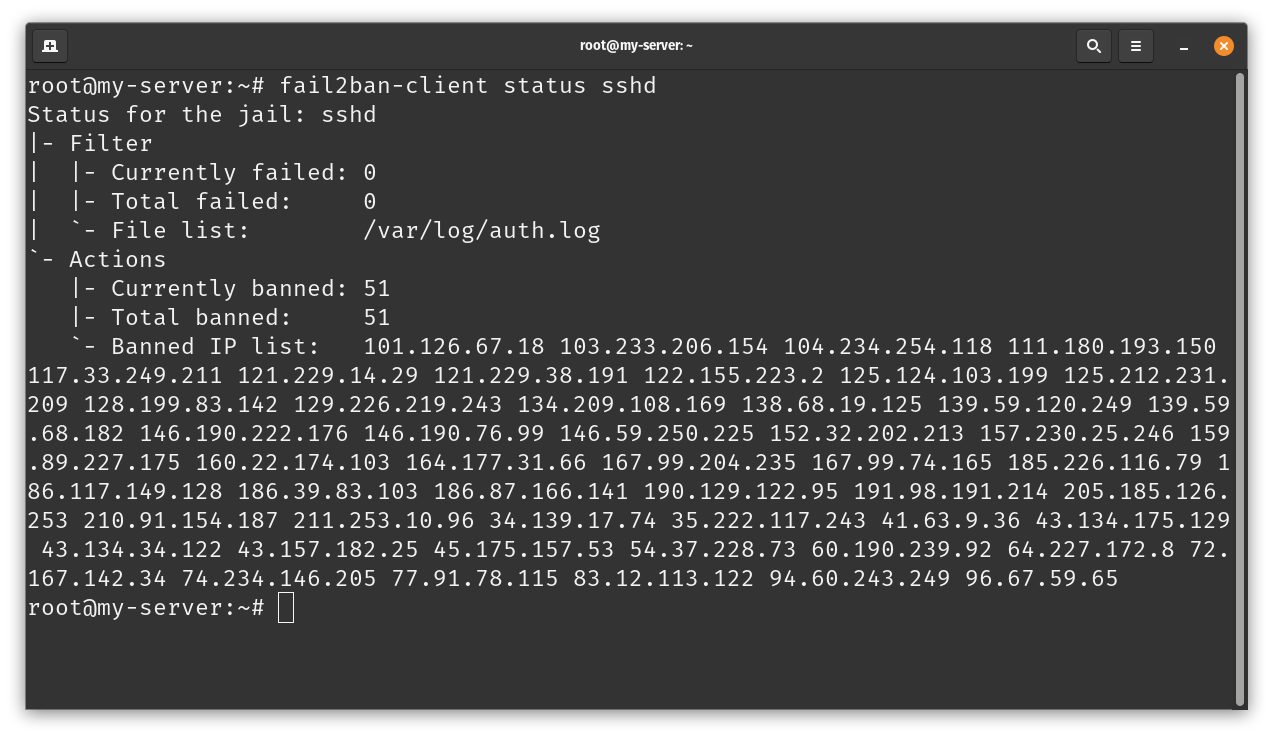
sudo fail2ban-client status sshd
If you have a static IP address or a corporate network where the list of IP ranges is fixed, you can whitelist these IP addresses. Once you add the addresses to the whitelist, these IP addresses will never get blocked, regardless of the number of failed attempts.However, if you don’t want to wait for the IP address to be automatically removed from the block list, then you can manually log in to your server and run the following command:
Configuration Structure
If you want to enhance your server security without the steep learning curve, RunCloud offers the perfect solution. With its intuitive Fail2Ban integration, you can enjoy robust protection and easy management.
- jail.conf: This is the default configuration file.
- jail.local: Administrators can override the default settings here to tailor them to their needs.
- filter.d/*.conf: These files define log parsing rules. They specify patterns to detect in system logs to identify potential threats or malicious behavior.
- action.d/*.conf: These files specify actions for rule violations. Fail2Ban responds with predefined actions when a filter triggers, such as blocking an offending IP address.
Pattern Matching
If you find that Fail2Ban banned your IP address, you can either wait for Fail2Ban to unban it or remove it automatically. An offending IP address is banned for 10 minutes by default, but server administrators can extend or reduce this.Furthermore, Fail2Ban runs as a background daemon and consumes minimal system resources, allowing configuration reloading without requiring a full restart. Importantly, Fail2Ban maintains its state across system reboots, ensuring consistent protection even after server restarts.
How to Unban an IP in Fail2Ban?
Here’s why you should use Fail2Ban on your server:
Step #1: List all Banned IPs in Fail2Ban
Sometimes, you might need to unban an IP address that Fail2Ban has blocked. Here’s how to do it:This functionality can be handy if you frequently perform security tests on your site that result in your IP address getting banned. This command allows you to continue performing security tests without turning off the firewall or waiting for long periods.Fail2Ban uses a hierarchical configuration system to protect against unauthorized access and attacks efficiently. Let’s see how it works:
There are several components in a Fail2Ban module that help in protecting your server.
Step #2: Unban Specific IP in Fail2Ban
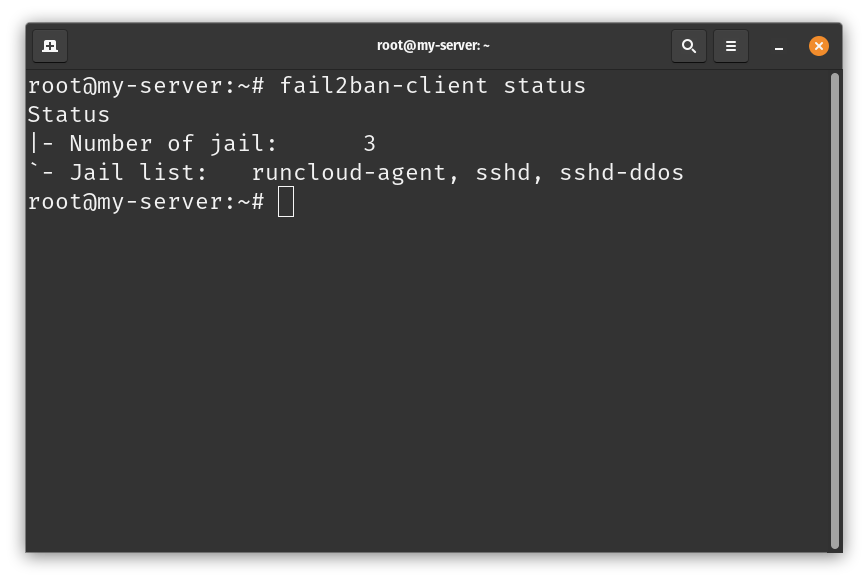
Fail2Ban stores a list of all the IPs currently banned from connecting to your server. Run the following command to see all active jails on your server:sudo fail2ban-client set JAIL unbanip IP_ADDRESS
However, this can also be a security flaw if misconfigured. We strongly recommend only adding IP addresses belonging to your organization or company. Follow the steps below to prevent Fail2Ban from banning a specific IP in the future:In the above example, you can see the list of all the IP addresses that were banned from connecting to this server. This command can help you identify whether one of your colleagues’ IP addresses was accidentally banned.
This is why understanding how to unban IP addresses is essential. It lets you quickly restore access for legitimate users who may have been inadvertently blocked, maintaining security and accessibility.Fail2Ban is an open-source intrusion prevention software framework for Linux systems. It monitors system logs and responds to malicious activities by blocking IP addresses. You should note that Fail2Ban alone can’t protect your servers; it is typically used with iptables or similar firewalls to block traffic from banned IP addresses.
Step #3: Whitelist Specific IP in Fail2Ban (optional)
To bypass a permanent ban, an administrator must manually unban the IP. If it’s your IP, you may need to contact your hosting provider or use a different IP to access the server and unban yourself.VPNs can potentially bypass IP bans as they change your IP address. However, if the new VPN IP is also detected performing suspicious activities, it can get banned.
- Edit the Fail2Ban configuration file using the following command. If you feel out of your depth here, you can refer to our guide explaining how to edit files on remote servers with SSH and Nano.
Fail2Ban is primarily an Intrusion Prevention System (IPS). It actively blocks potential threats based on log analysis rather than detecting and reporting them like an IDS.This approach is significantly more straightforward than using CLI commands directly on the server. RunCloud’s interface streamlines the entire process, allowing you to focus on your core tasks rather than getting bogged down in server management complexities.
How do you unban IPs in Fail2Ban with RunCloud?
Fail2Ban organizes its rules using a “jail” concept where each jail corresponds to a specific service, such as SSH or Apache. Within these jails, Fail2Ban combines filters and actions. Filters define patterns to detect in system logs, identifying potential threats or malicious behavior.
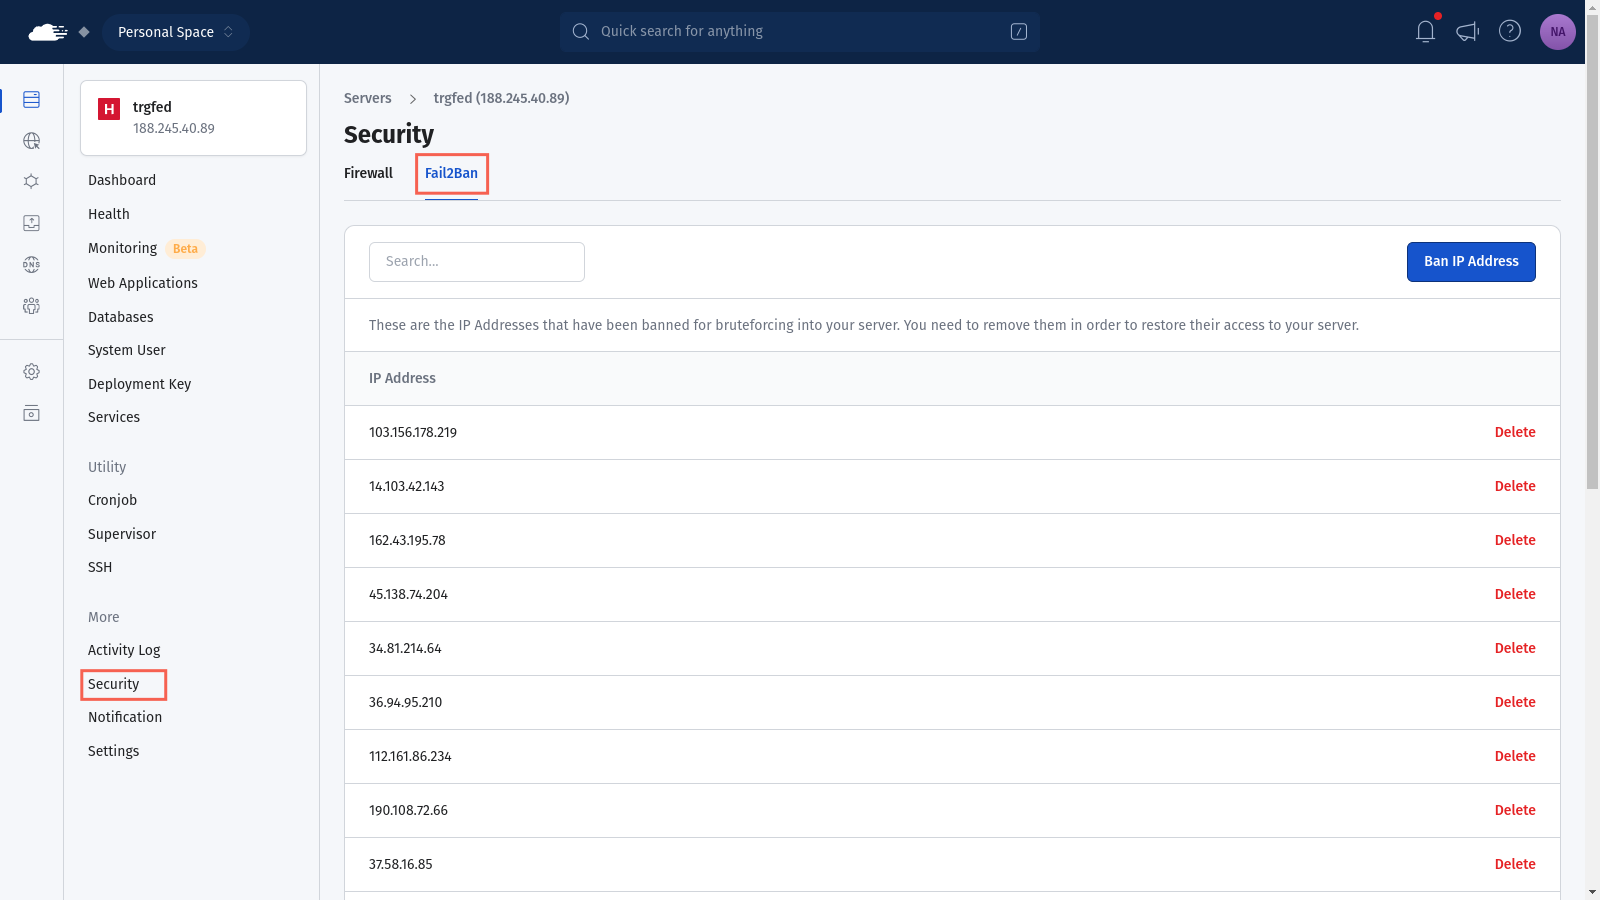
- Log in to your RunCloud dashboard and navigate to the server where you want to unban an IP.
- Go to the “Security” tab and switch to the “Fail2Ban” section.
- On this screen, you’ll see a list of banned IPs.
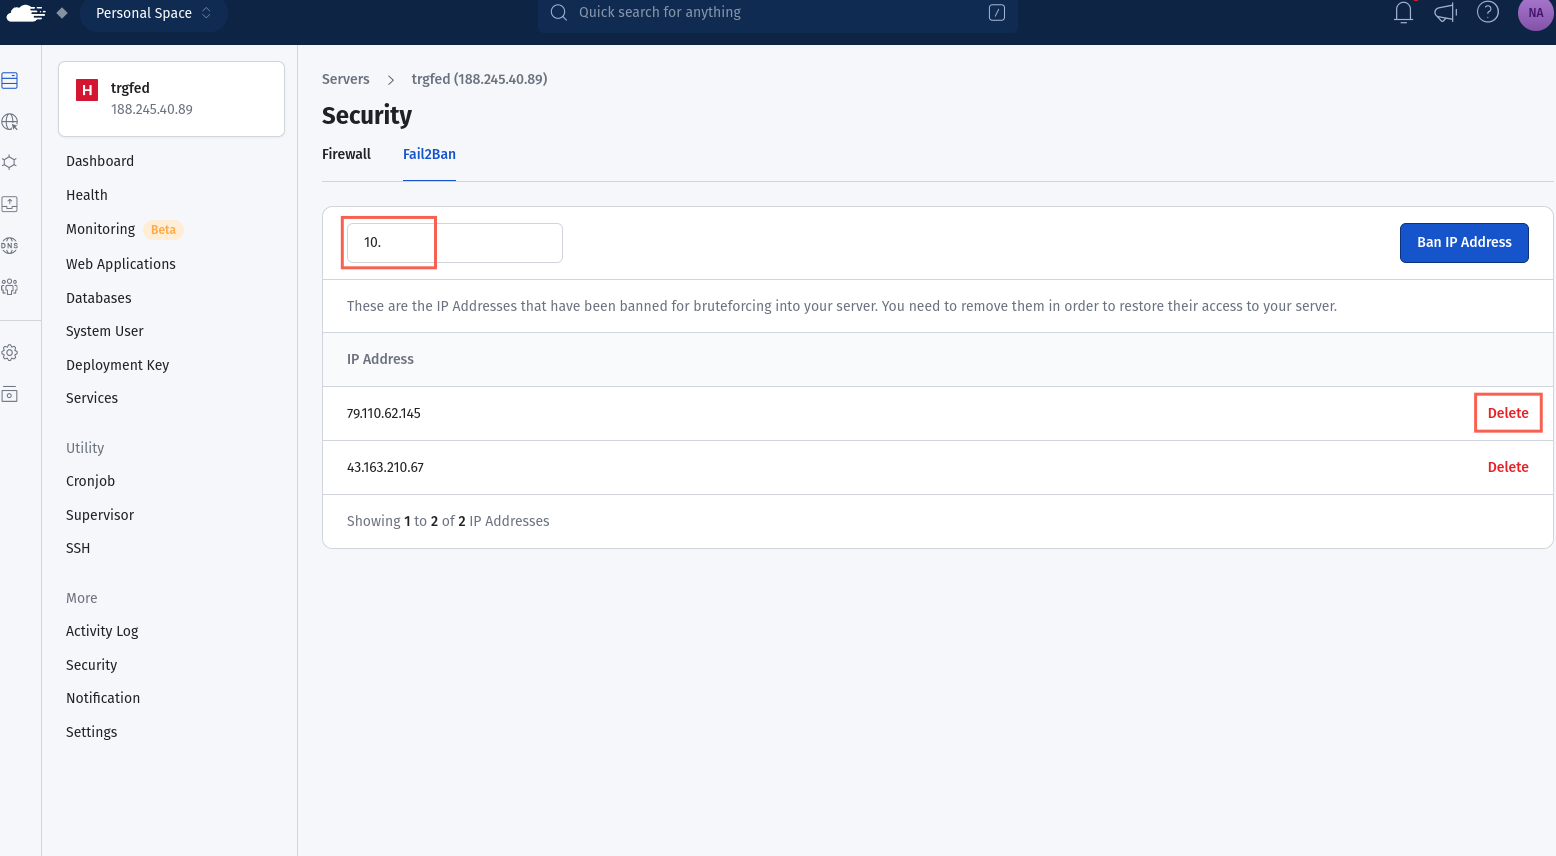
- Click the “Delete” button next to the IP you want to unban. If there are too many IPs, you can filter out the IP addresses by using the search functionality.
Final Thoughts
Fail2Ban uses regular expressions (regex) for log analysis. This allows it to efficiently identify complex patterns within log files, including IP addresses and timestamps. It also provides customization by supporting user-defined regex for unique log formats.When triggering a filter, Fail2Ban responds with predefined actions, such as blocking the offending IP address. This modular approach allows Fail2Ban to adapt to various services and efficiently protect against unauthorized access and attacks.In this guide, we’ll explain Fail2Ban and how it works under the hood. This information will help you confidently navigate the server configuration to modify and unban specific IP addresses.Fail2Ban continuously monitors specified log files to identify patterns that indicate potential attacks. Fail2Ban triggers automated responses to mitigate security risks when such patterns are detected. To allow an IP, add it to the ignoreip list in Fail2Ban’s configuration. In RunCloud, this can often be done through the web interface in the Fail2Ban or firewall settings.
- You can easily view and manage banned IPs
- Unbanning becomes a simple, one-click process
- Complex configurations are streamlined through an intuitive interface
Add your IP to the ignoreip list in the Fail2Ban configuration file (/etc/fail2ban/jail.local). In RunCloud, you can do this through the web interface in the Fail2Ban settings.Check the Fail2Ban status using sudo fail2ban-client status or look in the banned IP list in RunCloud’s Fail2Ban section. If you can’t access the server, your IP might be banned.I know what you’re thinking: “Ugh, sounds like a tech nightmare!” But hold your horses! We’re not just going to throw a bunch of command-line gibberish at you. Nope, we’ve got a secret weapon that’ll make managing Fail2Ban as easy as ordering pizza online.RunCloud provides a user-friendly interface that simplifies Fail2Ban management, making it accessible to users of all experience levels.
FAQs on Fail2Ban
How do I ignore my IP address in fail2ban?
Does a VPN bypass an IP ban?
Is Fail2ban an IPS or IDS?
How do I allow IP?
How do I know if my IP is banned with Fail2Ban?
What is the default block time for fail2ban?
sudo nano -l /etc/fail2ban/jail.local
- After opening the config file, you need to add the list of IP addresses to the ignoreip line. This will tell Fail2Ban to ignore these IP addresses in the future. By default, the 127.0.0.1/8 IP range is automatically whitelisted. If you want to add a specific IP, such as 192.168.1.100 then you can add this IP after it as shown below.
While Fail2Ban is a powerful tool, its complexity can be scary, especially for those new to server management. This is where RunCloud shines.


