October 12, 2020
Table of Contents
- 1
- 2 A guide to configuring a Global Server Load Balancer (GSLB) between an on premise NSX-T enabled datacenter and Amazon Web Services (AWS)
- 3 Configuring DNS and Virtual Services in NSX Advanced Load Balancer (NSX-ALB) for the GSLB Service
- 4 NSX Advanced Load Balancer – NSX-ALB: GSLB Service Configuration
- 5 Configuring MS DNS for Delegation to the NSX Advanced Load Balancer – NSX-ALB DNS Virtual Services
Multi-Cloud GSLB using NSX Advanced Load Balancer|LAB2PROD
A guide to configuring a Global Server Load Balancer (GSLB) between an on premise NSX-T enabled datacenter and Amazon Web Services (AWS)
A feature that was previously lacking in the NSX-T stack was the ability to properly perform DNS based load balancing, a feature that is extremely useful when an application spans multiple datacenters and requires load to be balanced across regions, especially when not running stretched layer 2 networks.
With the addition of NSX Advanced Load Balancer (NSX-ALB), formerly known as Avi Vantage, this is no longer the case. In this article I will go through the process of configuring the required components of NSX-T Datacenter, NSX-ALB, AWS and Microsoft DNS to be able to balance load across multiple regions.
Before getting started, it would make sense to describe the lab topology to make it easier to visualize. Below is a diagram of the layout.
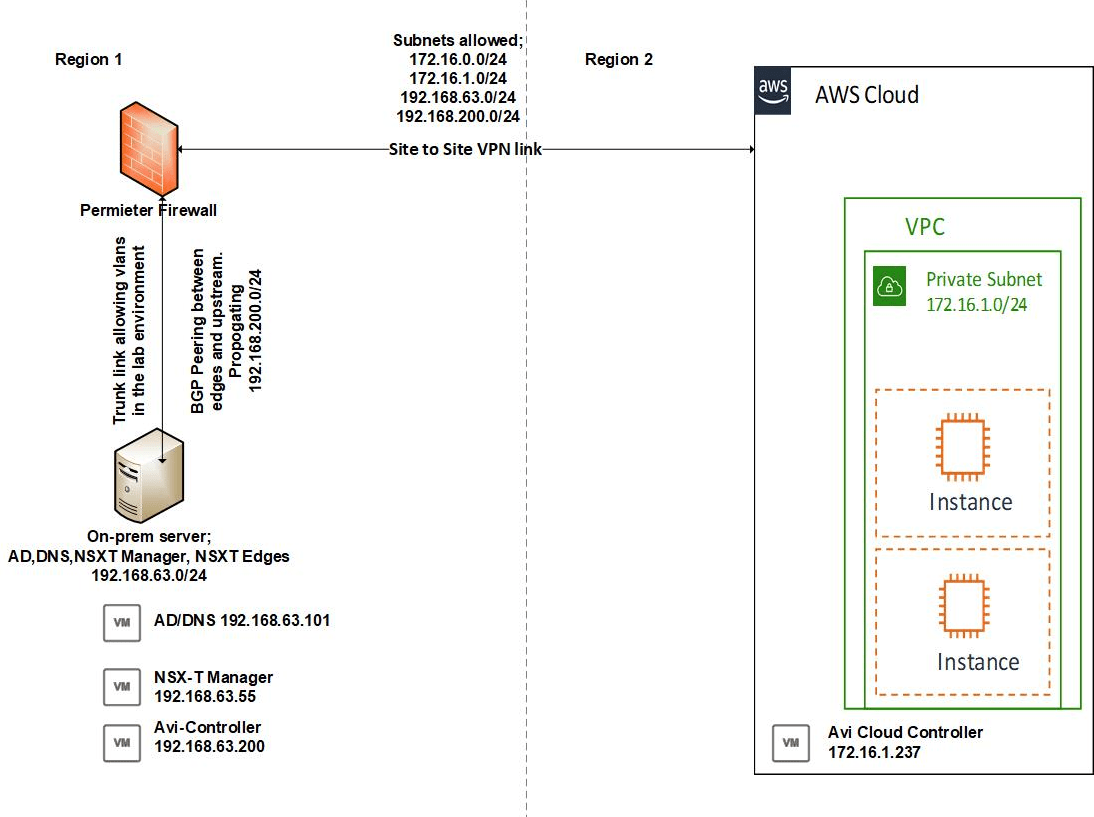
A quick overview;
- This lab is using a single Microsoft AD/DNS on a VM IP 192.168.63.101/24
- There is a single NSX-T Manager at IP 192.168.63.55
- There is an NSX-ALB/ Avi Vantage controller at IP 192.168.63.200 (on-prem) and one at 172.16.1.237 (AWS)
- There is a VPC private subnet in AWS with range 172.16.1.0/24, this is where all workloads and management appliances will sit (NSX-ALB/ Avi Vantage controller and service engines)
- The 192.168.63.0/24 on-prem subnet is used for all management interfaces
- The 192.168.200.0/24 network is an NSX-T overlay segment that is dynamically advertised to the upstream device using BGP and is where the on-prem virtual services and workload will sit
To begin first deploy two NSX-ALB/ Avi Vantage Controllers, this article does not walk through the process of deploying the NSX-ALB/ Avi Vantage Controllers, those details can be found in the below links;
Make sure you do not skip the step of configuring the T0, T1, segments with DHCP and route redistribution. It is good practice to have all the VIPs you anticipate creating on their on segment and workload on another, however this is not mandatory.
Next we will start configuring the NSX-ALB/ Avi Vantage Controllers, this includes DNS profiles, virtual services, service engines, service engine groups, pools and GSLB services.
Configuring DNS and Virtual Services in NSX Advanced Load Balancer (NSX-ALB) for the GSLB Service
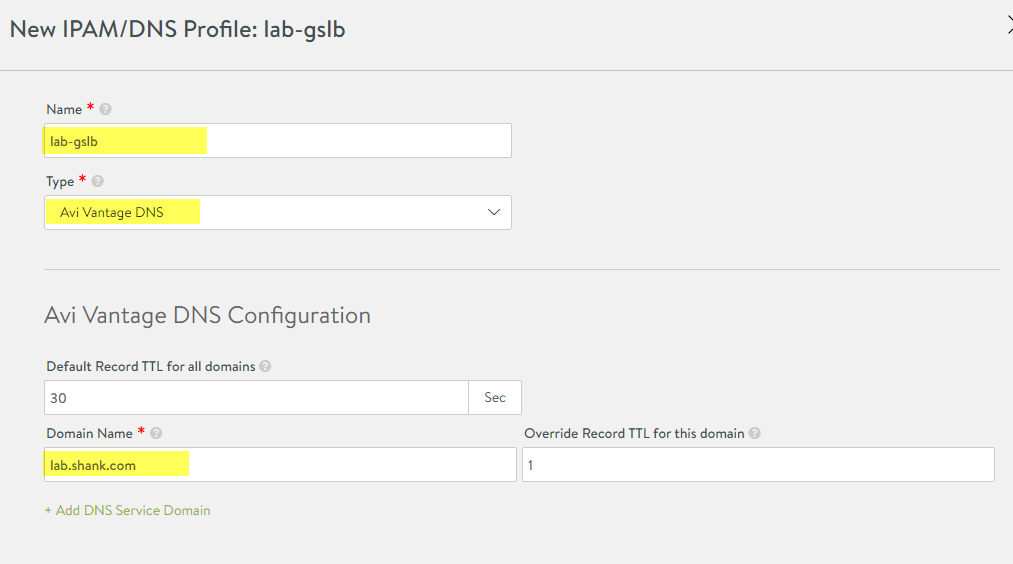
- Log in to the first controller, in my case it is 192.168.63.200 (avi-ctr01-.shank.com) and click on the 3 lines in the top left, then navigate to templates, and click on “IPAM/DNS Profiles” in the “Profiles” tab

- Click on “Create” in the top right, then “DNS Profile”, fill out the highlighted fields below changing them to suit your environment.
-
Next click on the 3 lines in the top left again and select “Applications”, we will be creating the first virtual service that will host the DNS service to respond to DNS queries.
-
Click on “Create Virtual Service” and then “Advanced setup”

-
If you followed the guides linked earlier to set up AWS and NSX-T integration you should now be presented with a choice of “Default-Cloud” and in my case “NSX Cloud” (this will vary depending on what you called it). Select your “NSX Cloud” and next.
-
The next two steps will walk through the initial page (Step 1: Settings) of the virtual service configuration

-
The second half of the settings page is below, these settings must be configured for the DNS Virtual Service that we are creating now.

-
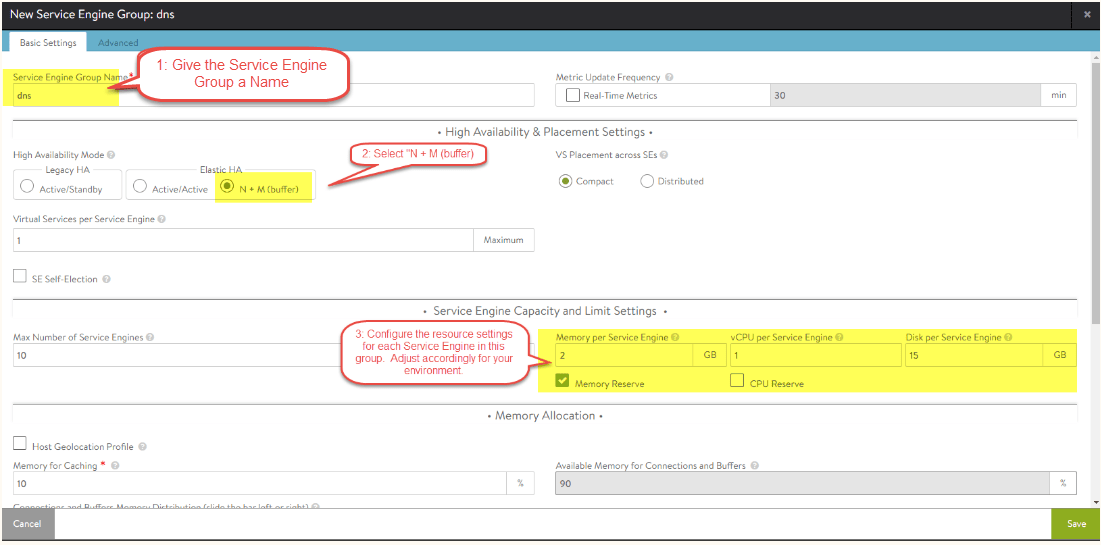
Continue clicking “Next” until you get to “Step 4: Advanced”, here the only setting that we will change is the “SE Group”, if you click on the drop down now you will notice you only have the option of the “Default” group. We will NOT be using this for our DNS virtual service. Select “Create SE Group”

-
There are a fair few settings on this page so please pay attention to the options being configured. The fields being edited in this page are based on minimal requirements and best practices. These configuration steps will be broken down into two 2 steps. On the basic settings page you must enter a “Service Engine Group Name”, if you wish you can select “Real Time Metrics”, more information regarding what each metric is for can be found here; Avi Vantage Analytics Overview. It is recommended that you do not share the Service Engine that the DNS virtual service runs on with other virtual services, I will show you how doing this can also cause false positives in a later step. Once complete, click on the “Advanced” tab.
-
On this page, the only setting I change is the one in the screen shot, which will result in the Service Engines that get deployed having “dns” prefixed to their name. Click save and finish up the Service Engine Group creation.

-
Once you are back in the “New Virtual Service” creation page, the “Service Engine Group” you just created will be populated in the “SE Group” field. Click “Next” and then “Save”
-
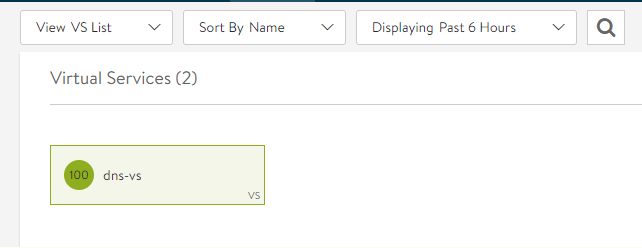
Once the service engines have deployed and communicated back to the controller to get their config, the virtual service status should be green like below. Checking the Service Engines in vCenter is also good to do at this point.
-
Next we create another virtual service or (VIP) for the web servers in this datacenter that will be load balanced. The steps will be similar to the previous steps, changing the name to reflect the use-case, eg. web. Also there is no need to change the service port, in my case I will be balancing across two web servers on port 80. This may be different for your use case.
-
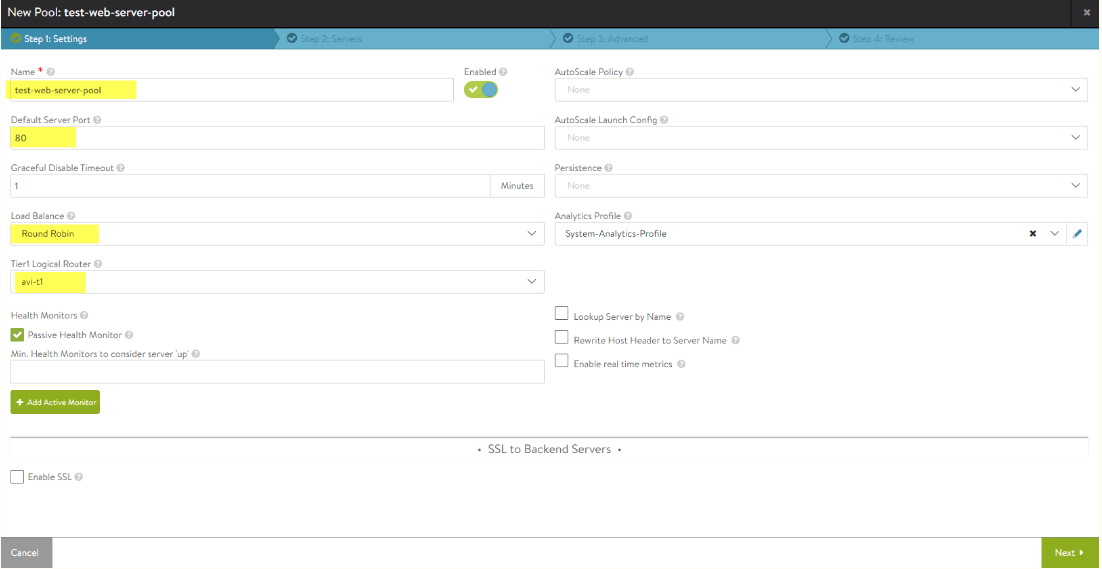
We do however need to create a pool, this will be a pool of web servers with which the load will be balanced across. To do this on the first page of creating the virtual service, click the drop down menu under pool and create new.

-
The next two steps will walk through creating the pool for the web server pool, the settings in the screenshot below reflect the requirements for my environment, replace the values with what is required in your environment. Once this part is completed, click on next.
-
On the next page “Step 2: Servers”, is where you define which servers will be part of this pool, there are a few ways to define them, in this case I am using their IP address. Click save and complete the virtual service creation wizard, keeping all remaining options as default.
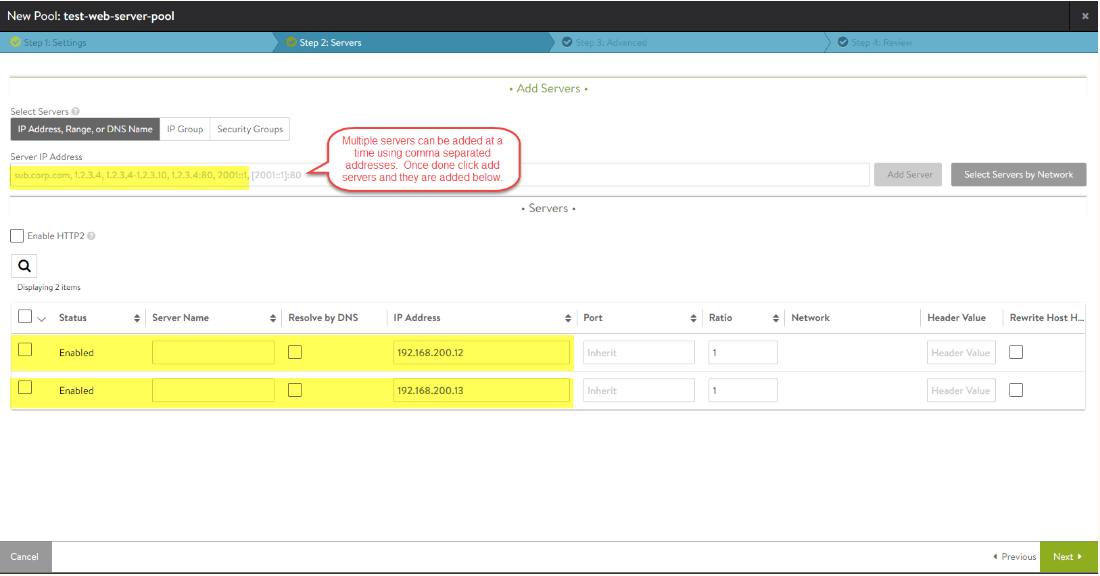
-
The summary of settings you require for the web server virtual service (or whatever type of pool you are creating, the port may need to change in your environment) are;

-
You should now have 2 virtual services configured and in a healthy state.

-
Repeat steps 1 through 17 for the second region or site, if all went well you should have two virtual services created in either site, 2 service engine groups and both should have their DNS services configured.
NSX Advanced Load Balancer – NSX-ALB: GSLB Service Configuration
The GSLB service operates by first linking both regions together, that is the NSX-T on-prem Datacenter and AWS. One of the sites NSX-ALB/ Avi Vantage Controller clusters will have to be the leader and the other will be the follower. All configuration for the GSLB service will be configured on the leader, if required the leader can be failed over to the other site. Once the sites have been linked and the GSLB service has been properly configured, the leader replicates data to the follower so they remain in sync. Later in this post we will cover checking the DNS service across each controller and ensuring load is being balanced across all available servers.
- Use the 3 lines in the top right and navigate to Infrastructure, GSLB and then Site Configuration, select Add New Site. Here you will first associate the leader controller. As can be seen in the below picture.
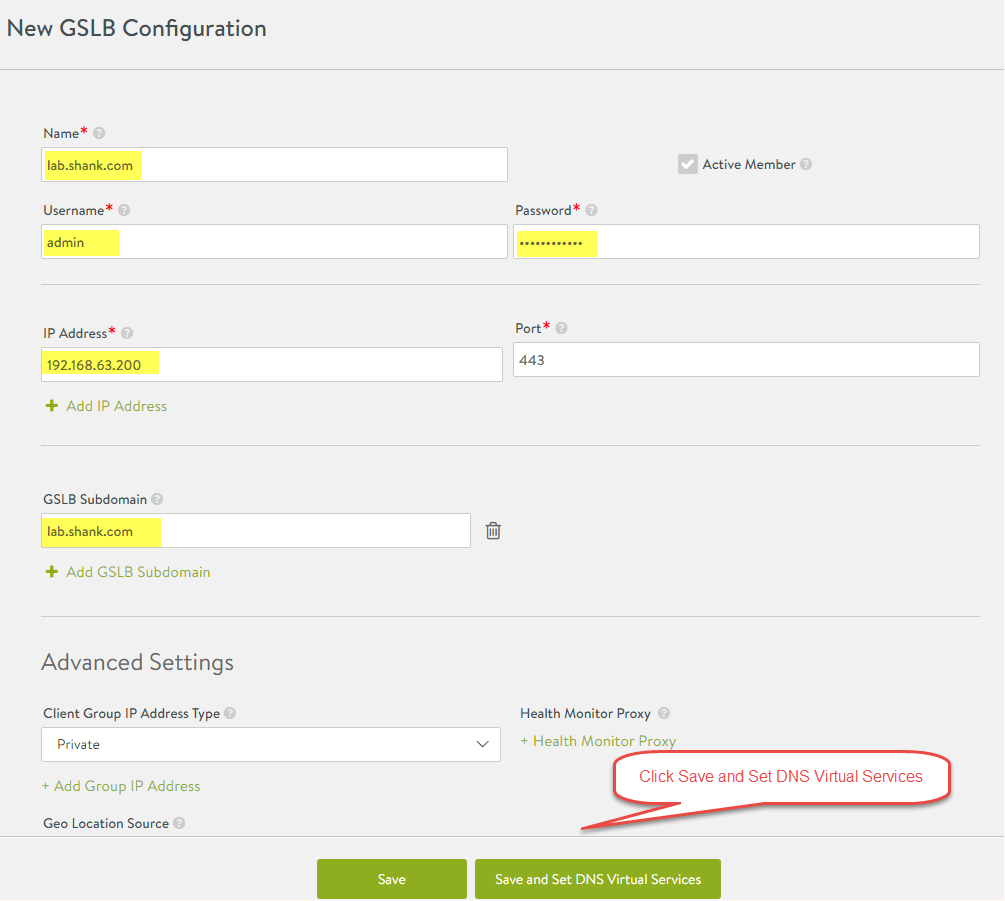
- Configure the DNS Virtual Service settings as below, clicking save once complete

- Repeat the above two steps to add the secondary region, in this case the AWS controller cluster. Once this process is complete both sites should be available and have a green status symbol. When configuring the second controller, there will be a check box called “Active Member” select this and it will then give you the ability to create the DNS Virtual Services for your second region.

-
Now go to Applications, GSLB Services, click on Create and Advanced Setup. Here we are creating the actual GSLB service, that is the DNS name to which clients will be resolving and then being redirected to a backend pool member. Change the settings in the screenshot to values relevant to your environment. First we define the service name and in the next step we will create and associate the pools.
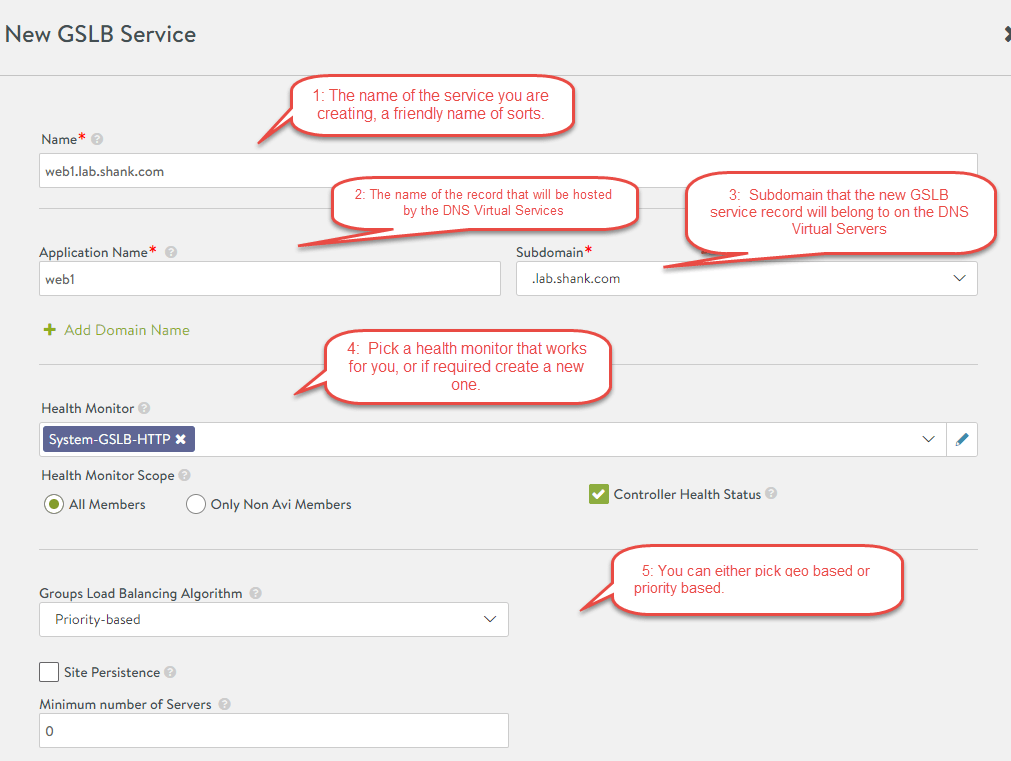
-
Scroll down till you see GSLB Pool and then click on Add Pool, once again match the settings to your requirements. Once this section is completed, scroll down and you will find another “Add GSLB Pool Member”. Select this and fill out the details for the second region. Make sure you do NOT set the virtual service as the DNS virtual service, you are mapping the second server pool that you created. Click Done and then Save on the next window.
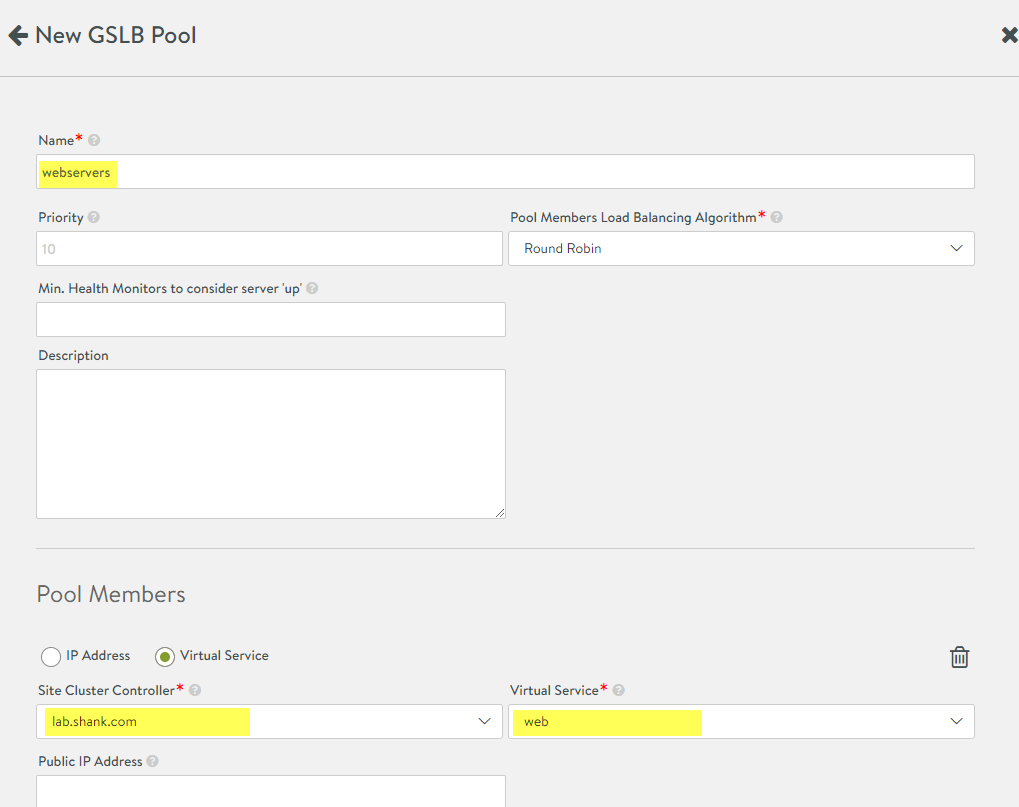
- In my case I can now see web1.lab.shank.com, click on your GSLB service and you should be able to check the site status. If you recall earlier when I mentioned that having a single Service Engine doing both DNS and your typical load balancing caused red herring errors, the below picture reflects this. The reason this occurs, from what I gather is because the same service engine group is hosting the DNS service it has troubles resolving itself. This is why I figure it is best practice to have the DNS service hosted on its on virtual service

-
I have noticed that sometimes regardless of having the DNS virtual service separate it still does not go green and changing the health monitor around can sometimes work. Keeping in mind the overall status and GSLB service is still up and functioning with the red status symbols.

Configuring MS DNS for Delegation to the NSX Advanced Load Balancer – NSX-ALB DNS Virtual Services
In order for DNS queries for *.lab.shank.com to be resolved by the DNS Virtual Services both on-prem and in AWS, we need to create a delegation and let MS DNS where to send those queries.
Lets start by verifying the application can be resolved and the webpages load, in order to show that different VIPs are being resolved upon each refresh, I have installed a chrome extension called Website IP. This extension shows the IP address of the page that you are viewing in the bottom right.
Test1: Loading the URL site.lab.shank.com
For the first test I will resolve the NSX-ALB GLSB service site.lab.shank.com that I created earlier in this article. This will demonstrate that the client (my browser), sends a DNS query to my domain controller, which then forwards the request to one of the DNS Virtual services we created in NSX-ALB/ Avi Vantage.
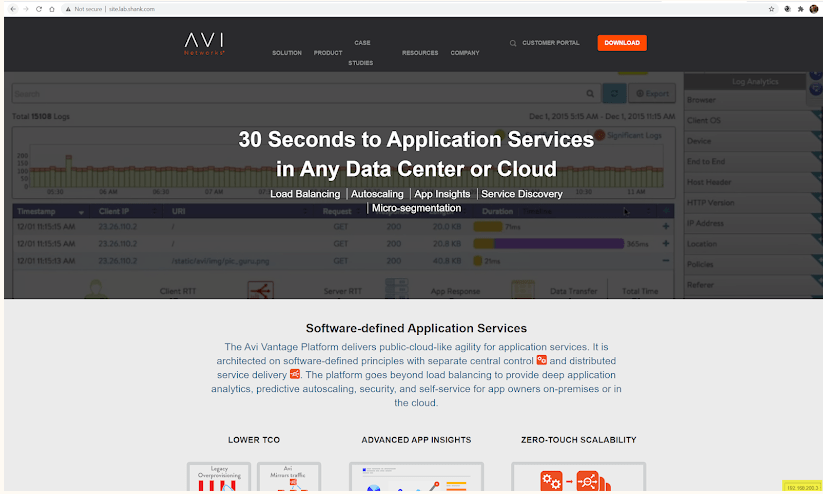
So on the first attempt you can see that the query was forwarded and resolved by the VIP 192.168.200.3, and this is the on-prem VIP. Let’s test again to see if we get the AWS VIP.
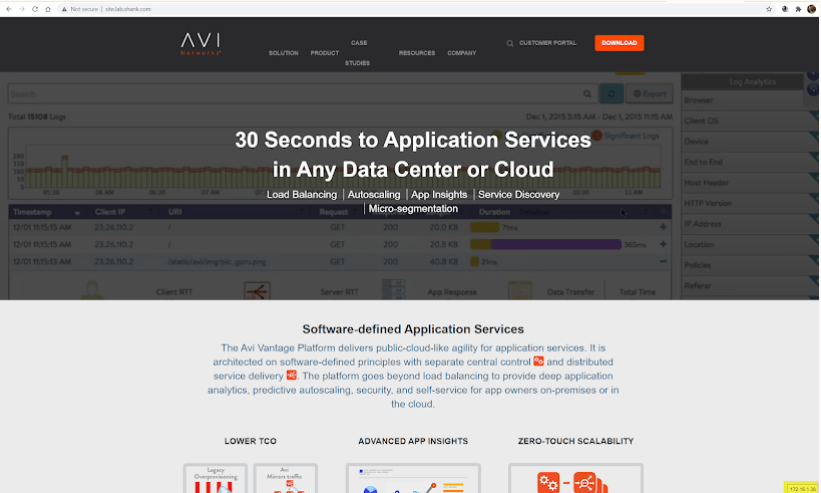
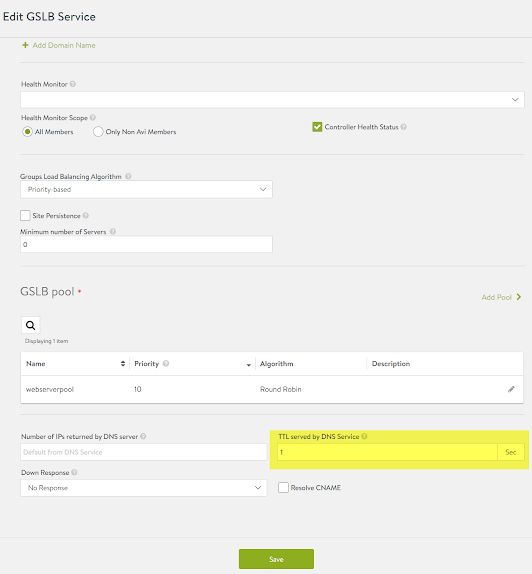
In the above screenshot we can see the IP address that was hit was 172.16.1.36, which is the AWS VIP that was created. You may notice in your tests that you rarely if ever get redirect to the second VIP, this may mean you have to adjust your DNS service TTL’s in NSX-ALB/ Avi Vantage GSLB service configuration. For my testing purposes I dropped the TTL to 1 as can be seen in the image below.
Test 2: Client NSlookups
In these tests I will be performing NSlookups from my Windows 10 client to site.lab.shank.com to show round robin working.
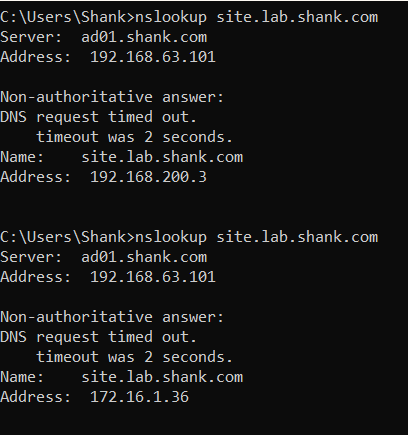
The above output from command prompt shows nslookup being run twice, one right after the other. The result shows that first the on-prem VIP is hit and then second is the AWS VIP.
Test 3: Checking DNS records on the DNS Virtual Services

Verifying Traffic in the Management Console
Log into the NSX-ALB/ Avi Vantage management console, you can do this by browsing to https://aviControllerFDQN. I like to log into both controllers so I can see traffic being hit at both sites.
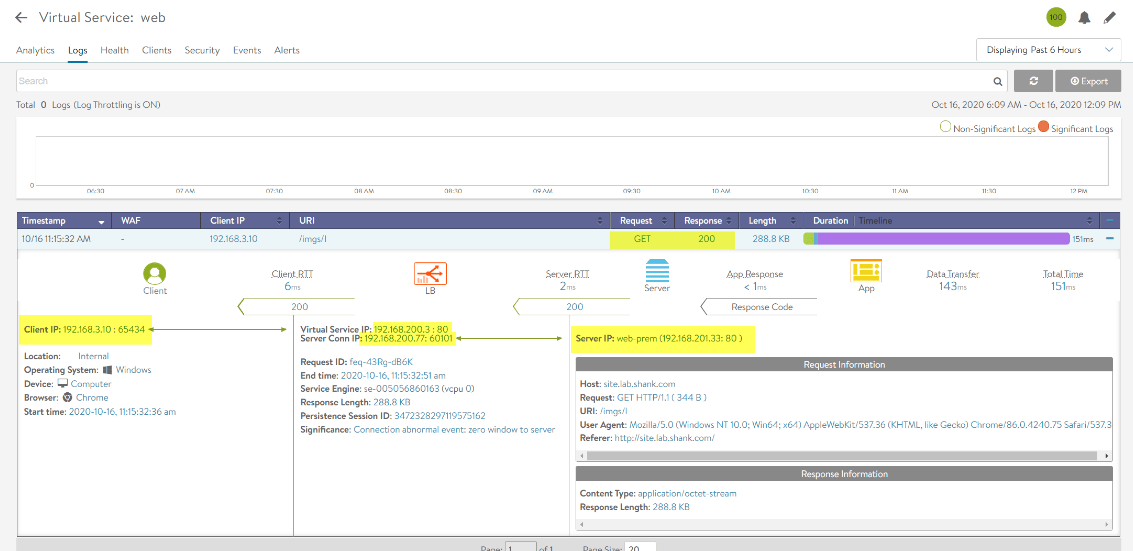
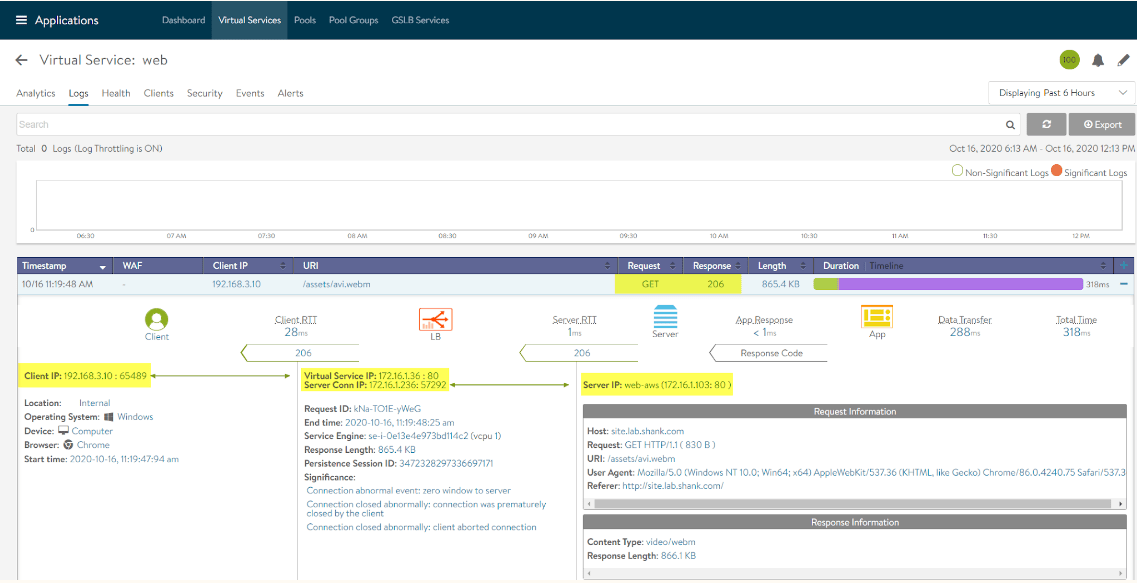
Once logged in, navigate to Application > Virtual Services and then select the server pool virtual service and not the DNS virtual service. From here you can click on logs and then you will be able to see the hits on the VIP, the queries and the responses.
The below screen shot is from the on-prem controller and the highlighted sections show the details pertaining to the first test we did.
Below is a screen shot of the AWS VIP being hit.
Conclusion
So by now you should be somewhat familiar with the process of deploying NSX-ALB/ Avi Vantage, integrating it with NSX-T Datacenter and AWS. Keep in mind the second region can be another NSX-T cloud or on-prem cloud, such as a vSphere environment.
We have also walked through creating and assigning DNS templates for use with the GSLB service, creating Virtual Services, both for DNS name resolution and standard server load balancing and finally creating the GSLB service for load balancing across two regions. If you have any questions or require anything clarified further, feel free to leave a comment!


