After deploying the application you will need to download the NextCloud installation file to your server. There are two ways to do this.cd <path to root>
wget https://download.nextcloud.com/server/installer/setup-nextcloud.php
Table of Contents
- 1 Prerequisites
- 2 2. Prepare NextCloud Installer
- 3 3. Run NextCloud Installer
- 4 4. Configure NextCloud
- 5 5. Troubleshooting NextCloud
- 6 Summary
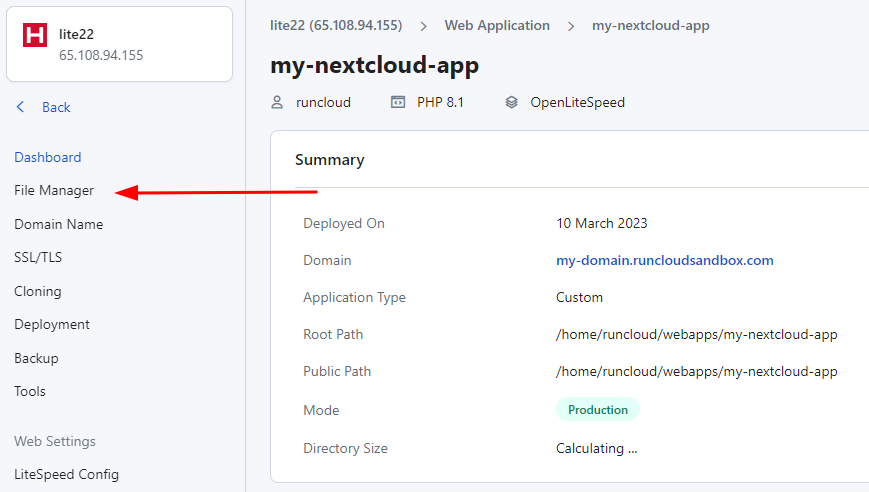
2.2 Using RunCloud File Manager
If you are getting the WebDAV interface seems to be broken error in your Nextcloud installation then you will need to tweak your server settings to fix this error. The exact steps vary for different tech stacks on RunCloud. You can find your application stack under the “Web Application Stack” section on the Settings page for your application.
Prerequisites
location ~ /.well-known {

try_files $uri @proxy;

}
After preparing your NextCloud installer, open the URL of your website in a web browser. By default you will see the “Welcome to RunCloud” message present in the index.html file. Go to the address bar of your browser and append /setup-nextcloud.php to the end of the URL.
If you are comfortable with SSH then you can run the following commands to download the installation file to your website’s root directory. Don’t forget to update the path to your web application’s root directory (displayed in RunCloud dashboard).
For example, if your website is located at www.example.com, you need to go to www.example.com/setup-nextcloud.php to start the installation.
2. Prepare NextCloud Installer
NextCloud is a self-hosted productivity platform that offers industry-leading, on-premise content collaboration functionality.
2.1 Using SSH
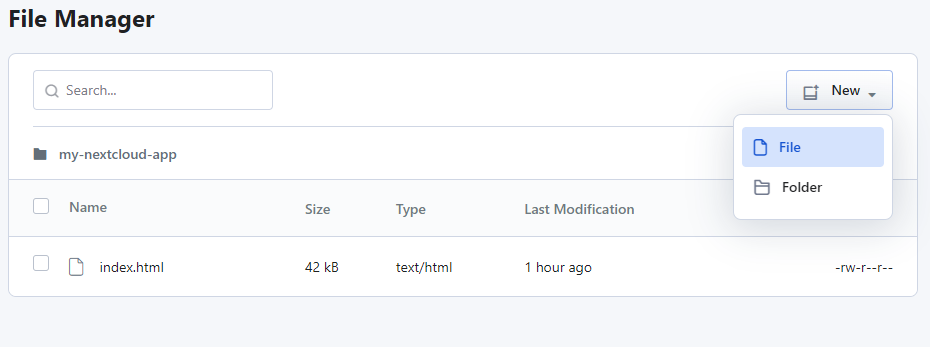
Once you have opened the file manager, you should only see one file – index.html. Click on “New” and create a new file with the name setup-nextcloud.php.Add the Redis Configuration: Add the following lines inside the main configuration array (not at the end of the file). Make sure the syntax is correct PHP. The location within the array doesn’t matter as long as it’s within the main $CONFIG = array ( ... ); block.
Ideally, you should see the green “All check passed” in the security and setup warning section. However, after installing NextCloud it is possible that you might see messages in any of three different colors:In this post, we will show you exactly how to install NextCloud using RunCloud.
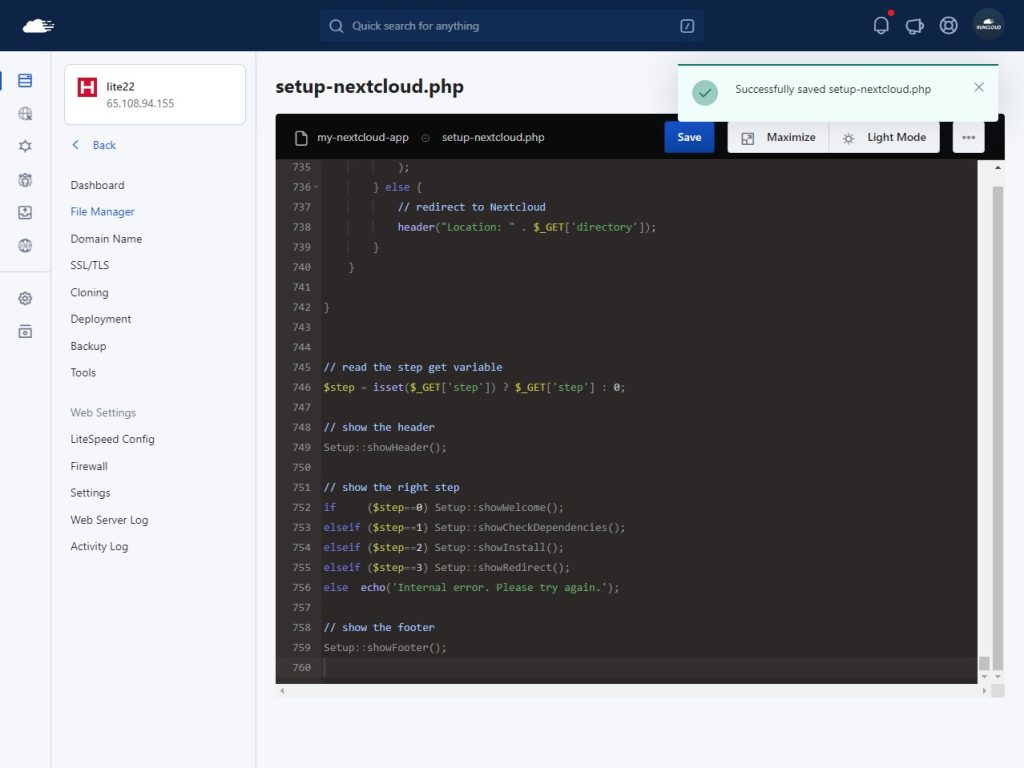
Download the installation file from https://download.nextcloud.com/server/installer/setup-nextcloud.php and open it in any text editor such as Notepad or VS Code. Press Ctrl + a to select all of the text, and Ctrl + c to copy it.Now go back to the RunCloud file editor and paste the text using Ctrl + v. Make sure to save the file afterwards.
3. Run NextCloud Installer
'memcache.local' => 'OCMemcacheRedis',

  'memcache.distributed' => 'OCMemcacheRedis',

  'memcache.locking' => 'OCMemcacheRedis',

    'redis' => [

    'host' => '127.0.0.1',

    'port' => 6379,

    'password' => 'your_runcloud_redis_password'

  ],
try_files $uri $uri/ /index.php$request_uri;
NextCloud requires a number of PHP functions to run properly. If there are any unavailable PHP functions, you will probably see this warning message.
After installation, you will be asked if you want to install the recommended apps. You can skip this step if you wish, and install any apps at a later time from the dashboard.
If you chose Option A (Default User):

4. Configure NextCloud
NextCloud uses Imagick for the preview generation process. When Imagick is not available, you will see a warning message in NextCloud’s automated checks.NextCloud is an open source file manager that provides many additional features such as calendar management and file sharing. If you want to run your own version of Dropbox or Google Drive on your server for your own team or business, NextCloud is a great solution, allowing you to share and collaborate on documents, and have video chats without potential data leaks.
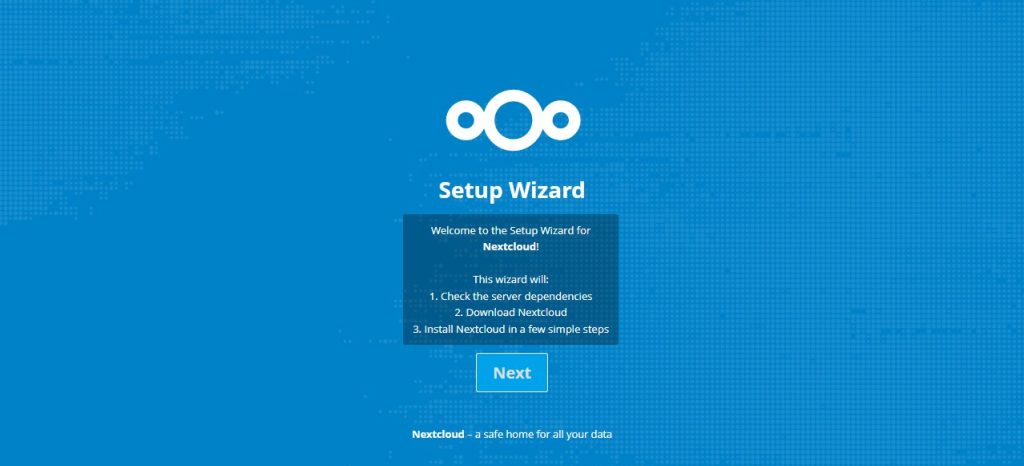
It’s an alternative to Dropbox or Google Drive, but with the advantage that it can be installed on your own server, ensuring that your data remains under your control.If you followed the steps correctly, you will be greeted with the following screen. Click on “Next” to move forward with the installation.
Once there, pick the third option to enable the policy, and click “Update” to save the changes.
5. Troubleshooting NextCloud
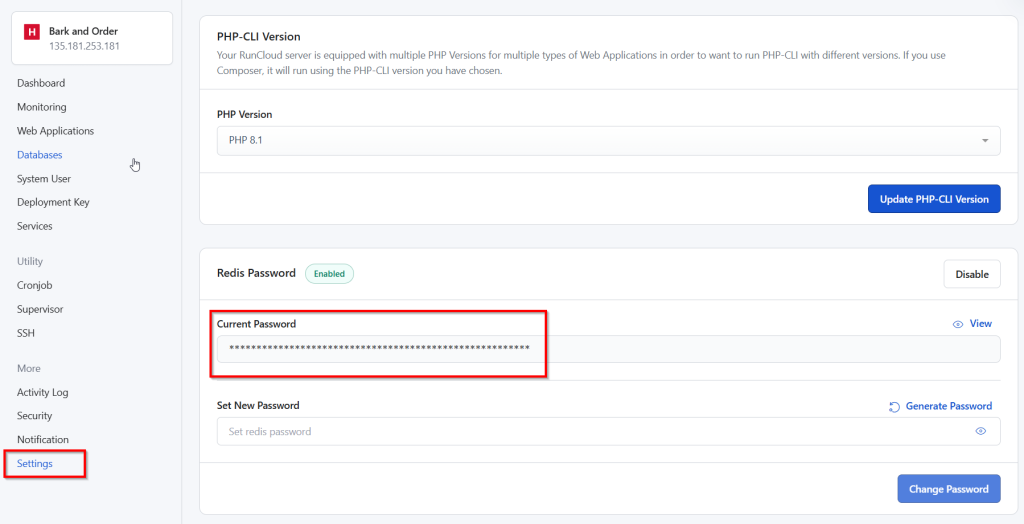
Step 3: Using the RunCloud Default Redis User (Option A)Retrieve the Default Password: You’ll need the default Redis password set by RunCloud. Go to your Server, click Settings, scroll down to the Redis Password tab, and copy the password from the Current Password field.
Create the User: After this, use the ACL SETUSER command provided below to create a new user with the correct permissions. Make sure to replace nextcloud_redis_user and your_secure_password with your desired username and a strong password.
- red (error)
- yellow (warning)
- black (notice)
If you are using containerised Docker servers on RunCloud to run your Nextcloud installation, then you will need to create custom Nginx config to redirect web requests. The steps for creating the custom configuration for this stack are similar to the native Nginx stack on RunCloud (as described above), but there is one key distinction.
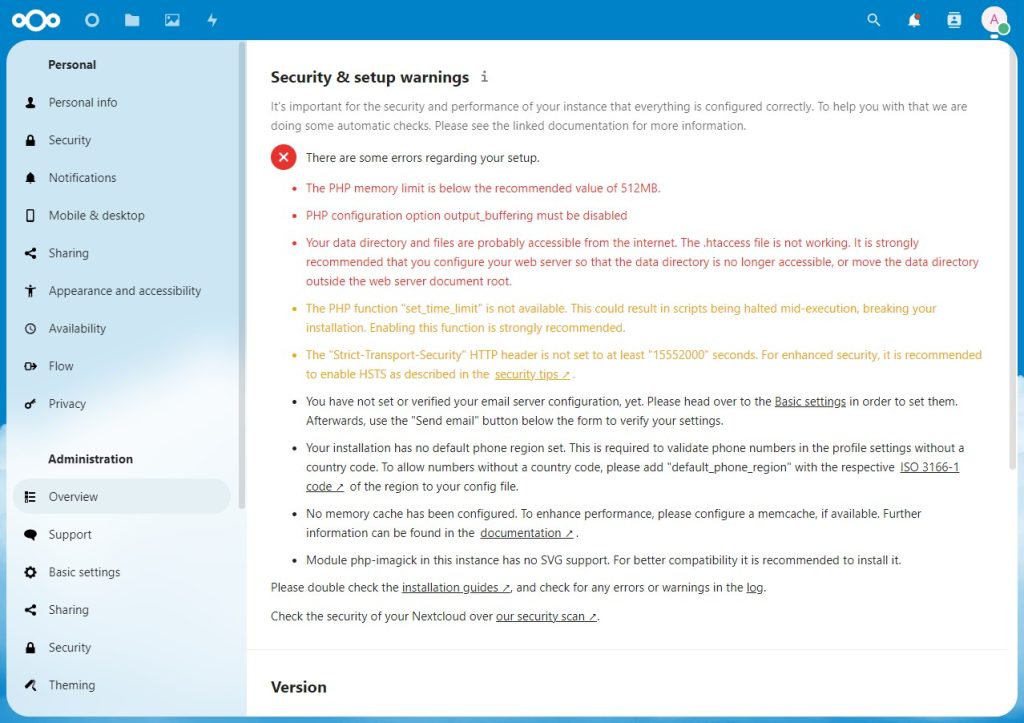
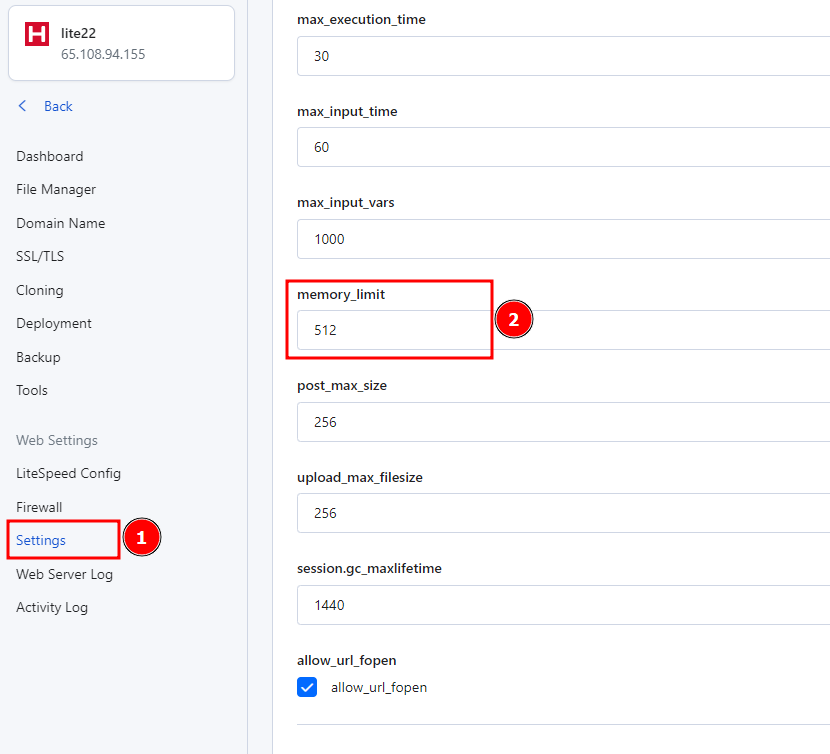
5.1 Fixing “PHP Memory Limit Is Below The Recommended Value”
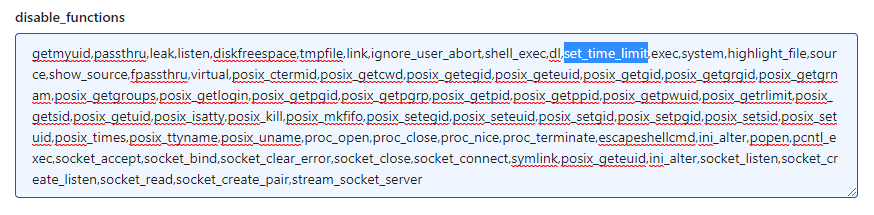
If you see the message that the PHP function set_time_limit is not available, this could result in scripts being halted mid-execution, breaking your installation. Therefore, enabling this function is strongly recommended.
5.2 Warning – PHP Function is Not Available
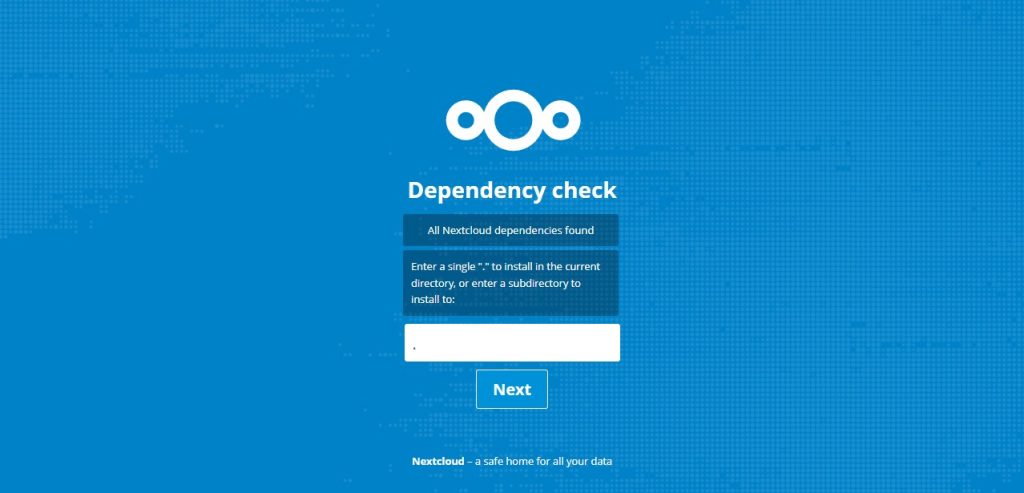
Before we proceed further, you should note that this step is optional. Once you have the master password for your Redis server (as explained in step 3), you can use it to connect your Nextcloud instance to Redis. However, advanced users should consider creating a separate user account for Nextcloud using the following steps:On the next screen you will be asked to specify the installation directory of your web application. Enter a single full stop to install the setup in the current location – i.e., where we added the “setup-nextcloud.php” file. This can be easily fixed in the RunCloud dashboard. Go to “Settings” and scroll down to the PHP settings section. You will see the option to modify the memory limit. Update the value, and save the changes.
set_time_limitignore_user_abortposix_getuidposix_getpwuid
To fix this issue, go to the RunCloud dashboard panel, select your server, click the Web Application menu, select your web application, and then click the “Settings” menu of this web app. Scroll to find the disable_functions option and remove the following functions from the text:
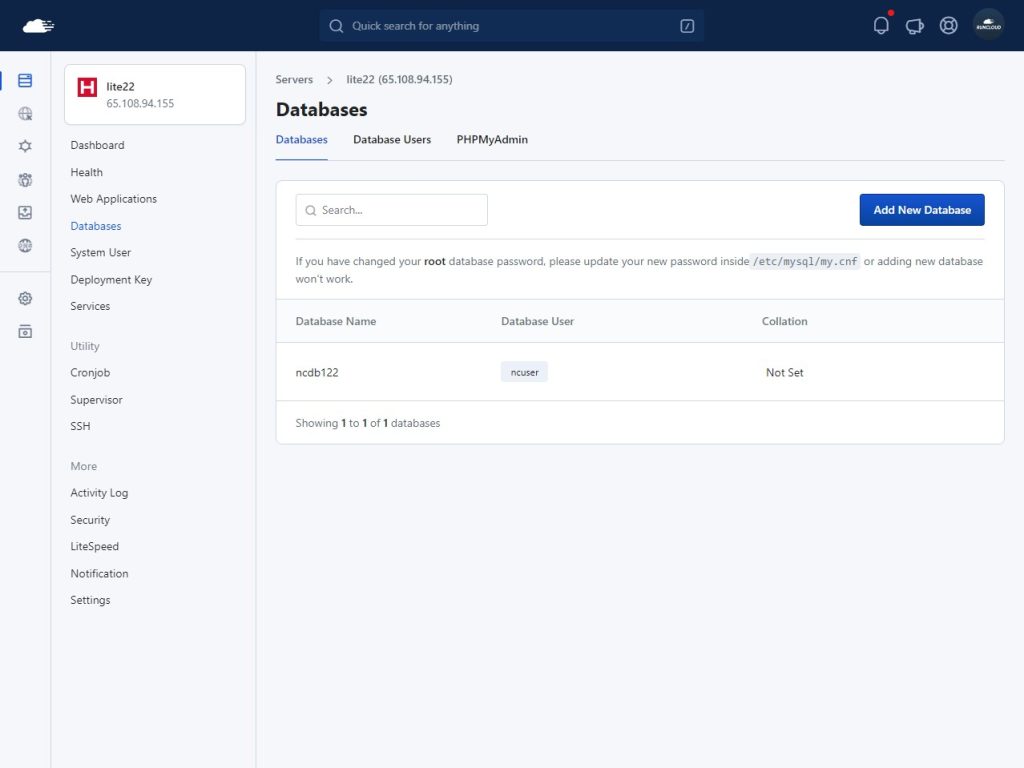
First, go to the RunCloud dashboard and create a new database user. After you have done this, create a new database and grant its access to the user that you just created. Once you have created the database, it should look like this:
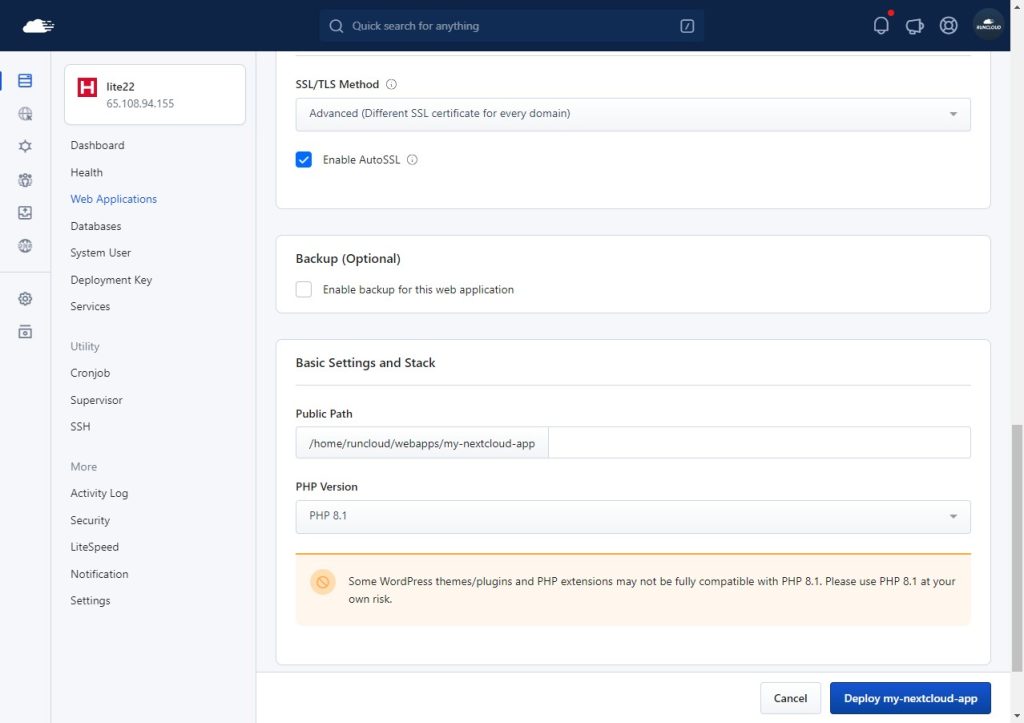
Next, select PHP version 8.1 and click “Deploy” to create the web application.
5.4 Configure Redis Memory Cache (with Enhanced Security)
Log in to your Nextcloud admin interface. Go to Administration settings -> Security & setup warnings. The warning about missing memcache should be gone.Step 5: Configure Nextcloud (config.php)After creating the database, return to the NextCloud installation and enter the login credentials of your administrator account. If you don’t want to use the default path to store data then you can change that as well.
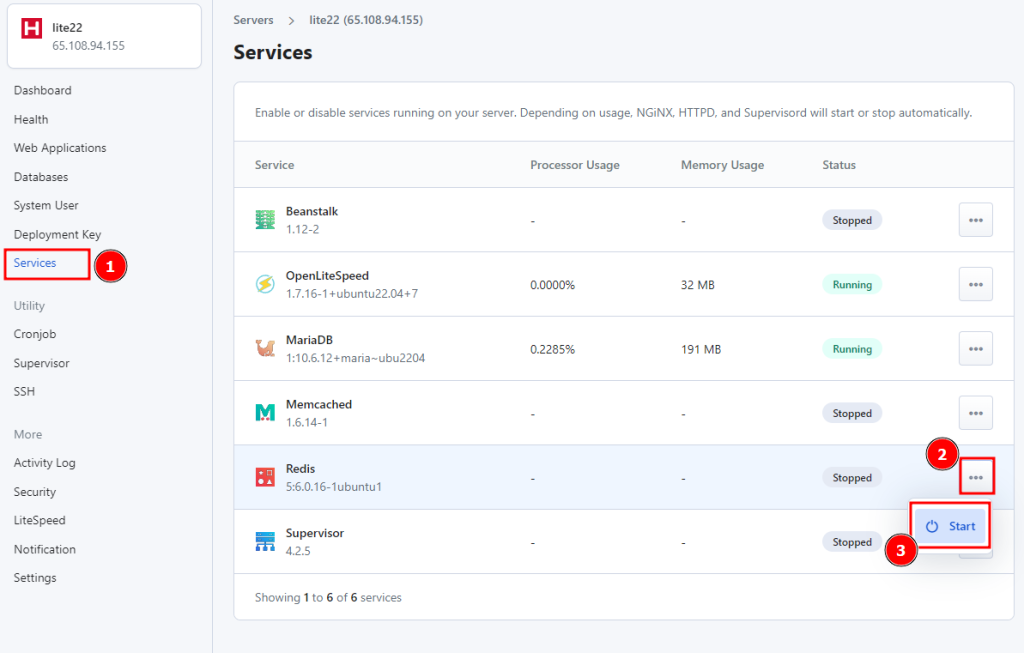
- Log in to your RunCloud dashboard and select the server where your Nextcloud instance is running.
- Navigate to the Services section.
- Locate the Redis service. If it’s not already running, start it. RunCloud pre-installs Redis, so you generally only need to enable it.
RunCloud sets a default Redis password for the default user. You have two primary options:Memory caching can significantly improve your Nextcloud server performance, as frequently requested objects are stored for faster retrieval. While Nextcloud displays a warning if a local memcache isn’t configured, it’s not strictly required. However, using a memcache is highly recommended for optimal performance.
- Option A (Simpler): Use the RunCloud Default Redis User: This is the easiest approach but less granular. You’ll use the existing default user and its password.
- Option B (More Secure): Create a Dedicated Nextcloud Redis User: This is the best security practice. You’ll create a new Redis user with specific permissions tailored only for Nextcloud, minimizing the risk of unauthorized access.
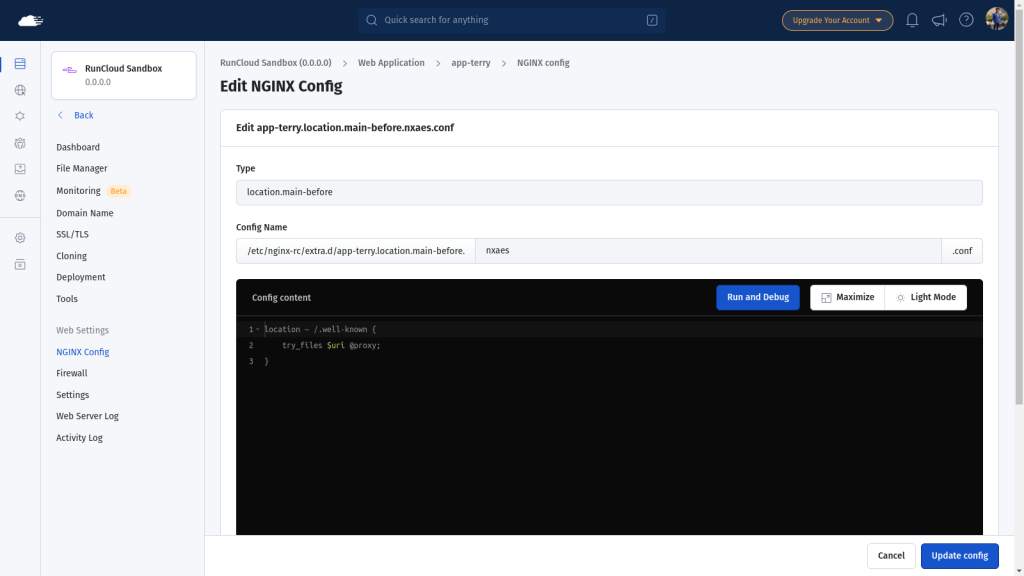
If you are using the native Nginx stack, then you will need to create a custom Nginx configuration file for your Nextcloud application. When creating the config, make sure to select the type as location.main-before and give it a descriptive name. Next, paste the following code snippet in the provided text box as shown below:
## Command to connect to Redis CLI

redis-cli -h 127.0.0.1 -p 6379 -a "your_runcloud_redis_password"
When editing the fastcgi_pass unix:/var/run/<appname>.sock; line in your configuration, you will need to replace it with fastcgi_pass unix:/var/run/php/<appname>.sock;. After replacing the line, you can modify it to update <appname> with the name of your application and continue with the rest of the process. RunCloud is a server management platform that makes it easy to manage and optimize your servers with an easy to use graphical user interface. Sign up for RunCloud today and see how it can save you time and money.You will need a server that meets NextCloud’s system requirements. When you connect your server to RunCloud, it automatically installs all necessary dependencies, and updates them. If you have an existing server connected to RunCloud, you can use that as well – as long as it has the necessary capacity to handle additional load.

Step 2: Choose Your Redis Authentication Strategy Connect to Redis via SSH: Connect to your server via SSH and use the following redis-cli to connect to your local Redis instance:
+@all: Grants both read and write access to your database.-@dangerous: Denies dangerous commands that could harm your Redis instance.
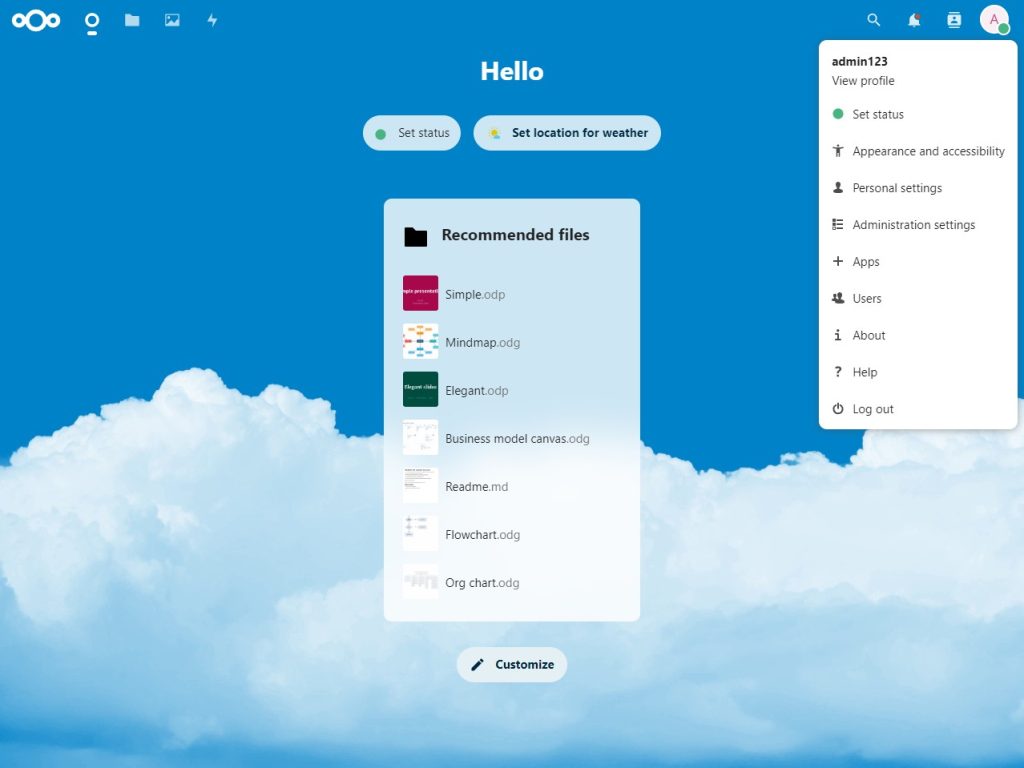
After installation, you will need to tweak a few settings to properly secure your server. Click on the user icon in the top right corner of your screen, and navigate to “Administration Settings”.## Create user in Redis without Dangerous permissions
ACL SETUSER nextcloud_redis_user >your_secure_password on ~* +@all -@dangerous
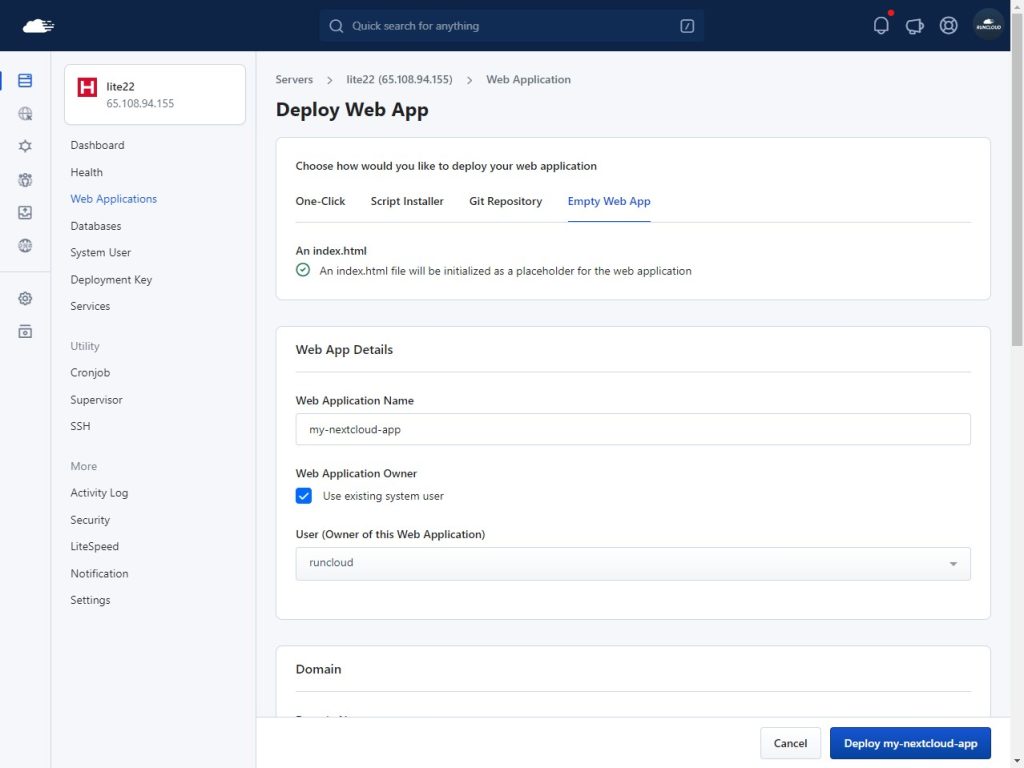
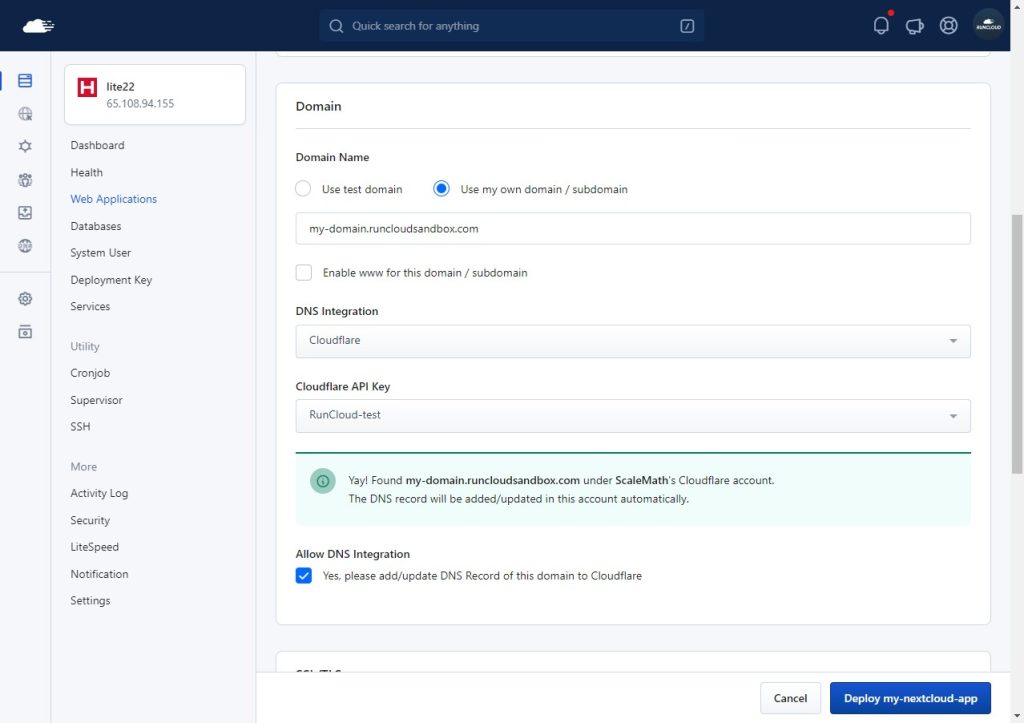
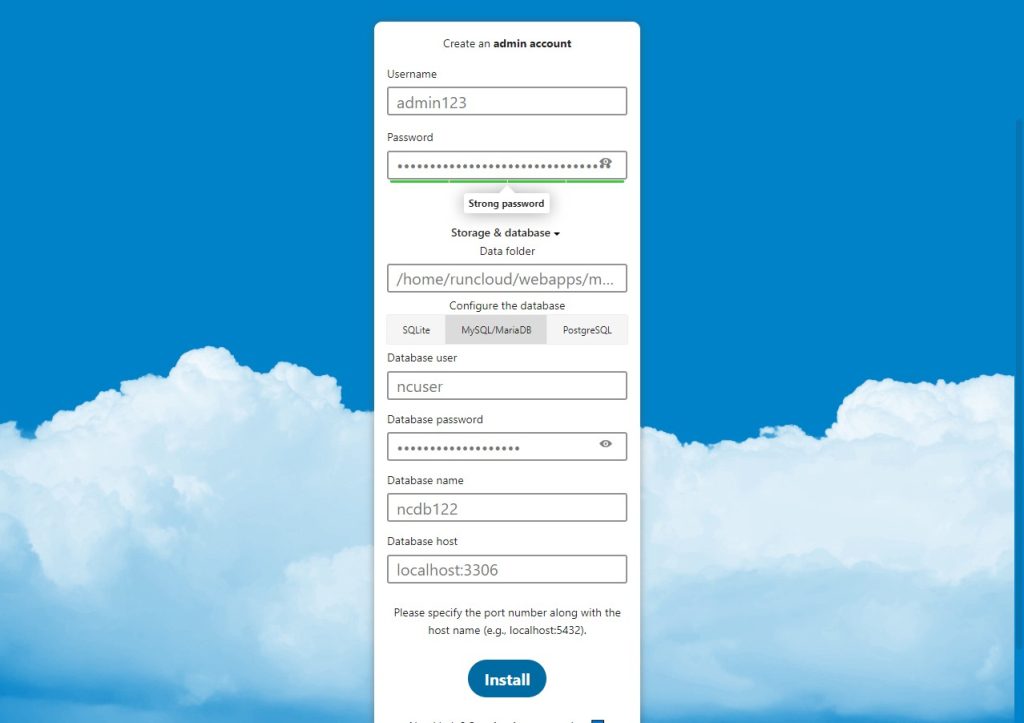
Go to your RunCloud dashboard and click “Deploy New Web App”. Next, switch to the “Empty Web App” tab and give your application a descriptive name.Finally, make sure to switch to the MySQL/MariaDB tab and enter the details of the new database and user that you created in the last step. Update the database host to localhost:3306 and click “Install”. If you are using a containerised server, then you will need to enter host:3306 instead; refer to our docs on networking in containerised servers on RunCloud for more information. You can use NextCloud to share and collaborate on documents, send and receive emails, manage your calendar, and have video chats – all without any possibility of data leaks.Imagick is optional – it’s not required, and you may safely ignore the warning if only a few users are using your NextCloud server. If you want to enable it, read our quick guide on how to install Imagick (ImageMagick PHP Extension) in RunCloud.For “Domain name“, you can either use your own domain name or use RunCloud’s test domain. If you are using RunCloud’s Cloudflare integration, RunCloud will automatically create the necessary DNS records for your domain.
5.5. Enable Imagick (ImageMagick PHP Extension)
index index.php index.html /index.php$request_uri;

location = / {

if ( $http_user_agent ~ ^DavClnt ) {

return 302 /remote.php/webdav/$is_args$args;

}

}
location = /robots.txt {
allow all;
log_not_found off;
access_log off;
}
# Make a regex exception for `/.well-known` so that clients can still
# access it despite the existence of the regex rule
# `location ~ /(.|autotest|...)` which would otherwise handle requests
# for `/.well-known`.
location ^~ /.well-known {
# The rules in this block are an adaptation of the rules
# in `.htaccess` that concern `/.well-known`.
location = /.well-known/carddav { return 301 /remote.php/dav/; }
location = /.well-known/caldav { return 301 /remote.php/dav/; }
location /.well-known/acme-challenge { try_files $uri $uri/ =404; }
location /.well-known/pki-validation { try_files $uri $uri/ =404; }
# Let Nextcloud's API for `/.well-known` URIs handle all other
# requests by passing them to the front-end controller.
return 301 /index.php$request_uri;
}
# Rules borrowed from `.htaccess` to hide certain paths from clients
location ~ ^/(?:build|tests|config|lib|3rdparty|templates|data)(?:$|/) { return 404; }
location ~ ^/(?:.|autotest|occ|issue|indie|db_|console) { return 404; }
# Ensure this block, which passes PHP files to the PHP process, is above the blocks
# which handle static assets (as seen below). If this block is not declared first,
# then Nginx will encounter an infinite rewriting loop when it prepends `/index.php`
# to the URI, resulting in a HTTP 500 error response.
location ~ .php(?:$|/) {
# Required for legacy support
rewrite ^/(?!index|remote|public|cron|core/ajax/update|status|ocs/v[12]|updater/.+|ocs-provider/.+|.+/richdocumentscode(_arm64)?/proxy) /index.php$request_uri;
fastcgi_split_path_info ^(.+?.php)(/.*)$;
set $path_info $fastcgi_path_info;
try_files $fastcgi_script_name =404;
include fastcgi_params;
fastcgi_param SCRIPT_FILENAME $document_root$fastcgi_script_name;
fastcgi_param PATH_INFO $path_info;
fastcgi_param HTTPS on;
fastcgi_param modHeadersAvailable true; # Avoid sending the security headers twice
fastcgi_param front_controller_active true; # Enable pretty urls
fastcgi_pass unix:/var/run/<appname>.sock;
fastcgi_intercept_errors on;
fastcgi_request_buffering off;
fastcgi_max_temp_file_size 0;
}
# Serve static files
location ~ .(?:css|js|mjs|svg|gif|png|jpg|ico|wasm|tflite|map|ogg|flac)$ {
try_files $uri /index.php$request_uri;
# HTTP response headers borrowed from Nextcloud `.htaccess`
add_header Cache-Control "public, max-age=15778463,asset_immutable";
add_header Referrer-Policy "no-referrer" always;
add_header X-Content-Type-Options "nosniff" always;
add_header X-Frame-Options "SAMEORIGIN" always;
add_header X-Permitted-Cross-Domain-Policies "none" always;
add_header X-Robots-Tag "noindex, nofollow" always;
add_header X-XSS-Protection "1; mode=block" always;
access_log off; # Optional: Don't log access to assets
}
location ~ .woff2?$ {
try_files $uri /index.php$request_uri;
expires 7d; # Cache-Control policy borrowed from `.htaccess`
access_log off; # Optional: Don't log access to assets
}
# Rule borrowed from `.htaccess`
location /remote {
return 301 /remote.php$request_uri;
}
# location / {
# try_files $uri $uri/ /index.php$request_uri;
# }
After you have configured the directory, the installation will begin. It will take 5-10 minutes, depending on the speed of your internet connection. Once the installation is complete you will be greeted with a success message.
5.6. WebDAV Interface Seems to be Broken
'memcache.local' => 'OCMemcacheRedis',

  'memcache.distributed' => 'OCMemcacheRedis',

  'memcache.locking' => 'OCMemcacheRedis',

    'redis' => [

    'host' => '127.0.0.1',

    'port' => 6379,

    'user' => 'nextcloud_redis_user',

    'password' => 'your_secure_password'

  ],
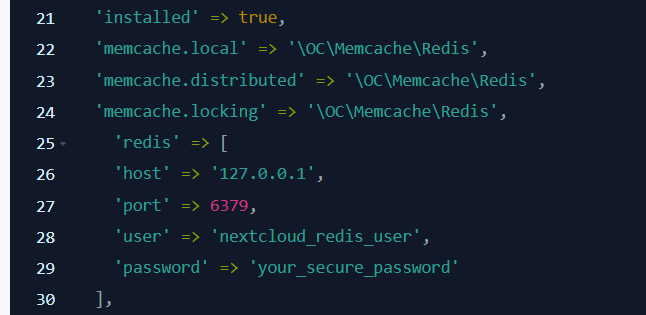
- Save the config.php file.
After installation you will need to set up the administrator account, storage path, and the database that will be used by NextCloud.With RunCloud, you can use either Redis or Memcached. Follow the steps below to configure the Redis cache for your Nextcloud installation:
For Native Nginx Stack on RunCloud
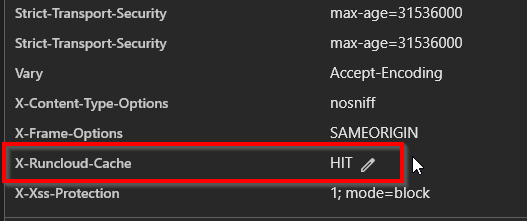
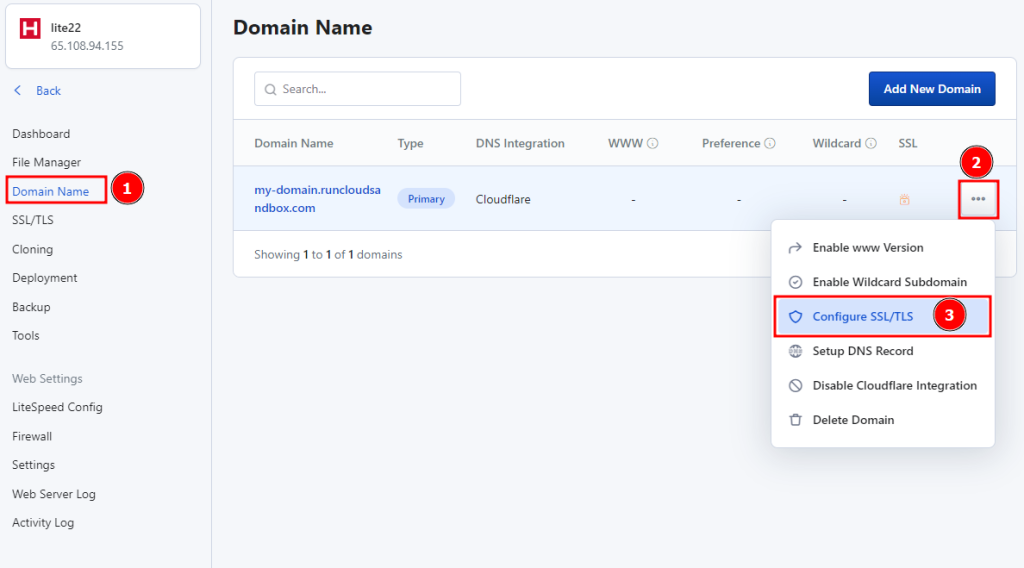
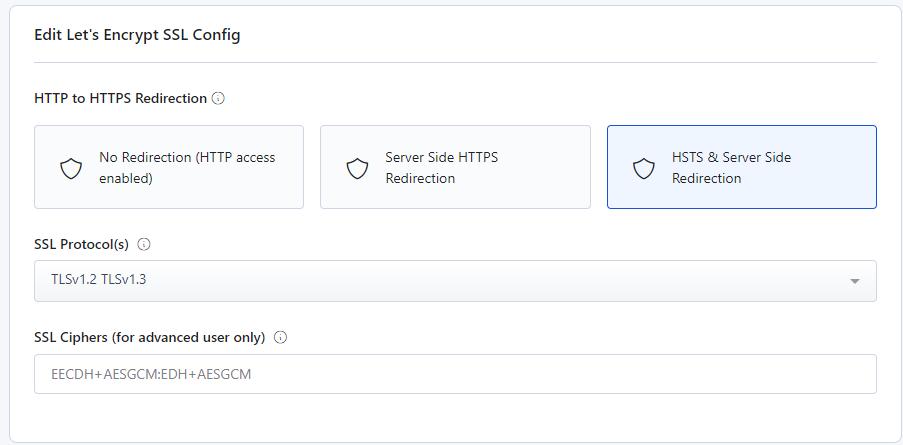
Fortunately, RunCloud makes it very easy to remove these messages. Let’s start with red ones first.If you are using the default hybrid stack on RunCloud, then you will need to create a custom Nginx configuration file for your Nextcloud application. When creating the config, make sure to select the type as location.main-before and give it a descriptive name. Next, paste the following code snippet in the provided text box as shown below:Enabling HTTP Strict Transport Security policy on your server will fix multiple error messages. Go to your dashboard and click on “Domain Name”. You will see all of the domains that are associated with your application. Configure the TLS settings to enable the HSTS policy.
For Containerised Nginx Stack on RunCloud
Step 1: Enable Redis Service (RunCloud)After removing the functions from the list, click the “Update Web Application Settings” button. Refresh the NextCloud page – the warning message should disappear.
Summary
After the file has been created it will be displayed in the file manager. Click on it to edit the file – it will open a file editor in a new browser tab.Step 4: Creating a Dedicated Nextcloud Redis User (Option B – Recommended only for Advanced Users)