This is part 2 of a series of blog posts where I will walk you through all the steps needed to deploy the VCF Installer appliance as part of bringing up a VCF 9.0.1 management domain. YES it is called VCF Installer in VCF 9.x compared to the Cloud Builder in previous VCF 5.x versions.
The placement of the VCF installer affects how it can be used:
- If it is deployed outside of the management infrastructure on any machine with connectivity to the management infrastructure, then you can use the appliance to deploy multiple VCF or VMware vSphere Foundation (VVF) platforms.
- If it is deployed on one of the ESX hosts that will form the management domain, then you can only use the appliance to deploy a single VCF platform.
The VCF Installer appliance requires 4 vCPU, 16GB RAM, and 914GB storage. Make sure to have such resources available in your environment before the deployment.
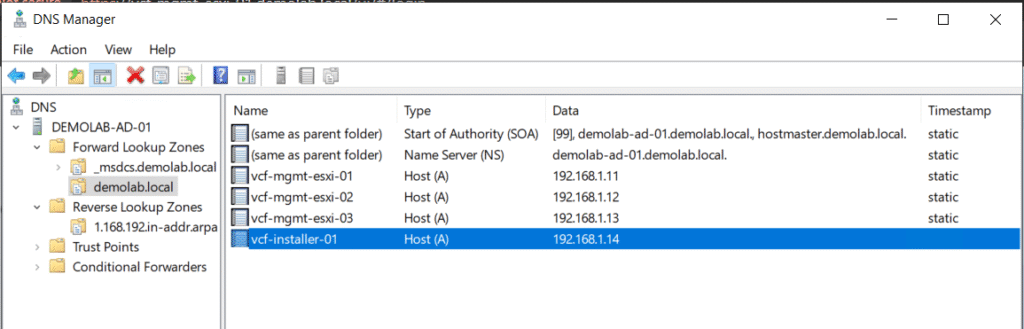
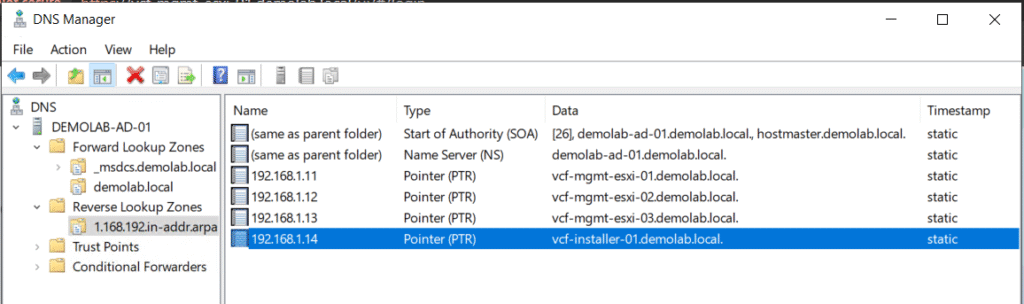
Step 1: Create Forward/Reverse DNS Records for VCF Installer Appliance
First of all, make sure to create the necessary DNS records for the VCF installer appliance.
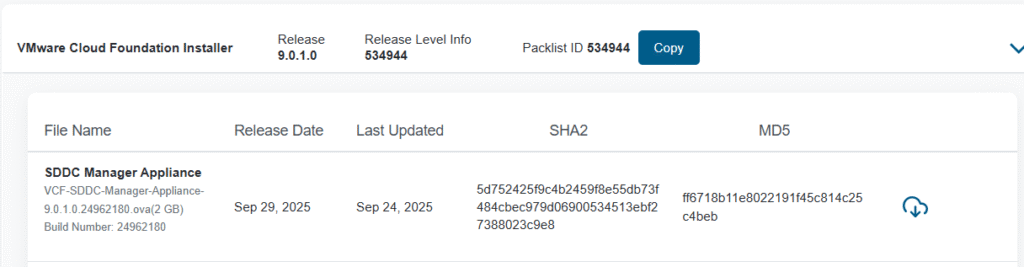
Step 2: Download the VCF Installer OVA Appliance
Login to Broadcom support portal and download VCF Installer 9.0.1.0 build 24962180.
https://support.broadcom.com/group/ecx/productfiles?displayGroup=VMware%20Cloud%20Foundation%209&release=9.0.1.0&os=&servicePk=534266&language=EN&groupId=534924&viewGroup=true
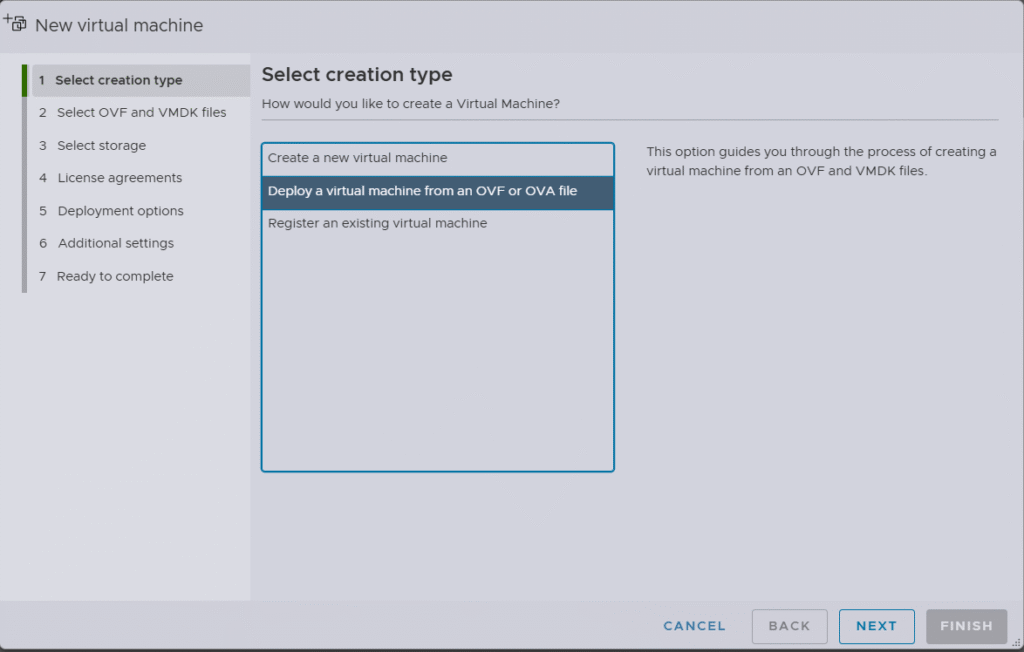
Step 3: Deploy the VCF Installer OVA appliance
In my home lab, I will be deploying VCF Installer appliance directly on my physical ESXi host, outside the 3 nested ESXi hosts that will form the MGMT domain.
In the navigation pane, select Host, and click Create/Register VM. On the Select creation type dialog box, select Deploy a virtual machine from an OVF or OVA file and click Next.
Enter a name for the virtual machine, browse to the VCF installer OVA file that you downloaded from the Broadcom Support Portal in step 2.

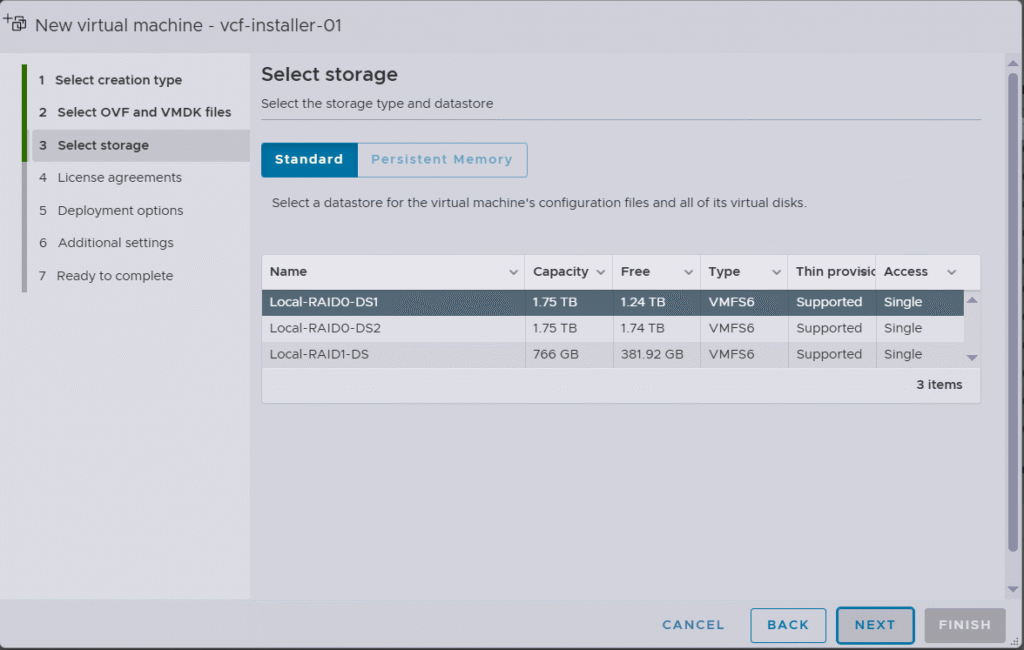
On the Select Storage page, select a datastore and click Next.
Read and accept the license agreement and click Next.

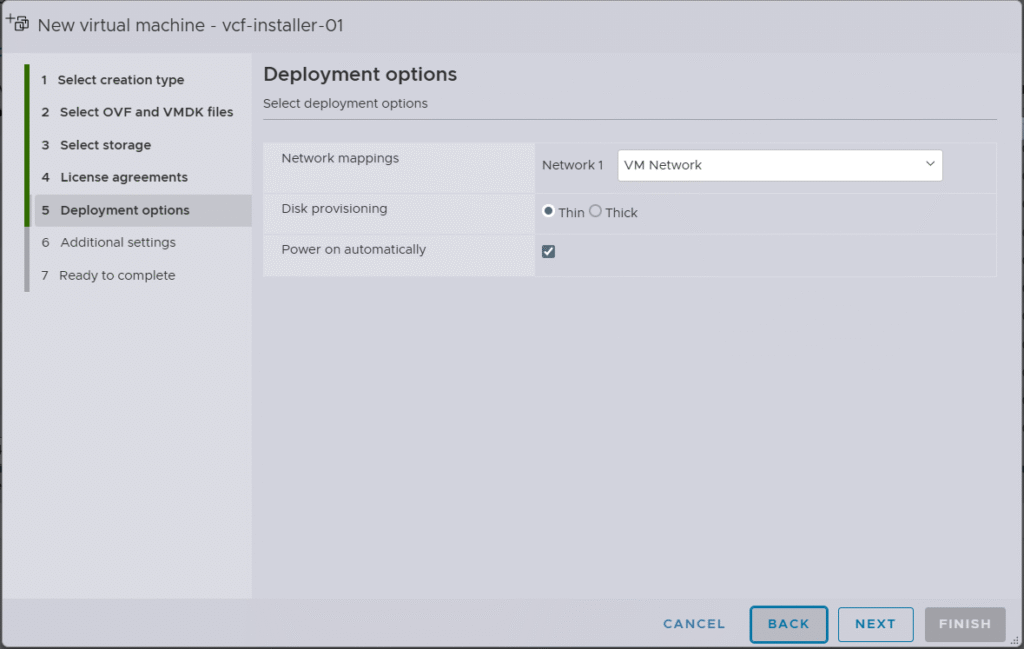
Select the network portgroup for the VCF installer appliance.
The VCF Installer appliance should be deployed on a network that can access the ESX hosts, VM management network, and all required external services, such as DNS and NTP that you plan to use for the deployment.
Enter a password for root & admin@local accounts, in addition to the FQDN of the VCF installer and IP address, subnet mask, gateway, NTP/DNS servers and domain name.
Note that the root user password must be a minimum of 15 characters and include at least one uppercase, one lowercase, one digit, and one special character.

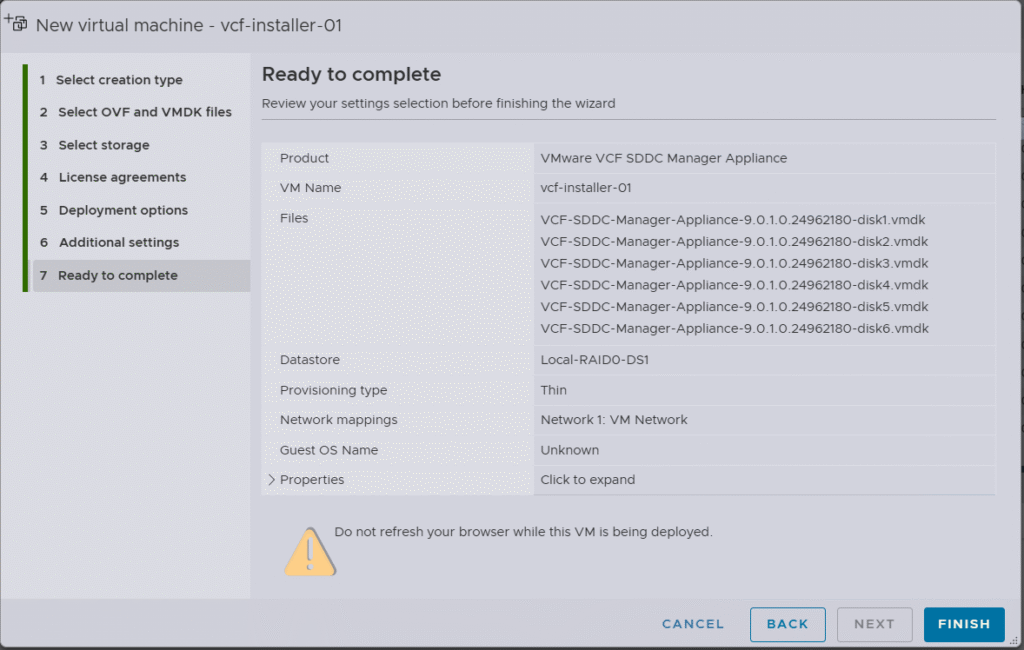
Review the virtual machine configuration and click Finish.
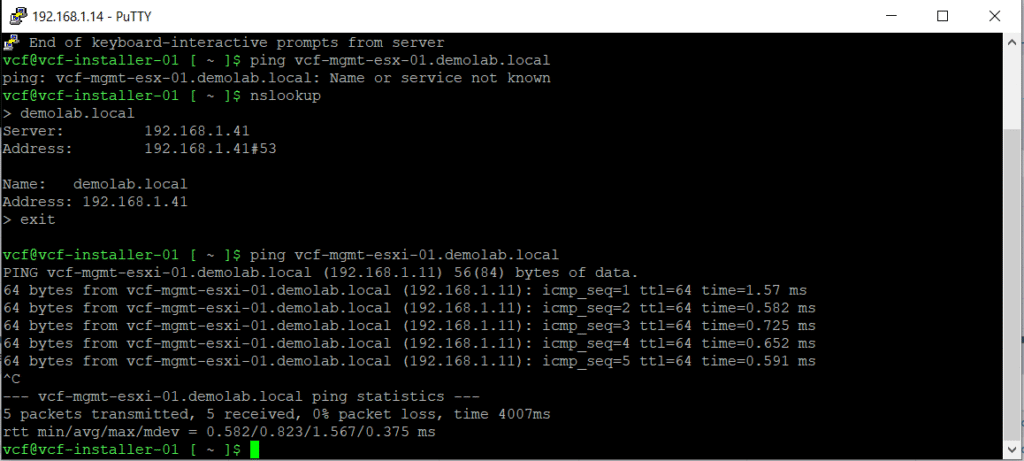
Step 4: Verify reachability from the VCF Installer to ESX Hosts & NTP/DNS Services
SSH to the VCF Installer appliance and login using vcf account and the password selected during installation.
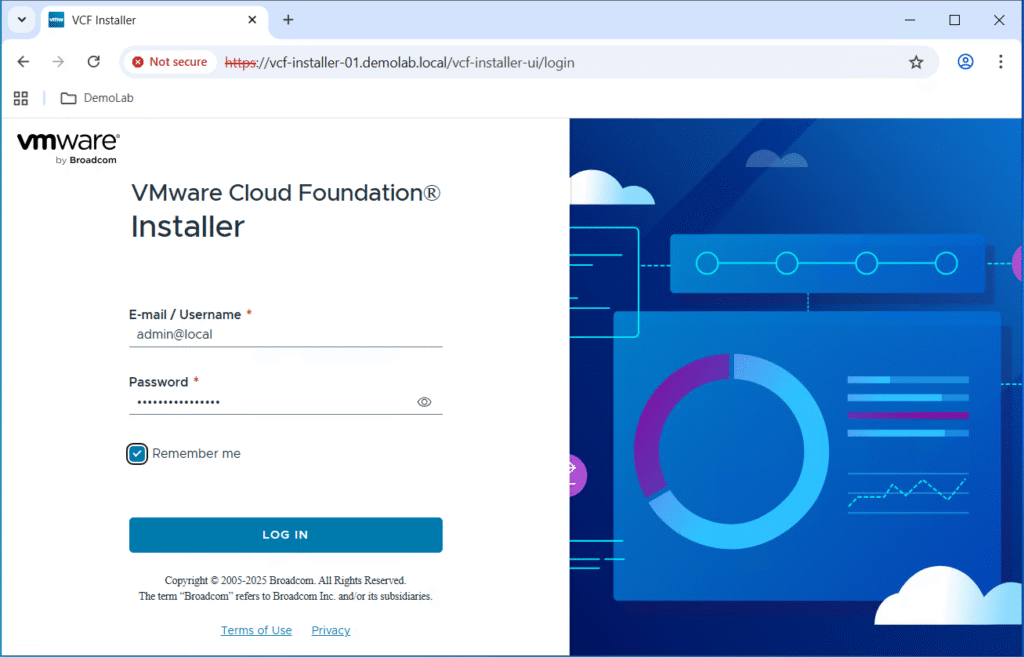
The deployment is completed successfully and you should be able to log in to the VCF Installer appliance administration interface https://<VCF-Installer-IP or FQDN> using admin@local account.

VCF 9.0.1 Considerations for vSAN ESA & 10GB Checks for Lab/POC environments
Thanks to William Lam for his amazing post detailing the considerations and enhancements in VCF 9.0.1 to bypass vSAN ESA HCL & Host Commission 10GbE NIC Check.
Accordingly, and as I do NOT have compatible vSAN ESA hardware and I am using 1 GB NICs for the ESX hosts instead of 10GB NICs, the below Day0 workarounds will have to be applied on the VCF installer. Unlike VCF 9.0.1 prior releases, users no longer need to craft custom vSAN ESA JSON files or mess around with installing community VIBs on their ESX hosts.
To disable vSAN ESA compatibility check and 10GB NICs validation, SSH to the VCF installer appliance using vcf account, then switch to root (su) and run the below commands:
echo “vsan.esa.sddc.managed.disk.claim=true” >> /etc/vmware/vcf/domainmanager/application-prod.properties
echo “enable.speed.of.physical.nics.validation=false” >> /etc/vmware/vcf/domainmanager/application.properties
echo ‘y’ | /opt/vmware/vcf/operationsmanager/scripts/cli/sddcmanager_restart_services.sh
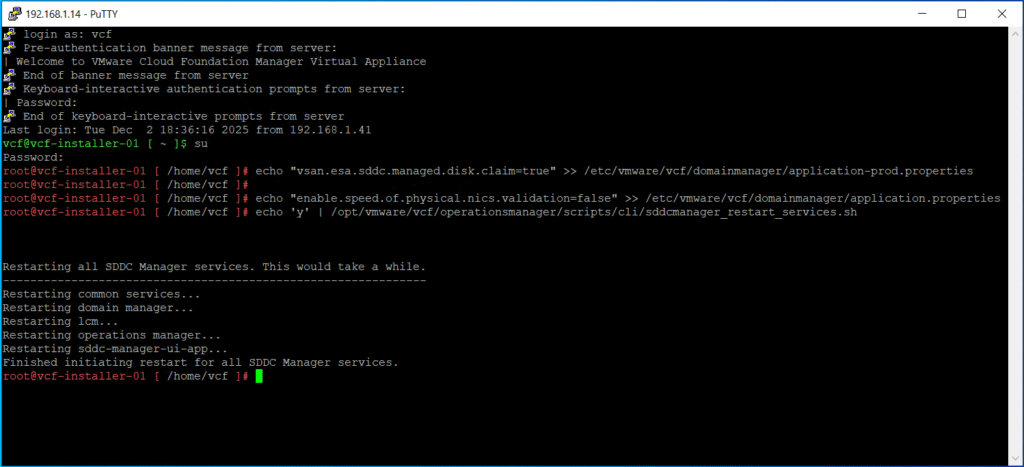
The deployment and tweaking of the VCF installer has been completed successfully.
Hope this post is informative,
Stay tuned for the next part where we will be focusing on how we can make the binaries available to the VCF installer before kicking off the VCF bringup process.
Thanks for reading,
 (1 votes, average: 5.00 out of 5)
![]() Loading…
Loading…