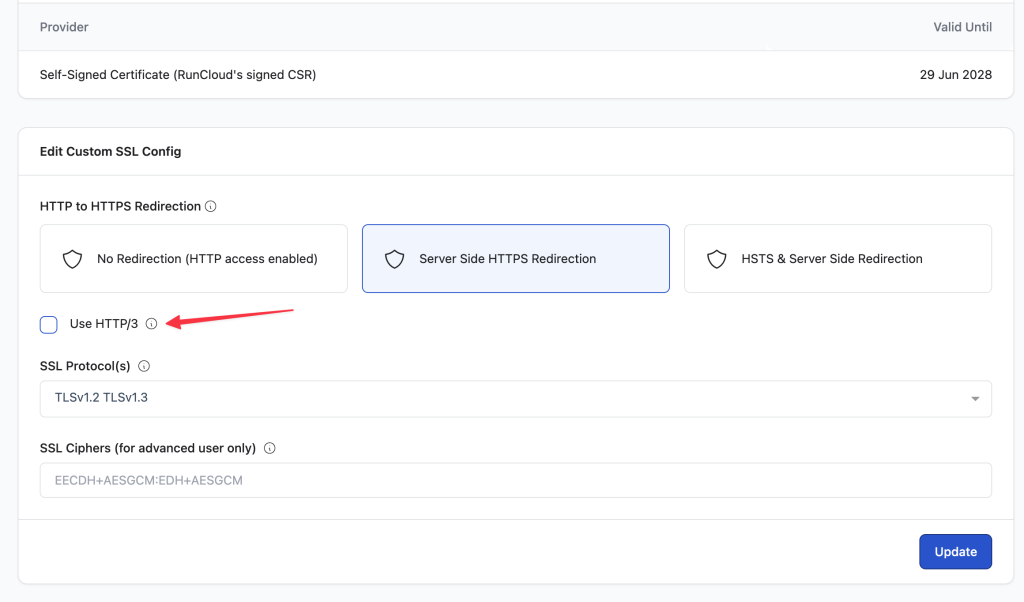
With RunCloud, you can skip the command line entirely, instead enabling HTTP/3 for each web application directly from your dashboard with a single toggle.sudo apt update
sudo apt install curl gnupg2 ca-certificates lsb-release ubuntu-keyring
- Import the official NGINX GPG signing key:
For your primary website, use: listen 443 quic reuseport;No, enabling HTTP/3 does not break older protocols because it runs on UDP port 443, while HTTP/2 and HTTP/1.1 operate over TCP. Modern web servers and browsers use a “fallback” mechanism that ensures that if a client doesn’t support QUIC (the foundation of HTTP/3), the connection seamlessly reverts to HTTP/2 without the user noticing.
Table of Contents
- 1 Step-by-Step Instructions for Enabling HTTP/3 on NGINX
- 2 Enable HTTP/3 Without Touching Config via RunCloud
- 3 Wrapping Up
- 4 FAQs
Step-by-Step Instructions for Enabling HTTP/3 on NGINX
Here’s how RunCloud simplifies the process:
Step 1: Ensure You Meet Prerequisites for HTTP/3
For all other websites on the same server, omit reuseport: listen 443 quic; If you put reuseport in multiple server blocks, NGINX will throw an error and refuse to start.
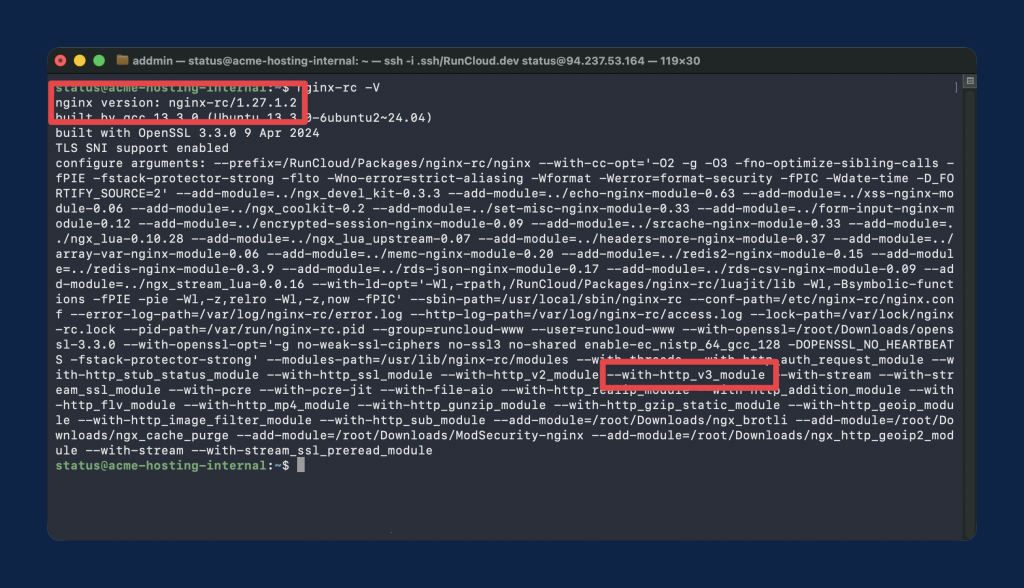
NGINX Version Supports HTTP/3
nginx -V 2>&1 | grep --color -- --with-http_v3_module
If you host multiple websites (virtual hosts) on the same NGINX server, you need to be careful with the reuseport parameter. You can only define reuseport once per IP and port combination.ssl_protocols TLSv1.3;Configures the use of TLS 1.3, the strict encryption standard required by the QUIC protocol.RunCloud is a server management dashboard for PHP and web applications. It provides a visual interface for configuring firewalls, managing databases, deploying code via Git, and enabling features like HTTP/3 without editing configuration files.Command-line tools like curl can be forced to use a specific protocol, but Chrome requires the server first to send an Alt-Svc (Alternative Services) header to “discover” that HTTP/3 is available. Because HTTP/3 runs over UDP, Chrome often completes the initial handshake over TCP (HTTP/2) and switches to HTTP/3 only for subsequent requests or after the protocol is cached in the browser’s memory.
- Install prerequisite packages:
HTTP/3 changes how browsers connect to your server. It reduces latency, improves performance on unstable networks, and can noticeably speed up real-world page loads – especially for mobile users.
SSL Certificates are Configured (HTTP/3 Requires TLS 1.3)
listen 443 quic reuseport;Tells NGINX to listen for UDP traffic on port 443 and distributes the processing load across multiple worker processes.Yes, HTTP/3 is considered production-safe and is officially supported in the NGINX mainline releases, though you should monitor your server’s CPU usage closely. Because QUIC handles encryption and packet loss at the application level rather than the kernel level, it can be more CPU-intensive than HTTP/2, especially during high-traffic spikes.
- You have a valid domain name pointing to your Ubuntu server’s IP address.
- An SSL/TLS Certificate is configured. A free certificate from Let’s Encrypt (using Certbot) is perfect for this.
- TLS 1.3 is enabled in your config. Verify that your existing NGINX server block contains TLSv1.3 in the ssl_protocols directive.
Your current HTTPS block should look something like this before adding HTTP/3:sudo nginx -s reload
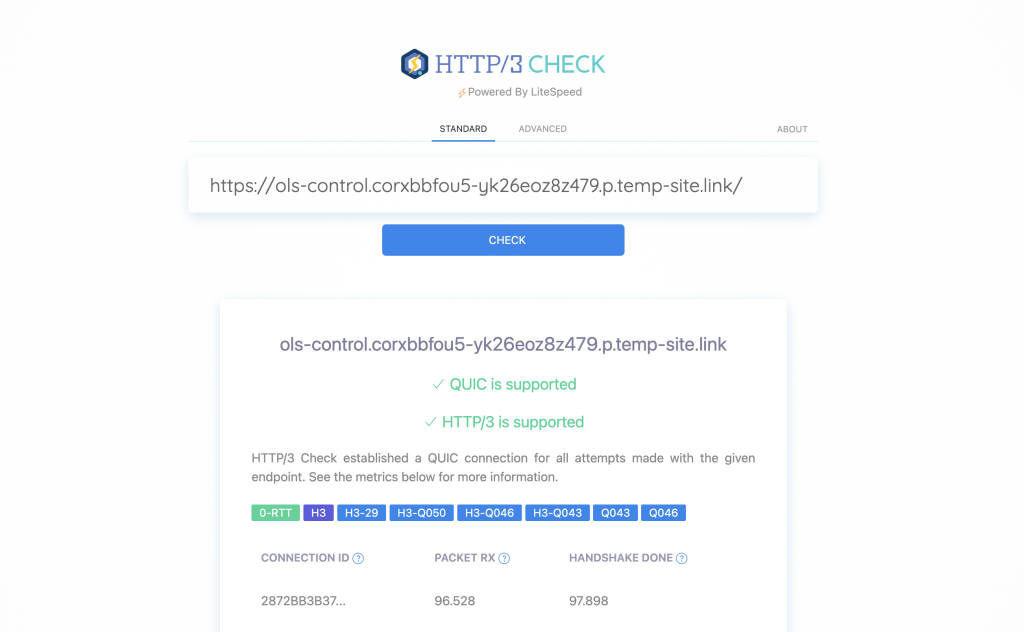
Step 5: Verify HTTP/3 Is Active
Before proceeding, you must ensure:
UFW (Ubuntu)
If you are using Uncomplicated Firewall (UFW), which comes standard on Ubuntu, simply run:Use the steps below to enable and verify HTTP/3 on your Ubuntu server.quic_retry on;Defends against UDP spoofing attacks by requiring clients to validate their IP address during the handshake.
Cloud Firewall (Hetzner, GCP, DigitalOcean)
Now it’s time to tell NGINX to actually listen for QUIC traffic and advertise HTTP/3 capabilities to the browser.
- Hetzner Cloud: Go to your server’s “Firewalls” tab and add an Inbound rule for Protocol: UDP, Port: 443.
- Google Cloud Platform (GCP): Go to VPC Network > Firewall. Create a new ingress rule targeting your instance, select UDP, and specify port 443.
- DigitalOcean: Navigate to Networking > Firewalls. Add an Inbound Rule for Custom UDP on port 443.
Here is a complete, copy-paste-ready server block configured for HTTP/3:
Step 3: Add the QUIC Listener and HTTP/3 Directives to Your Server Block
The most important requirement for enabling HTTP/3 is having a compatible NGINX version. According to the official NGINX QUIC documentation, support for QUIC and HTTP/3 was officially introduced in NGINX version 1.25.0. In these newer releases, the required ngx_http_v3_module is included in the official Linux binary packages by default.http3 on;enables the HTTP/3 protocol decoding for the current server block.While the benefits of HTTP/3 are worth the effort, manual configuration is tedious and prone to human error. You don’t have to do it this way.ssl_early_data on;Enables 0-RTT (Zero Round Trip Time), allowing returning clients to resume encrypted connections instantly without handshake delays.sudo iptables -A INPUT -p udp --dport 443 -m conntrack --ctstate NEW,ESTABLISHED -j ACCEPT
If your server is hosted on a cloud provider, local firewall rules (UFW/iptables) are often overridden or supplemented by cloud-level security groups. The exact steps will vary depending on your cloud provider:The answer is ‘yes’, and the solution is RunCloud.Unlike HTTP/1.1 and HTTP/2 which rely on TCP, HTTP/3 uses the QUIC protocol, which operates entirely over UDP. If you don’t explicitly open UDP port 443 on your firewall, client requests will never reach your NGINX HTTP/3 listener, and browsers will silently downgrade back to HTTP/2 over TCP.Whenever you alter NGINX configurations, you must test the syntax before applying the changes to prevent your live server from crashing.If you have just completed all the manual steps above, you might be wondering: Is there an easier way to do this for my next server?Managing NGINX configurations manually can quickly become a headache, especially as your server scales. One typo in your nginx.conf, forgetting to open a UDP port, or accidentally duplicating the reuseport directive across multiple server blocks can crash your entire web server.Open your website’s NGINX configuration file (e.g., sudo nano /etc/nginx/conf.d/example.com.conf or /etc/nginx/sites-available/default).If your Ubuntu repository ships older “stable” releases (like 1.18.x or 1.24.x) that do not include HTTP/3 support out of the box. Then you can install the Mainline version from the official NGINX repositories.Pro Tip: If you are using RunCloud to manage your infrastructure, our official server setup guides for providers like Hetzner and GCP cover this firewall step in great detail.
Step 4: Test and Reload NGINX
In this post, we have discussed the steps required to enable HTTP/3 on an NGINX server. As you can see, the manual process requires several intricate steps: checking NGINX versions, configuring firewalls for UDP port 443, and carefully modifying server block directives.add_header Alt-Svc 'h3=":443"; ma=86400' always;Tells connecting web browsers, “Hey! I support HTTP/3 on port 443, remember this for the next 86,400 seconds (1 day).”Suggested read: How to Set Up a Google Cloud Server to Host Your Websites You can completely skip the command line and complex configuration files by using RunCloud.
For more details on how effortlessly this works, check out the official RunCloud documentation on enabling HTTP/3.
Enable HTTP/3 Without Touching Config via RunCloud
In this guide, you’ll learn exactly how to enable HTTP/3 on NGINX step by step – from checking compatibility to verifying that it’s working correctly.server {
listen 443 ssl;
server_name example.com;
ssl_certificate /etc/letsencrypt/live/example.com/fullchain.pem;
ssl_certificate_key /etc/letsencrypt/live/example.com/privkey.pem;
# TLS 1.3 MUST be included for QUIC/HTTP/3 to function
ssl_protocols TLSv1.2 TLSv1.3;
}
Root or Sudo Access to Edit NGINX Config
Suggested read: How to Fix ERR_SSL_VERSION_or_CIPHER_MISMATCH
If you want to avoid manual setup and reduce the risk of configuration errors, sign up for RunCloud and enable HTTP/3 in a few clicks.The problem is that enabling HTTP/3 on NGINX isn’t straightforward. It requires the right version, specific modules, firewall changes, and careful configuration. One small mistake can stop NGINX from restarting.
- No SSH Required: You never have to log in to your server’s terminal to edit configuration files.
- No reuseport Management: RunCloud’s automated NGINX stack intelligently handles the listen 443 quic reuseport rule across multiple domains. You never have to worry about conflicting server blocks.
- One-Click Toggles: Simply navigate to your Web Application settings, toggle HTTP/3 on, and RunCloud safely reloads your NGINX server in the background.
Run a configuration test to confirm your changes are valid before reloading NGINX:
Wrapping Up
sudo ufw allow 443/udp

sudo ufw reload
iptables
If you’re running NGINX on a modern server, you’re likely leaving performance on the table by sticking with HTTP/2.To disable HTTP/3, simply remove the quic and reuseport parameters from your listen 443 directives, and delete the add_header Alt-Svc line from your configuration file. Once you run nginx -s reload, the server will stop advertising QUIC capabilities and will no longer accept connections over UDP port 443, forcing all traffic back to standard TCP.Unlike older HTTP versions, where HTTPS was a secondary layer, HTTP/3 inherently requires encryption via QUIC. You cannot run HTTP/3 over unencrypted http:// connections. Additionally, the QUIC protocol mandates the use of TLS 1.3 to enable faster 0-RTT (Zero Round Trip Time) handshakes and better security.Run the following commands to install the necessary dependencies:
FAQs
Does enabling HTTP/3 break HTTP/2 or HTTP/1.1?
Why does curl –http3 work but Chrome still shows HTTP/2?
Is HTTP/3 on NGINX production-safe?
server {

# 1. Standard TCP listener for HTTP/1.1 and HTTP/2 (Fallback)

listen 443 ssl;
    # 2. UDP listener for QUIC and HTTP/3

listen 443 quic reuseport;
    server_name example.com www.example.com;
    # 3. SSL/TLS Certificates

ssl_certificate /etc/letsencrypt/live/example.com/fullchain.pem;

ssl_certificate_key /etc/letsencrypt/live/example.com/privkey.pem;
    # 4. Enable TLS 1.3 (Required for HTTP/3)

ssl_protocols TLSv1.2 TLSv1.3;
    # 5. Core HTTP/3 Directives

http3 on;

quic_retry on;

ssl_early_data on;
    # 6. Advertise HTTP/3 to clients via the Alt-Svc header

add_header Alt-Svc 'h3=":443"; ma=86400' always;
    # The rest of your location blocks go here...

location / {

try_files $uri $uri/ =404;

}

}
No, your standard SSL/TLS certificate (such as a free Let’s Encrypt certificate) will work perfectly. However, the QUIC protocol explicitly requires TLS 1.3, so your NGINX configuration must enable TLS 1.3.
Do I need a special SSL certificate for HTTP/3?
sudo nginx -t
If the output says nginx: configuration file /etc/nginx/nginx.conf test is successful, apply the changes instantly without dropping active connections by reloading NGINX: