In this guide, you’ll learn how to deploy n8n using Docker, configure it securely with Nginx and SSL, and use RunCloud to handle the heavy lifting – from server setup to backups.
Table of Contents
Why Host n8n with RunCloud & Docker?
You now have a secure, fully self-hosted n8n setup – managed through RunCloud and running in Docker.
- Full control – Keep your data and workflows on your own terms.
- Simplified management – RunCloud handles your domain, SSL, and Nginx config.
- Efficient setup – Docker keeps n8n isolated and updates easy.
- Multi-app support – Run multiple apps on one server with ease.
Let’s explore how to get your n8n instance running smoothly with RunCloud.
Step-by-Step Instructions to Install n8n
After creating the web application, connect to your server via SSH. If you don’t know how to do this, read our documentation on How to Connect to Your Server via SSH to learn more.In your RunCloud dashboard, set up automated backups for your n8n-app. You can create daily snapshots of your files and easily restore them if needed.
- A cloud server (e.g., DigitalOcean, Vultr) connected to RunCloud
- A domain or subdomain pointed to your server IP
Ready to simplify your server management? Sign up for RunCloud today.
Step 1: Create a New Web Application in RunCloud
proxy_pass http://host:5678;

# > uncomment below line if you want to disable proxy buffering

# proxy_buffering off;

proxy_set_header X-Real-IP $remote_addr;

proxy_set_header X-Forwarded-Host $host;

# > websocket support. if you want to proxy websockets, uncomment 3 lines below

proxy_http_version 1.1;

proxy_set_header Upgrade $http_upgrade;

proxy_set_header Connection "upgrade";
- After configuring the required settings, click “Create nginx Config“. RunCloud will test and apply this configuration on your server immediately.
Step 6: Access Your Secure n8n Instance
For more flexibility (custom env settings, time zones), use Docker Compose instead. See n8n’s Docker documentation for advanced setups.You’ll need:RunCloud makes it very easy to manage domain names, SSL certificates, and backups for your web applications. But before we can configure all that, you will need to create a dedicated web application for n8n:Why Use RunCloud and Docker to Host n8n?
Step 4: Create the Docker Application
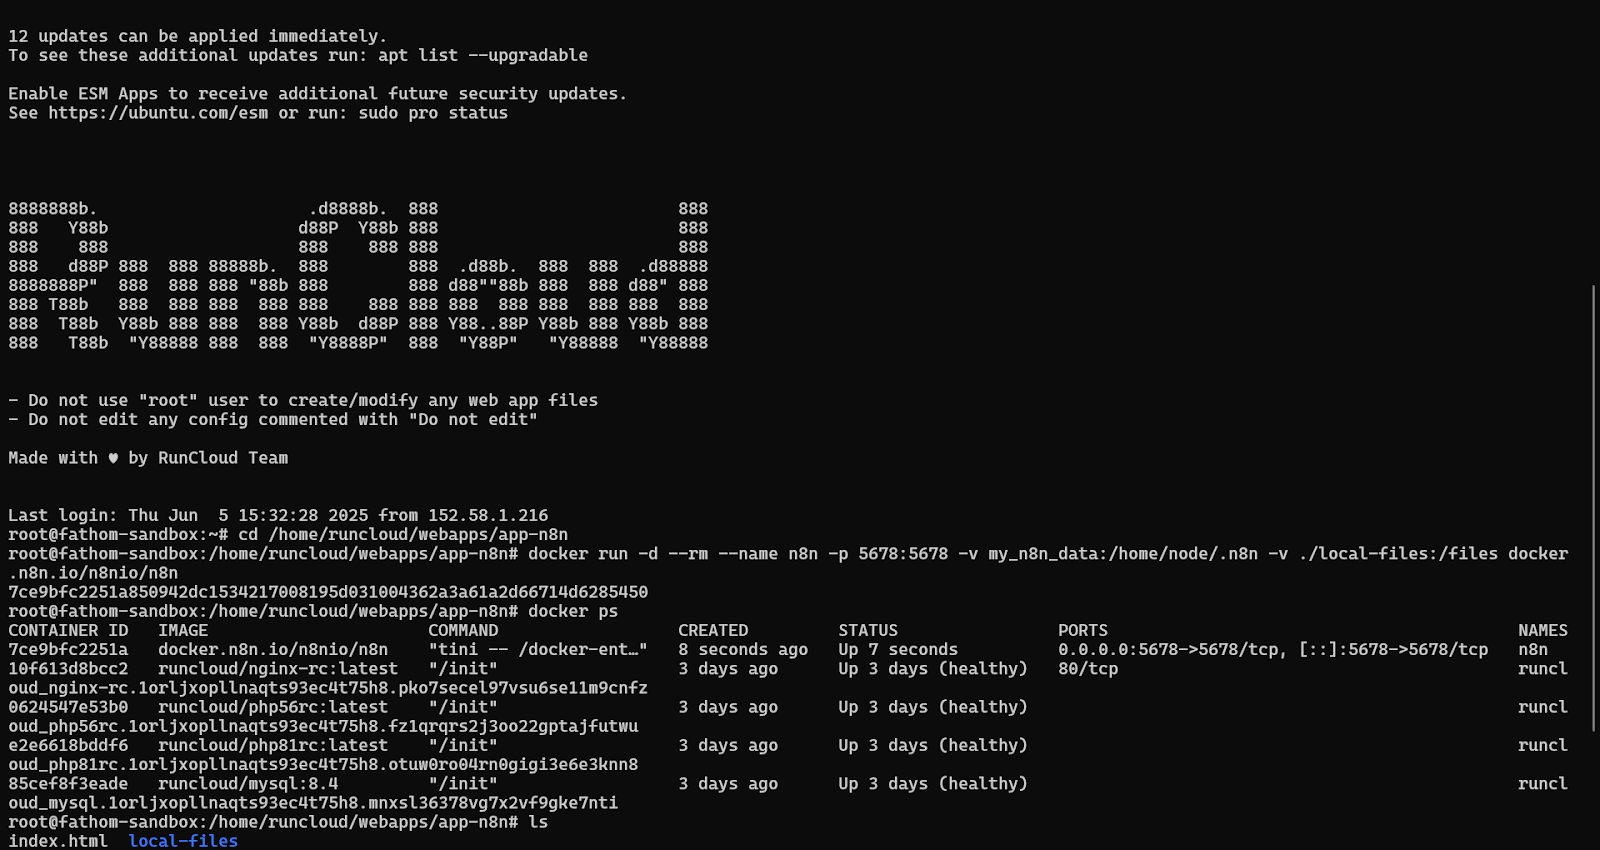
Now, let’s define and launch our n8n application using Docker. You have two ways to approach this. For a very quick start, you could use the following Docker run command:If you use RunCloud’s Cloudflare integration, DNS setup takes just a few clicks during web app creation.Don’t skip this. Backups protect your data and save time if anything breaks.
Step 5: Configure nginx Reverse Proxy via RunCloud
mkdir local-files
RunCloud takes the hassle out of server administration, allowing you to focus on what you do best → building, creating, and automating. But setting up n8n is just scratching the surface of what RunCloud can simplify for you. You can also use RunCloud to effortlessly host other applications without diving deep into complex server configurations. With RunCloud, you can easily deploy and manage:
Step 7: Enable Backups
If you want full control over your setup, self-hosting n8n is the way to go. But managing your own infrastructure doesn’t have to be complicated.After connecting to your server, navigate to the web application’s root directory you just created in RunCloud using the ‘cd’ command. Make sure to replace the path in the following command with the actual root path of your web application:Follow these steps to create your own n8n instance on your server:
Final Thoughts: Your Automation Journey and Beyond with RunCloud
cd /home/runcloud/webapps/<app-name>
Step 3: Create the local-files Directory
docker run -d --rm --name n8n -p 5678:5678 -v my_n8n_data:/home/node/.n8n -v ./local-files:/files docker.n8n.io/n8nio/n8n
After enabling the Docker container, you must configure a reverse proxy to route traffic to your container. n8n is an open-source automation platform that connects apps and services to streamline repetitive tasks – all under your control.


![How to Create a Public Status Page for Your Website [FREE]](https://vmme.org/wp-content/uploads/2025/10/how-to-create-a-public-status-page-for-your-website-free-20-768x408.png)