UpCloud uses its own proprietary MaxIOPS storage technology to deliver industry-leading performance and reliability. It’s claimed to be faster than SSD – built on enterprise-grade SSDs, but up to 2x faster compared to industry-standard cloud servers.
- Amsterdam
- Chicago
- Frankfurt
- Helsinki
- New York City
- London
- San Jose
- Singapore.
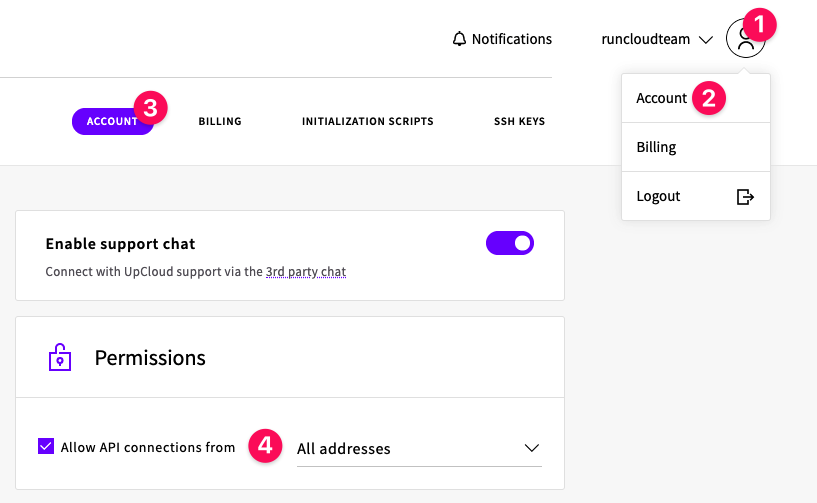
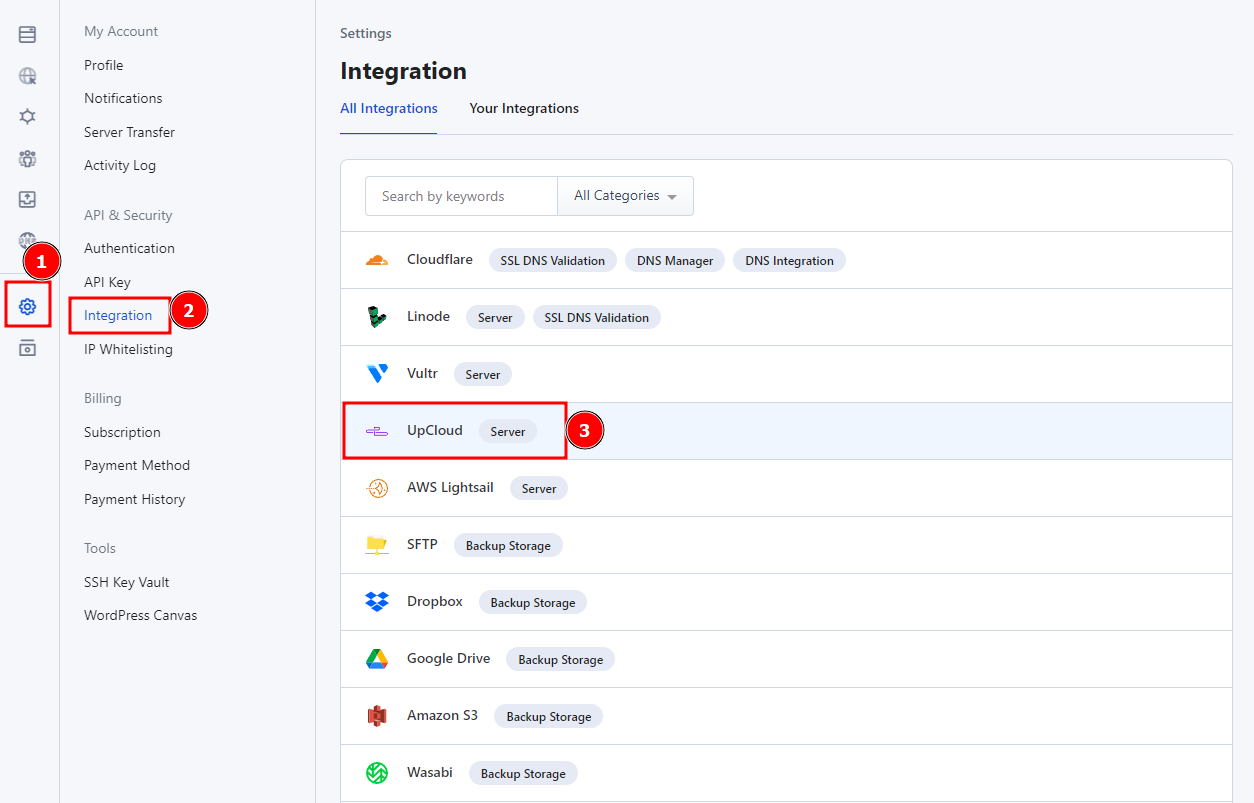
After creating the key, you need to add it to RunCloud. You can either use the “Add a new key” shortcut when building a new server using RunCloud, or you can go to the “3rd Party API Key” menu by clicking your profile (top right), then clicking the Settings menu. There you will see the list of all server provider API keys that you have added to RunCloud.In UpCloud, your API key is in the form of the username and password of your UpCloud account. You only need to enable the “Allow API connection” option from your UpCloud account settings.
Table of Contents
Why Choose RunCloud to Setup Your UpCloud Server?
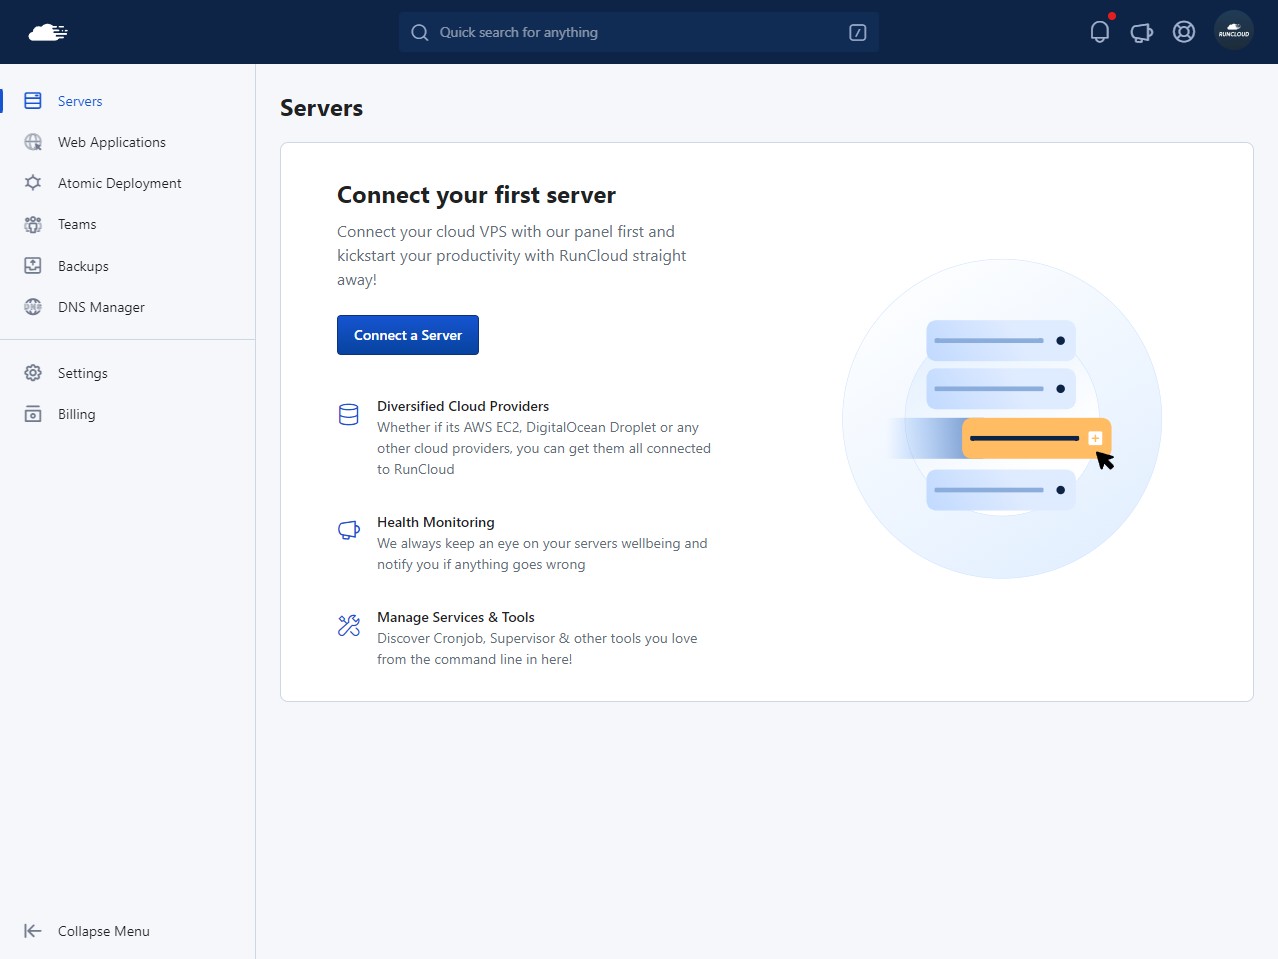
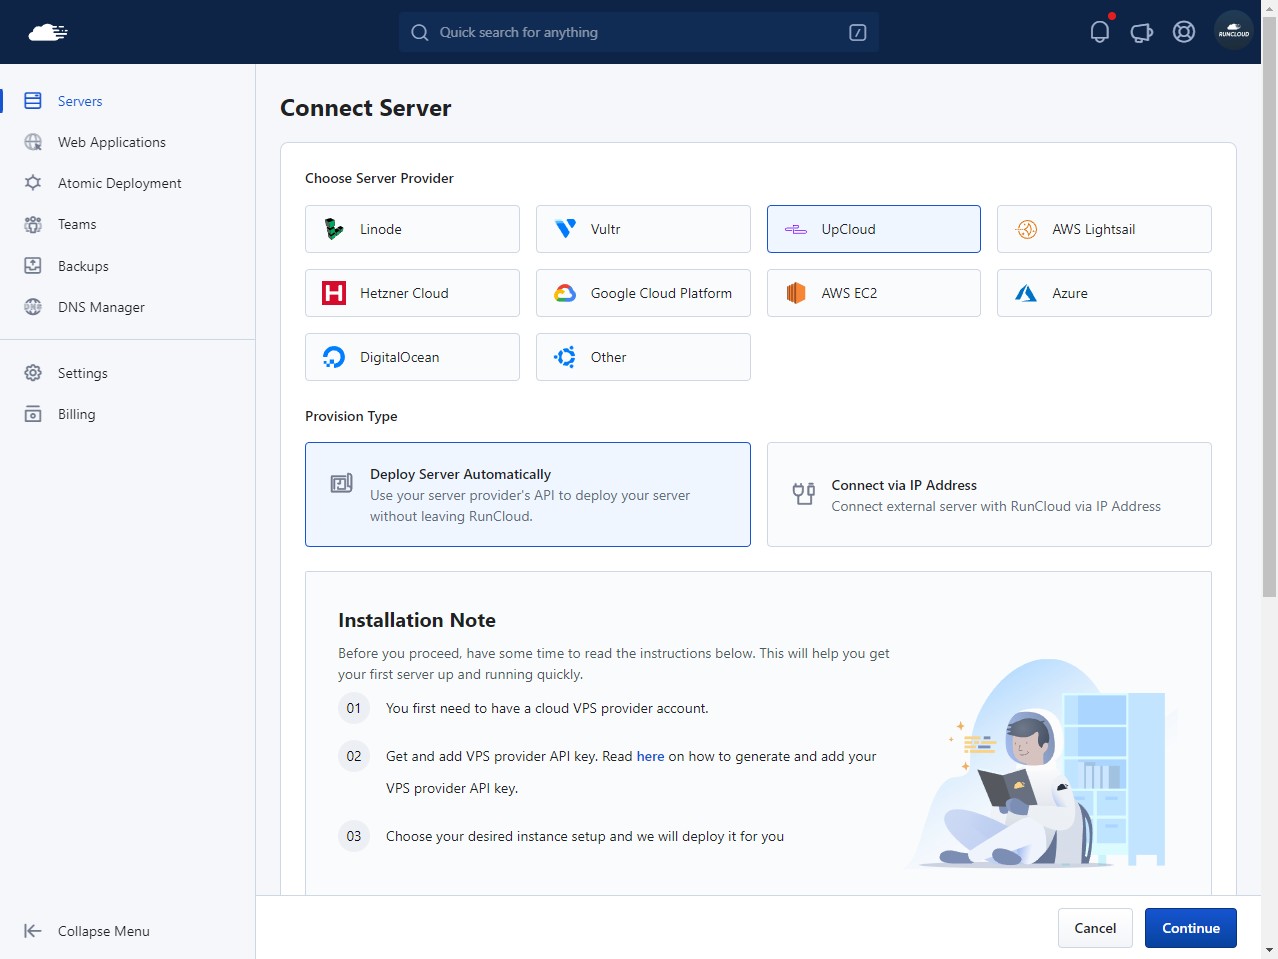
With our server provisioning feature, you can set up a server in UpCloud directly from the RunCloud dashboard by connecting to UpCloud using their API in RunCloud.This gives you the flexibility to deploy your applications close to your customers and reduce latency.After logging in to your server, go to the RunCloud dashboard and click on “Connect a Server”. In this method, instead of using “Direct installation” select “Connect via IP Address”.
Method 1 – UpCloud Server Provisioning (Recommended)
UpCloud has 12 worldwide data centers, including digital hubs such as:
Video Tutorial: Setup UpCloud Server
Create UpCloud API Key
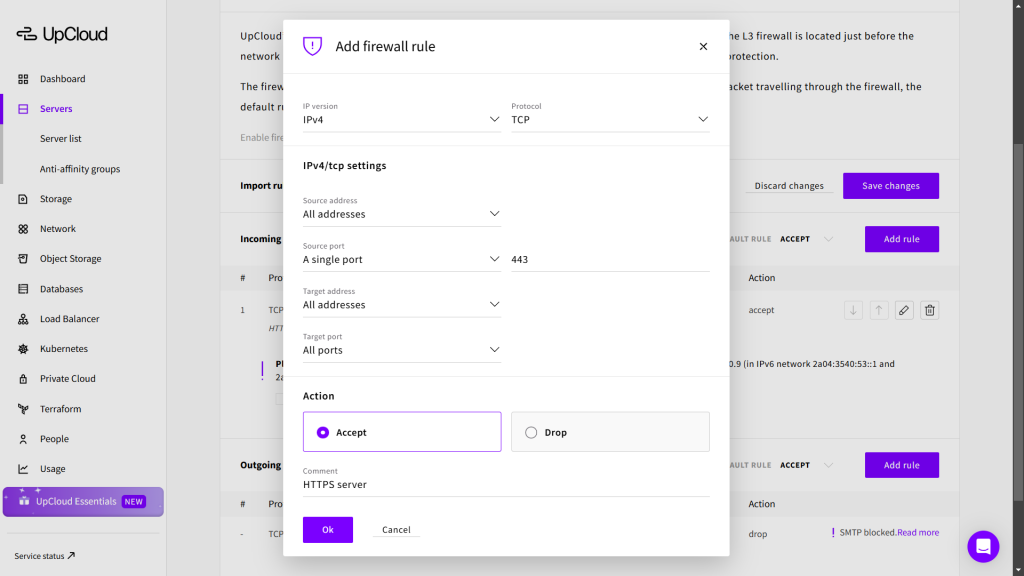
Next, you will add a series of rules to allow specific types of incoming traffic required for RunCloud and standard web hosting to function correctly. You will need to create a new rule for each of the following services:After connecting your server to RunCloud, it is recommended that you configure a firewall. UpCloud provides a straightforward, network-level firewall that you can manage directly from your control panel. This section will guide you through setting up the necessary rules to ensure your server can communicate with RunCloud and serve web traffic securely while blocking all other unauthorized access.
You can create a subaccount in UpCloud from the People tab within the account settings.

In this post, we will show you how to set up an UpCloud server to host your websites with the help of RunCloud.
Add UpCloud API Key to RunCloud
Click on UpCloud and add the login credentials of the new account that we just created. Once you have added your API key, you can start building the UpCloud server directly from the RunCloud dashboard.
UpCloud offers a very simple pricing plan. The cheapest plan costs only €7/month, which includes 1GB Memory, 1 CPU Core, 25GB SSD, and 1 TB Transfer.

Deploying Your UpCloud Server
If you’re looking for a reliable and high-performing hosting option for your website, UpCloud is an excellent choice. Their enterprise-grade hardware and MaxIOPS storage technology provide consistent and fast performance, with an astonishing 100% Uptime SLA. Furthermore, their plans start as low as €7 per month, making it an affordable option for both businesses and individuals alike.
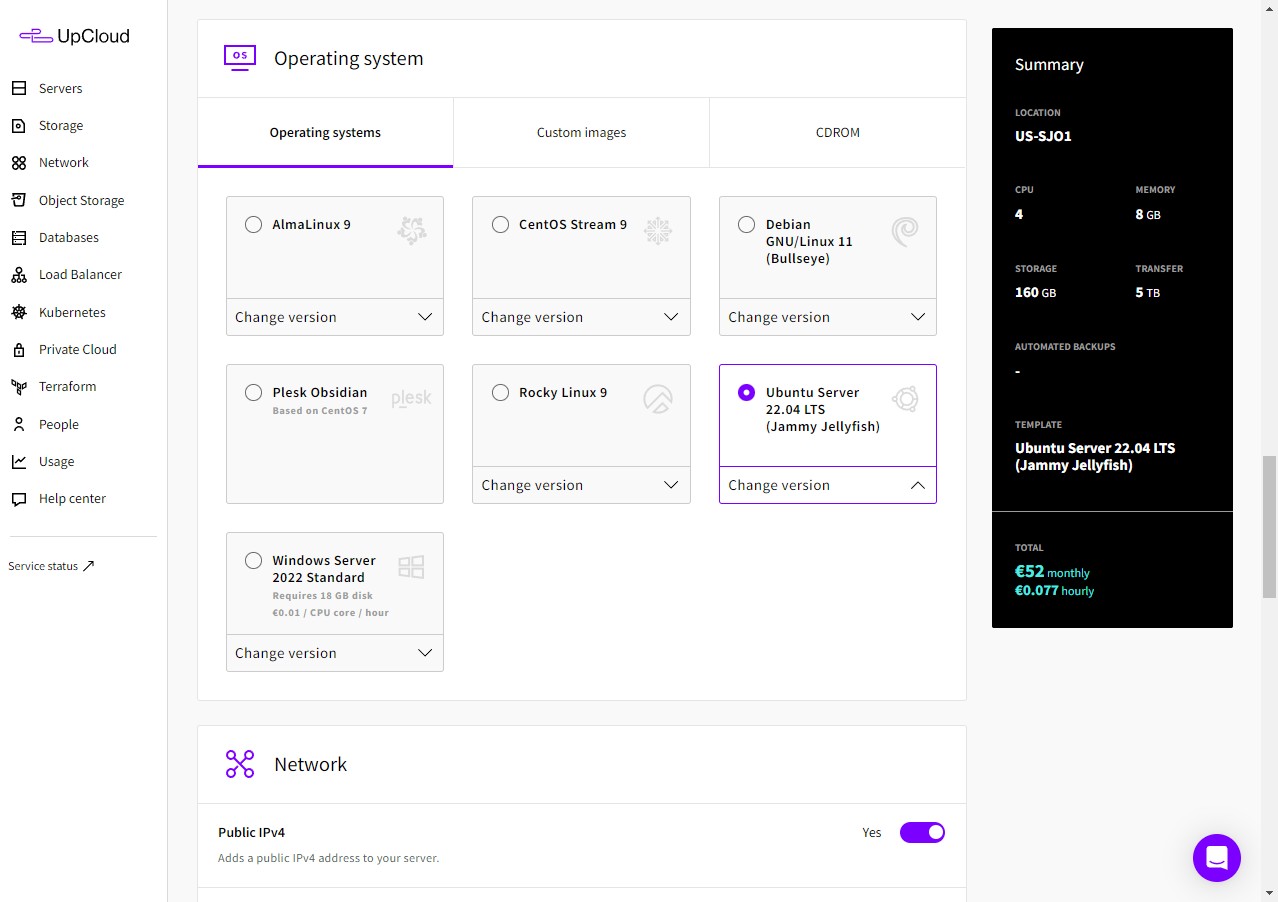
RunCloud simplifies server management, allowing you to manage multiple servers and web applications with ease. You can easily change web application stacks and PHP versions, clone web applications, and secure them with SSL/TLS.You can also use the direct server installation method to connect a server to RunCloud. To do this, go to your UpCloud dashboard and create a new server using either the Ubuntu 20, 22, or 24 LTS OS image in your desired datacenter.
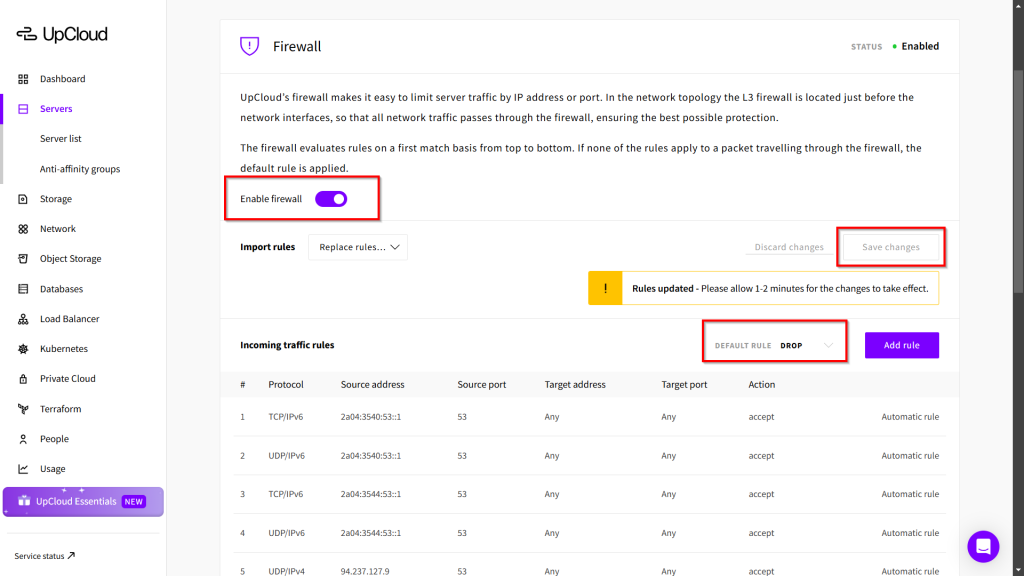
UpCloud is a popular European cloud server provider that offers affordable cloud hosting services across the globe. What makes it especially striking is that UpCloud gives you a 100% Uptime SLA – which makes it one of the top choices for hosting your websites.With all the necessary “allow” rules in place, you must now set the default policy for all other traffic. For a secure configuration, the default incoming traffic rule should be set to Drop. You can easily do this by selecting “drop” from the drop-down menu at the top. This ensures that any traffic not explicitly permitted by the rules you just created will be blocked, which will effectively secure your server from unsolicited connections.
Method 2 – Connect UpCloud With Direct Server Installation
On the next screen, you can pick your desired operating system, data center region and instance type according to your requirements. After this, you can deploy your server by clicking the “Add This Server” button – RunCloud will begin provisioning your server automatically.
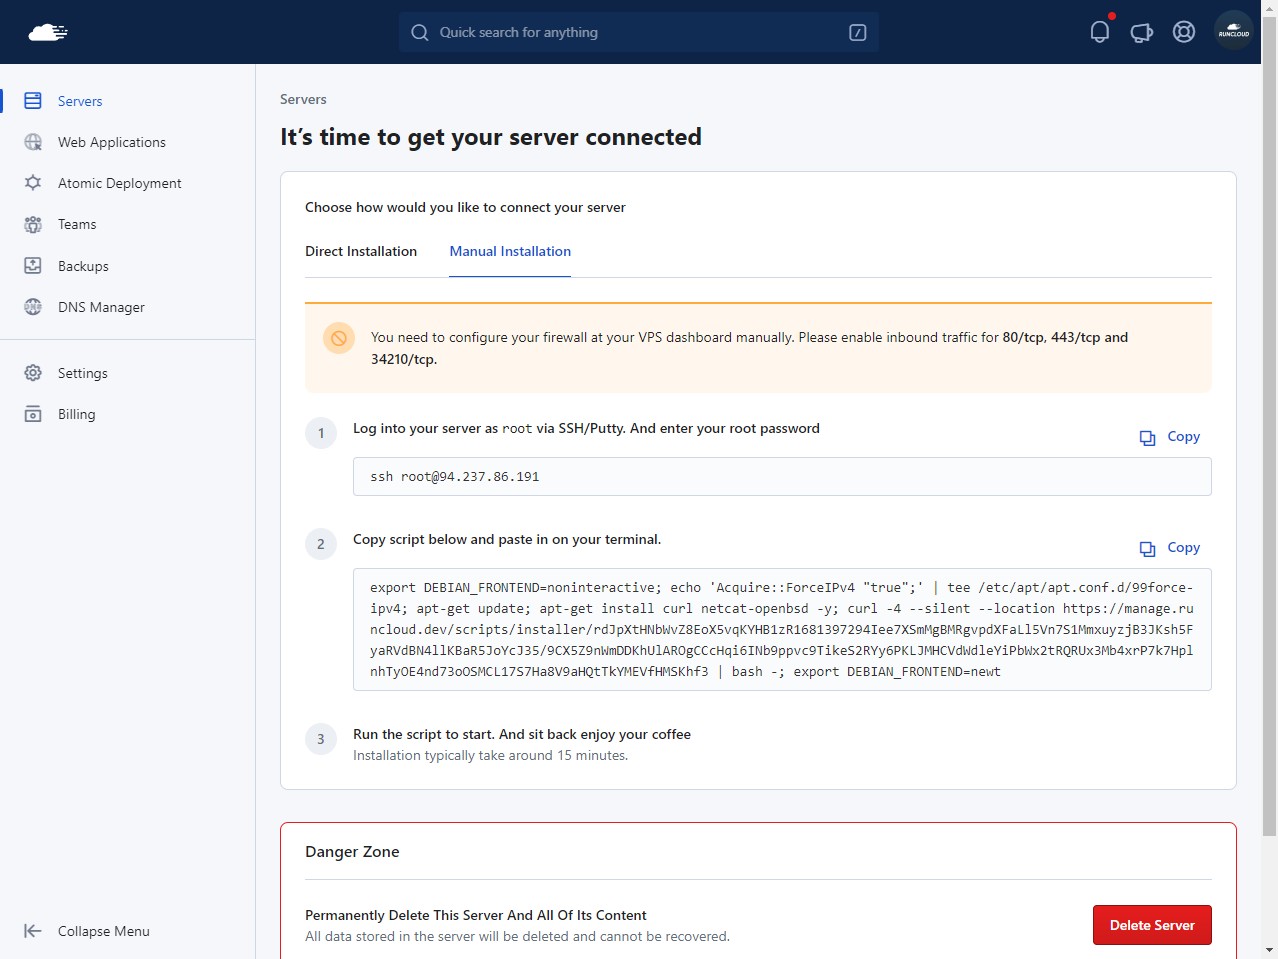
After creating your server, it should be visible in your UpCloud dashboard. Wait for the server to finish provisioning. Once it has, log into it using SSH.
RunCloud supports a range of web applications, including WordPress and Laravel, and offers features such as Git deployment and custom Nginx configuration. The Team feature is useful for agencies assigning different members to different servers with separate permissions.
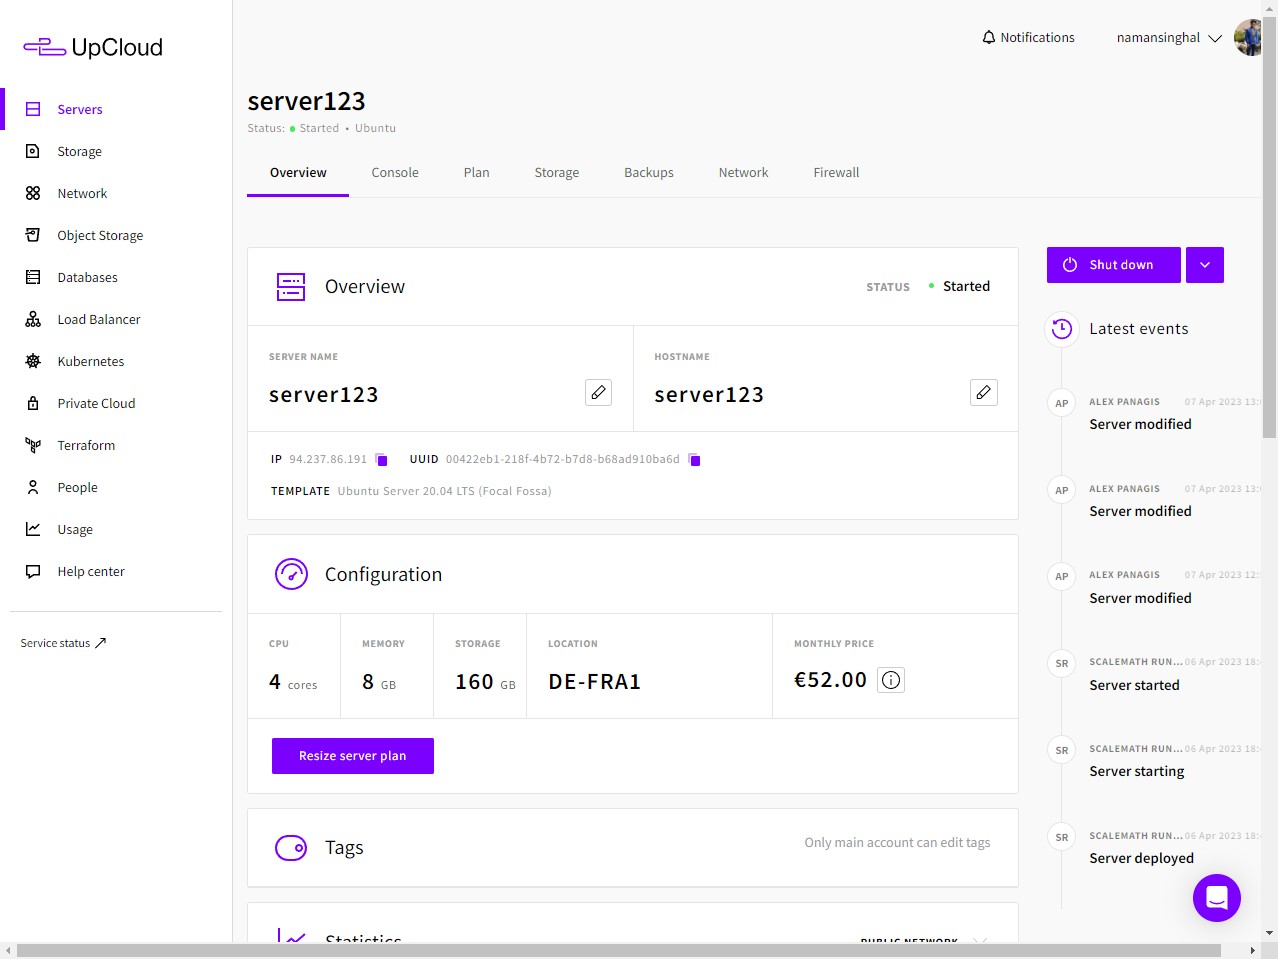
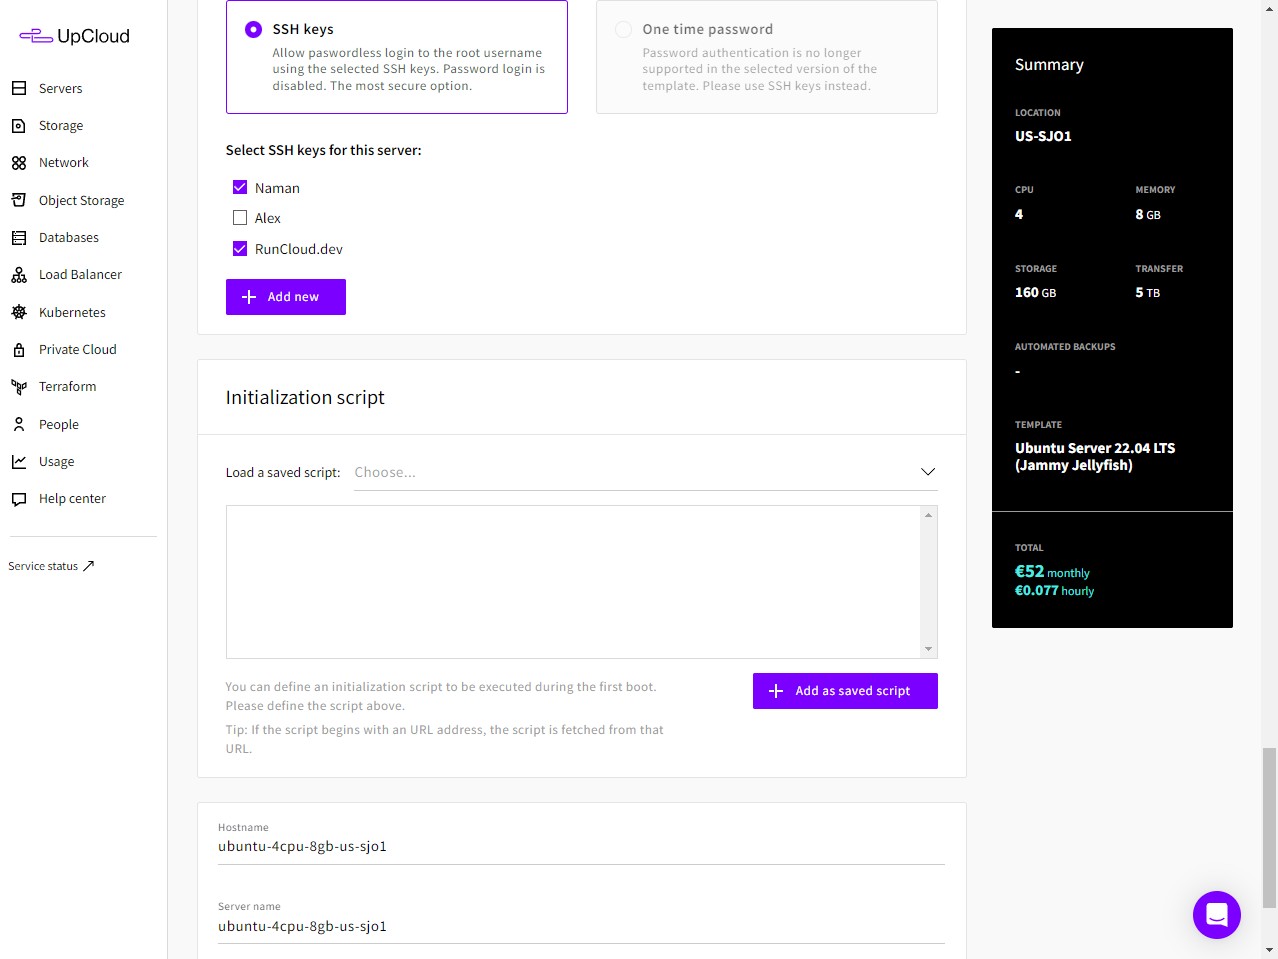
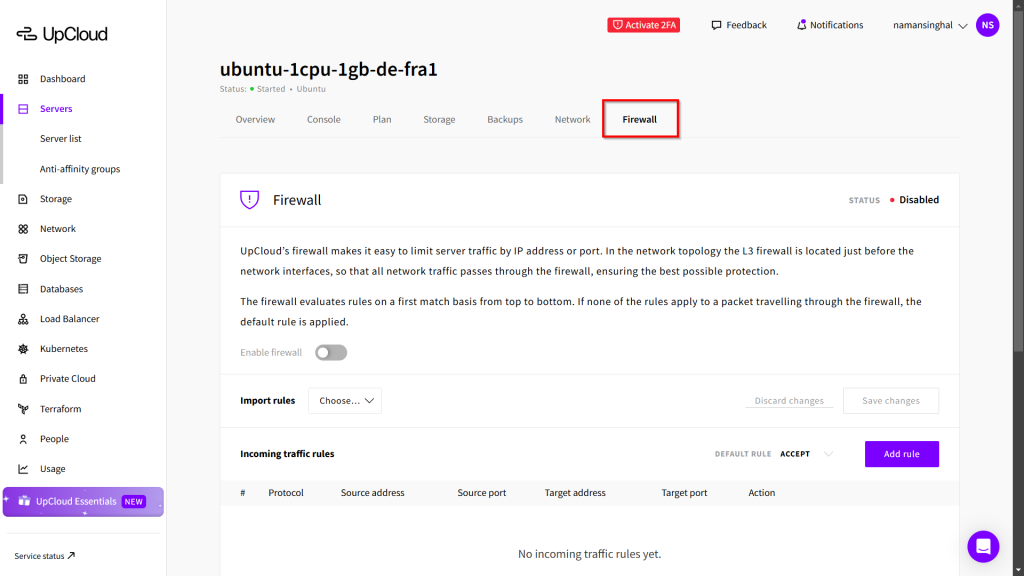
First, you need to access the firewall management interface for your server. To do this, log in to your UpCloud control panel and navigate to the details page of the server you intend to use with RunCloud. Once you are on the server’s overview screen, click on the Firewall tab to proceed.To take your hosting experience to the next level, start using RunCloud alongside your UpCloud server. With RunCloud, you can easily manage your server and web applications from a single dashboard, even if you’re not an expert in Linux. Register for RunCloud and streamline your server management experience. Next, configure any other settings that you want to change, such as adding SSH keys or updating your server’s name. The RunCloud agent requires TCP traffic on ports 80, 443, and 34210 to function properly, and we will explain how to do this later in the article.
Configuring the UpCloud Firewall for RunCloud
It is NOT a good practice to use your main UpCloud username and password for the API key. We strongly recommend you create a dedicated subaccount that you can use for the API key.Scroll down to the bottom of the page and give your server a suitable name, select the API key from the list, then click “Continue”.
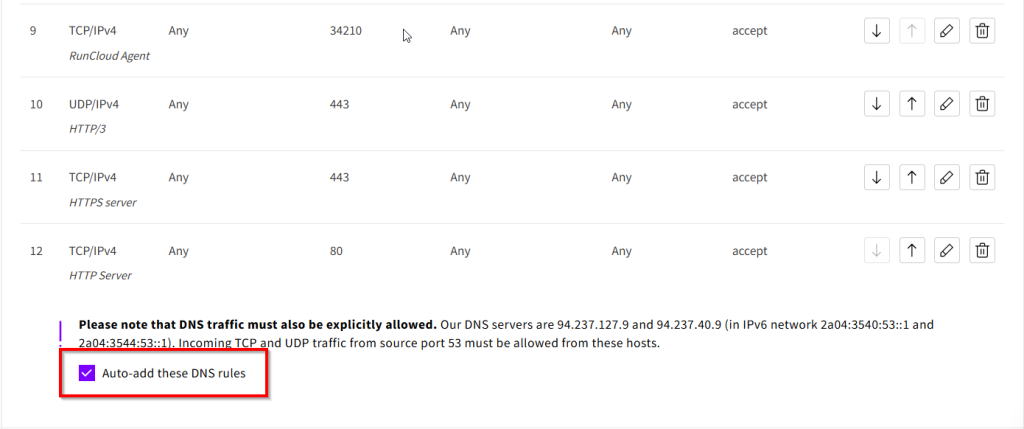
After setting up the above rules, you must also allow traffic from UpCloud’s DNS servers. You need to add rules that permit incoming TCP and UDP traffic that originates from source port 53 from UpCloud’s specified DNS servers. You can simply create the necessary rules by clicking on the corresponding. checkbox.
- Create a rule to allow standard HTTP traffic by permitting incoming connections on TCP port 80.
- Add another rule for secure HTTPS traffic by allowing incoming connections on TCP port 443.
- Optionally, to support the modern HTTP/3 protocol, you can add a rule that allows incoming traffic on UDP port 443.
- Next, you must create a rule to allow the RunCloud agent to communicate with your server. Add a rule to permit incoming connections on TCP port 34210.
- To allow yourself to connect to the server via SSH, create a rule for TCP port 22. For enhanced security, it is highly recommended that you disable or remove this rule if you don’t plan to connect to your server via SSH.
Professional WordPress developers can use the one-click WordPress Staging feature to create a staging version of your website easily. If you don’t have a RunCloud account, you can sign up for a 5-day free trial, with no credit card required.A screen will pop up showing you a list of available server providers – select UpCloud and click the “Deploy Server Automatically” option.
After Action Report
This will install all the necessary dependencies on your server that are required to run websites. After the installation is complete, you can close the terminal, and manage your server from the RunCloud dashboard. For this subaccount permission, uncheck the “Access to control panel” option, and only enable the “Allow API connection” option. This subaccount will be dedicated to API connections only and can’t be used to access your UpCloud control panel.