It’s safer than allowing anonymous comments, significantly reducing bot spam, but it doesn’t eliminate the threat entirely, as bots can automate registration. To stop fake user signups, you should also implement strong registration security, like email verification and reCAPTCHA on registration forms.
- Perhaps you’ve implemented CAPTCHAs, only to find they frustrate legitimate users, can still be bypassed by sophisticated bots, and potentially slow down page loads.
- Maybe you’ve installed anti-spam plugins but worry about their impact on site performance, potential conflicts they introduce, or recurring subscription fees.
Open /etc/fail2ban/jail.local with your text editor. If this file doesn’t exist, you can create a new one. By default, Fail2Ban reads from /etc/fail2ban/jail.conf, and it’s best practice to copy jail.conf to jail.local and make your customizations there.On servers managed by RunCloud, Nginx stores separate access logs for each web application you’ve created within the /home/<username>/logs/nginx/ directory, named following a pattern like your-app-name_access.log.sudo nano /etc/fail2ban/filter.d/wordpress-comment.conf
By using Fail2Ban, you gain efficient, low-overhead protection that complements your existing WordPress security practices. This highlights the power of RunCloud: it provides an intuitive platform for managing your servers and applications while still granting you the full underlying access and control necessary to implement advanced, custom security measures like this Fail2Ban configuration.After enabling the jail, you can check the status of Fail2Ban and see if your new jail is active and if any IPs have been banned. Check the overall status and list active jails:sudo fail2ban-regex /home/runcloud/logs/nginx/your-app-name_access.log /etc/fail2ban/filter.d/wordpress-comment.conf
📖 Suggested read: The 6 Best WordPress Security Plugins (2022)For the new filter and jail to take effect, you must reload the Fail2Ban service. To do this, you can simply execute the following command in your terminal:
- Server-Wide Protection: This single Fail2Ban rule protects all WordPress sites hosted on the same server that log to the specified Nginx log directory, without needing configuration on each site. If a bot attempts to spam comments across multiple websites hosted on your server simultaneously, its IP address will be quickly blocked based on the cumulative activity seen in the logs.
- Protection across the entire website: It doesn’t just stop users from posting comments, it completely blocks the user from even opening the site or accessing it via API for the defined duration. This is much stronger than blocking a spam comment.
- More Robust Than User/Email Blocking: Spammers frequently cycle through fake or stolen usernames and email addresses, making blocks based on that data less effective; however, obtaining and rotating unique IP addresses at scale is significantly harder and more expensive for them.
- Protects from Trusted user accounts: Even if a normally trusted (moderated) user account is compromised or a bot inadvertently slips through initial approval, this Fail2Ban rate limit ensures that the user can only submit a handful of comments before their excessive posting frequency triggers an automatic IP block.
- No Plugin Bloat: This method avoids installing additional WordPress plugins, keeping your site’s codebase leaner and reducing potential third-party code conflicts or vulnerabilities.
- Firewall-Level Efficiency: The IP blocking is handled by the server’s firewall (like iptables or nftables), which is highly efficient and prevents the spam traffic from even reaching WordPress or PHP, reducing server load compared to application-level filtering.
- Adjustable Thresholds: You can easily modify the maxretry (attempts allowed) and findtime (time window) parameters in the Fail2Ban jail configuration to make the blocking more or less aggressive based on your observations.
- Doesn’t Stop Initial Spam: This method is reactive based on frequency. It will not prevent the first one or two spam comments from a new IP address from being submitted; the block only occurs after the threshold (maxretry) is exceeded within the findtime. You still need WordPress-level tools (like Akismet, moderation queues, or disabling comments) to handle those initial attempts.
📖 Suggested read: 10 Security Tips to Secure a VPS Server in 2025 [Ultimate Guide]Since you might have multiple WordPress sites (web applications) on the same server and want Fail2Ban to protect all of them with this rule, you need to ensure the logpath directive we configure later correctly points to all relevant access logs.
Table of Contents
Prerequisites
- You will need SSH access to your server with sudo privileges.
- You need to ensure that Fail2Ban is installed and running on your server. If you are using RunCloud, you don’t need to do anything, as RunCloud includes Fail2Ban out of the box.
What makes this approach particularly effective and distinct from standard WordPress anti-spam plugins is its server-wide application. A single Fail2Ban rule protects all the WordPress sites hosted on your RunCloud server, efficiently blocking malicious IP addresses at the firewall level before they can strain your web application resources. This is usually unachievable with site-specific plugins alone.
Step 1: Locate Web Server Logs
Absolutely. Excessive spam comments filled with low-quality or malicious links can dilute your page quality, negatively impact user experience, and potentially lead to search engine penalties. They also consume crawl budget and server resources that could be better used on legitimate content.The core idea here is simple: legitimate users rarely post multiple comments in rapid succession across different posts within a short timeframe. Automated bots, however, often hit the wp-comments-post.php endpoint repeatedly as they crawl sites looking for comment forms.This guide has explored an effective, server-level technique to mitigate WordPress comment spam by implementing Fail2Ban rate limiting. This method tackles the problem from a different angle, focusing on the frequency of posting attempts rather than just the content. It provides a powerful layer of defense against automated bots hammering your wp-comments-post.php endpoint.
Now, we define a “jail” that uses the filter we created and specifies the conditions for banning (like maxretry, findtime) and the ban duration (bantime). It’s important to add this configuration to jail.local to avoid it being overwritten by package updates.
Step 2: Create the Fail2Ban Filter Definition
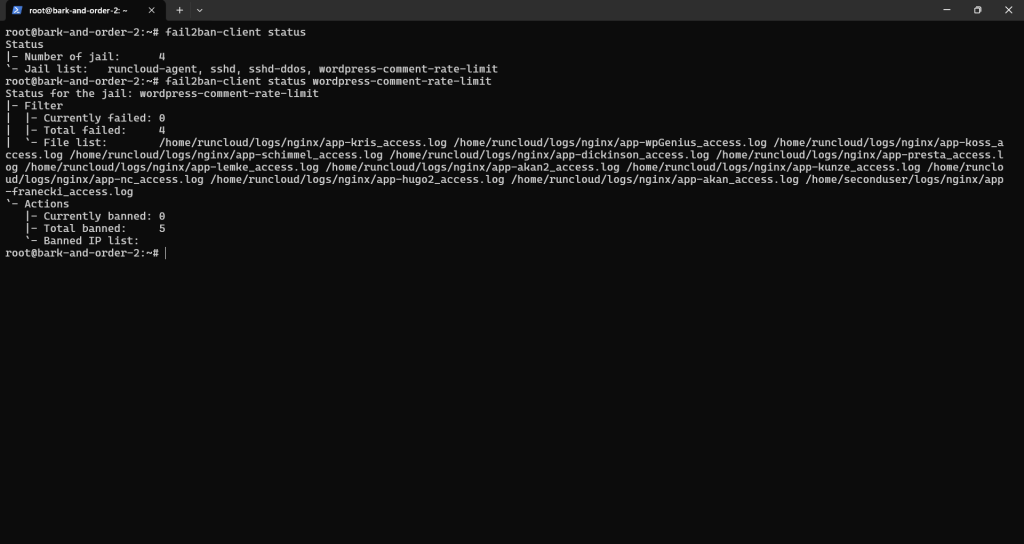
This guide will walk you through the process of setting up Fail2Ban on your server (specifically tailored for a RunCloud environment, but it is easily adaptable on any other server) to automatically block the IP addresses of bots or individuals who attempt to post comments too frequently on your WordPress sites.Is your website drowning in WordPress comment spam? If you’re battling endless waves of bot-generated junk, you’ve likely tried the usual suspects…Do you ever wish there was a different, more fundamental way to tackle this?sudo fail2ban-client status wordpress-comment-rate-limit
📖 Suggested read: 11 Alternatives to reCAPTCHA to Protect Your Site from Spam
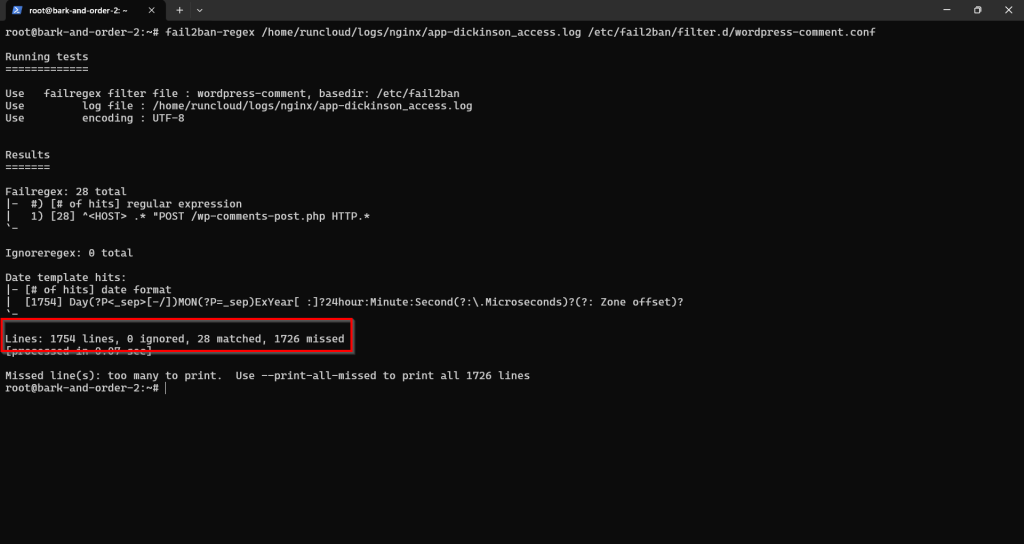
Step 3: Test the Regular Expression (Optional but Recommended)
📖 Suggested read: How to Use ModSecurity and OWASP CRS for Web App Firewall (WAF) to Secure Your WebsiteYou should see a positive number of matches if your log file contains recent comment posting attempts (legitimate or spam). It will also list the actual log lines that matched, allowing you to verify. If you don’t see any matched entries, then you will need to troubleshoot your fail-regex before moving forward. 📖 Suggested read: DKIM – What Is It & Why Your Emails Need It
- Lines matched by failregex.
- Lines ignored by ignoreregex (should be 0).
- Total lines read.
Before enabling the rule, it’s wise to test your failregex against one of your actual Nginx access logs to ensure it correctly identifies comment posting attempts.sudo nano /etc/fail2ban/jail.local
After editing the file, save it and exit the editor (in nano, press Ctrl+X, Y, then Enter).[wordpress-comment-rate-limit]
backend = auto
allowipv6 = auto
enabled = true
port = http,https
filter = wordpress-comment
logpath = /home/runcloud/logs/nginx/*_access.log
bantime.increment = true
bantime.factor = 6
bantime.maxtime = 1w
bantime = 3h
findtime = 1h
maxretry = 5
Yes, disabling comments entirely reduces your site’s attack surface by removing a primary vector for user-submitted content and potential code injection attempts. Although it is not a complete security solution, it eliminates comment-specific vulnerabilities and simplifies security management. But it also removes the way you interact with your users.sudo systemctl reload fail2ban
sudo systemctl status fail2ban
If you accidentally block yourself, read our guide on How to Unban an IP Address in Fail2Ban.If you want to monitor multiple websites using the single configuration, then you can either individually list out the log file for each of the application in its separate line (as shown above) or you can use a wildcard to read all the log files in a directory (/home/runcloud/logs/nginx/*_access.log).We have already written a detailed guide on how to protect your WordPress login page using Fail2Ban. However, you can also use Fail2Ban to reduce spam comments on your site.
Step 5: Reload Fail2Ban Configuration
This section will walk you through the steps for configuring your Fail2Ban client to block spam comments automatically. But before we go ahead, make sure you satisfy the following requirements:After making the necessary changes, you can save the file and exit the editor (Ctrl+X, Y, Enter in nano).Fail2Ban monitors server logs to block and restrict server access. Therefore, the first step is to identify the location of the Nginx access log files that record incoming requests to your WordPress sites, as Fail2Ban needs to monitor these files for comment submission attempts.
Step 6: Monitor Fail2Ban (Optional but Recommended)
Run the fail2ban-regex command, replacing your-app-name_access.log with the actual name of one of your application’s access log files:Fortunately, there is.We will configure Fail2Ban to monitor your web server’s access logs for POST requests to the wp-comments-post.php file. If any single IP address makes more than five such requests within a one-hour period, Fail2Ban will automatically block that IP address at the firewall level for an initial period, with subsequent blocks increasing in duration for repeat offenders.sudo fail2ban-client status
Instead of analyzing the content of the comment, which can be complex and resource-intensive, this method focuses purely on the frequency of comment submission attempts.By setting maxretry = 5 and findtime = 1h, we are telling Fail2Ban: “If you see the same IP address making a sixth attempt (or more) to post a comment via wp-comments-post.php within any 60-minute window, block that IP address.” The first five attempts are allowed, but the sixth triggers the ban.Open or create the filter file using a text editor like nano:# Fail2Ban filter for WordPress comment posting attempts
# This filter looks for POST requests to wp-comments-post.php
[Definition]
failregex = ^<HOST> .* "POST /wp-comments-post.php HTTP.*
Ready to experience powerful, flexible server management that doesn’t lock you out? Sign up for RunCloud today and take control of your web hosting environment.