March 4, 2021
Table of Contents
- 1 Getting past those annoying issues when administering VMware Cloud Foundation (VCF)
- 1.1 LAB2PROD 4.4K Views 2 years ago 61 Likes 5 Comments VMware Cloud Foundation Cloud Builder is a software tool used to deploy VMware Cloud Foundation, a u… Stopping a Task in SDDC Manager
- 1.2 Removing a task in SDDC Manager that is stuck in Running, Pending or any other non-complete state
- 1.3 Add Host to Cluster Task Fails with License Has Expired
- 1.4 Failed to validate BGP Route Distribution Distribution
- 1.5 ESXi Password After Imaging With VMware Imaging Appliance (VIA)
- 1.6 Renaming Objects Deployed by SDDC Manager
- 1.7 Management Domain Bringup with EVC Failing
- 1.8 Modifying NSX-T Tier-0 Settings
- 1.9 Unable to Configure Edge Bridging on Edge Cluster Deployed by SDDC Manager
- 1.10 NSX-T Sequential Host Updates Through SDDC Manager
- 1.11 Incorrect or Duplicate IP Assignment When Adding Hosts
- 1.12 Removing a Host From the SDDC Manager Database
- 1.13 Starting a New Management Domain Bringup Using Existing Cloud Builder Appliance
- 1.14 Skipping Tasks in SDDC Manager Workflows
- 1.15 VCF 4.2.1 Configuration Drift Bundle Pre-Check Failures
- 1.16 Recreating VCF Managed vSAN Disk Groups
- 1.17 VCF SDDC Manager Bundle Checksum Issue
- 1.18 Replace a Failed vSAN Diskgroup on a VCF Managed Node
- 1.19 Rebuild VCF Management Domain Host
- 1.20 Delete Domain Workflow Fails
- 1.21 VCF Domain Failed State
- 1.22 SDDC Manager: Unable To Configure Security Global Config
- 1.23 VMware Cloud Foundation: Manual Product Upgrades
- 1.24 Related
The Unofficial VCF Troubleshooting Guide v2 | LAB2PROD
Getting past those annoying issues when administering VMware Cloud Foundation (VCF)
This is my unofficial VMware Cloud Foundation (VCF) troubleshooting guide. This is an article that will be kept up-to-date on a regular basis.
A lot of the testing and workarounds that will be detailed in this article have been tested on VMware Cloud Foundation (VCF) 3.x. and VCF 4.x. Each section will explicitly state if it has been tested for both versions.
When performing database edits or any modifications, do so at your own risk. VMware Support may not support your environment once the changes have been made, ensure you have a snapshot before making changes!
Before diving into the content, you may be interested in some videos I have published that related to VCF.
Stopping a Task in SDDC Manager
Let’s start off nice and easy, more often than not you may find yourself in a situation where you have a task won’t complete. That is, it is stuck in either a pending or running state in SDDC Manager.
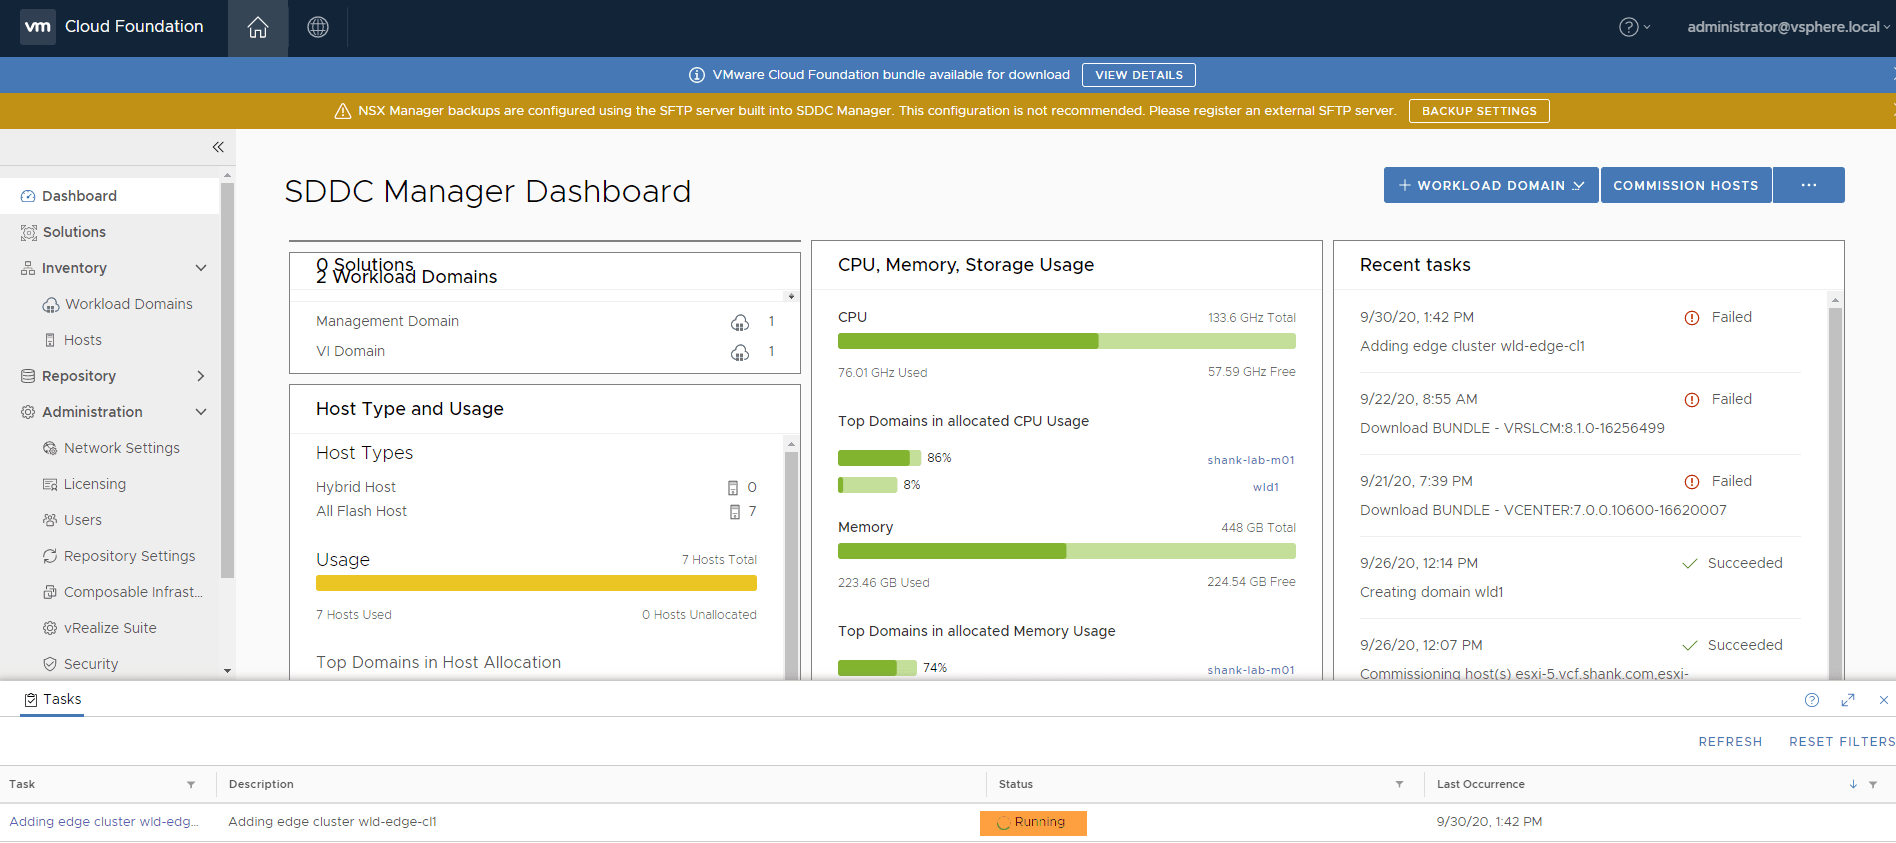
In SDDC Manager you should see a task in a similar state to the above. The task may have been running endlessly or you need to stop it before it completes, this is actually quite easy to do.
Putty (or use whatever tool you prefer onto SDDC Manager), login as the vcf user and then su to root. You should see the below screen.
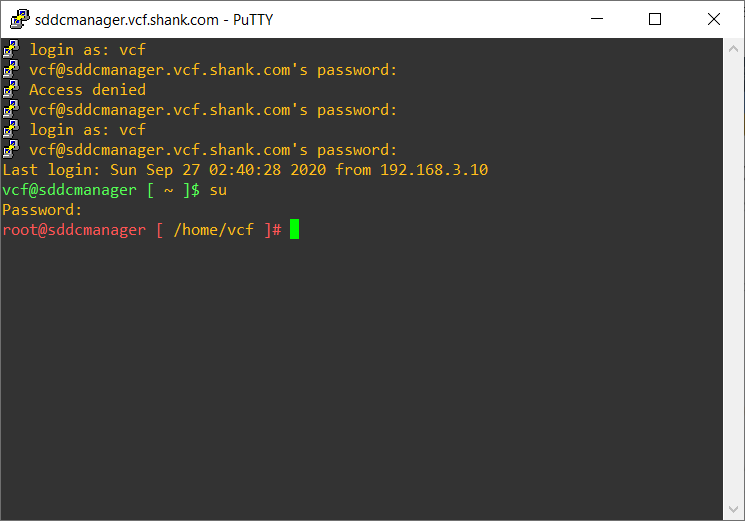
Once you are in we need to restart the domainmanager service, to do so type in systemctl restart domainmanager, you won’t have any output return on the screen and should see the same as what is in the image below.
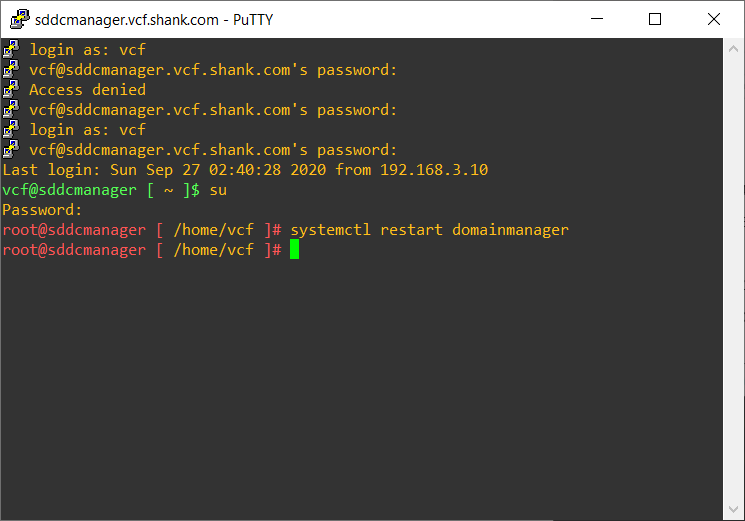
You can run systemctl status domainmanager to check how long the service has been up for.
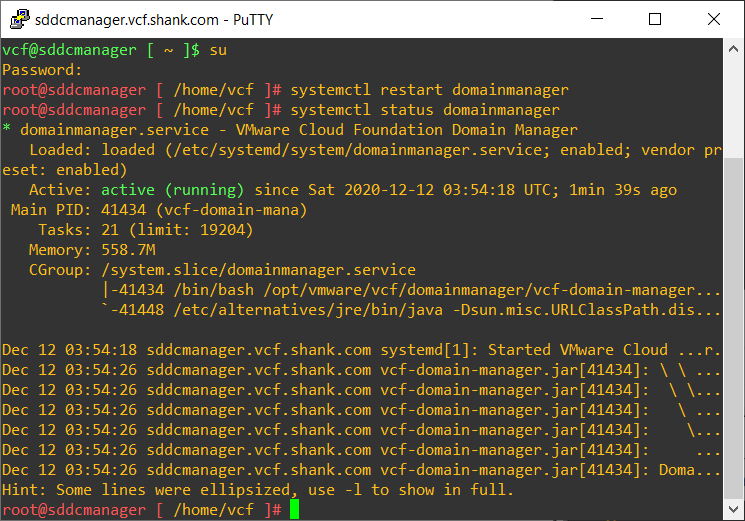
Wait about a minute and then log back into SDDC Manager and you should see the task that you wanted to stop now in a failed state.
This has been tested in VMware Cloud Foundation 3.x and 4.x. In VCF 4 and above you may have to also restart the operationsmanager service and commonsvc.

Removing a task in SDDC Manager that is stuck in Running, Pending or any other non-complete state
You may sometimes find yourself needing to remove a stale task in SDDC Manager. This may be as a follow up to having to stop a task or for whatever other reason you may have.
To start, we will need to get the ID of the task that you are wanting to remove. There are a couple of ways to do this, for now let’s use the SDDC Manager GUI to get this.
Click on the task that you want to remove in SDDC Manager. After doing so, it expands the task and shows it’s subtasks.
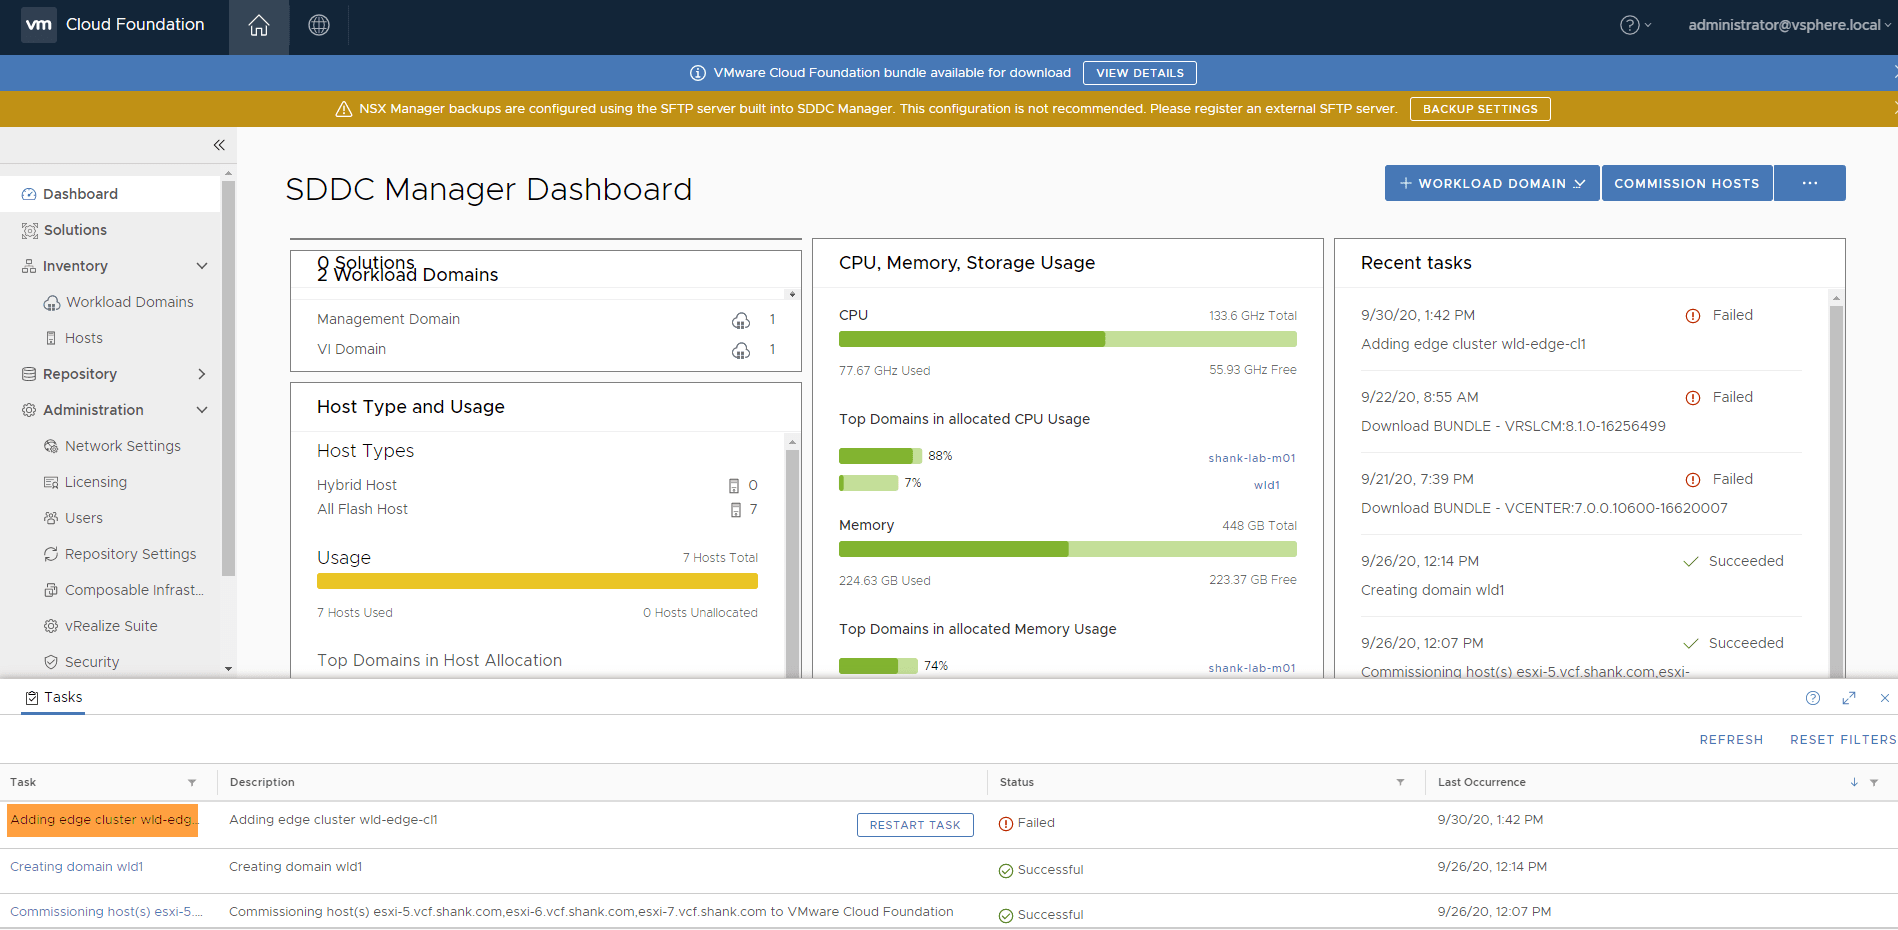

You should now be able to see the task ID in the URL at the top of the browser.

Now that we have the task ID, putty into the SDDC Manager, once again logging in as vcf and then su to root.
The command we are going to run here is ;
curl -X DELETE http://localhost/tasks/registrations/<taskID> (replace the id with the task id from your environment.
The task has now been cleared from SDDC Manager,

Remember to take snapshots before making any changes so you can revert to them if required. But also remember to delete them once you are done with them!
This has been tested in VMware Cloud Foundation (VCF) 3.x and 4.x.
Add Host to Cluster Task Fails with License Has Expired
VCF 3.x
This is another common problem when adding a host to a cluster in SDDC Manager that you may face. The issue occurs after you have commissioned a host and are then adding it to a cluster in a workload domain.
The workflow kicks off and the first few tasks will successfully complete. Once it gets to the validation of the vMotion network (it could be at another step as well), the subtask eventually fails and it says the hosts license has expired. You can confirm this by also wither viewing the domainmanager.log file (/var/log/vmware/vcf/domainmanager/domainmanager.log) or tailing it as you kick off the workflow. Generally tailing the log as a workflow is going gives you more insight to what is happening under the hood… if you like that kind of detail!
If you do encounter this issue. it is generally due to the evaluation license on the ESXi host having lapsed.

The quickest way to get past this is to apply a valid license to the host. In this case, the key that would have been applied through the SDDC Manager workflow was used directly on the host. After this, the process completed successfully.
VCF 4.x
In VCF 4.x the the workflow prompt is a lot more clear and direct. Users should quite easily figure out they have a licensing issue on the host. The image below is what you should expect if you are facing the same issue.

Failed to validate BGP Route Distribution Distribution
This is a common error that is faced during a bring up, it may be shown as Failed to validate route distribution. If you look at the bring up log files, path can be found here, you should see something similar to the image below.

If you do get this error, start by checking the below.
- Edge Nodes are deployed, with no issues
- You are able to ping the Edge nodes
- You are able to SSH onto the Edge nodes
- Check the routing table on the Edge nodes, ensure they can see the management subnet. You will need the management subnet to be advertised into BGP
- You may want to consider advertising a default route from the upstream or wherever BGP is configured, into BGP as well
Once you have covered this off and you are able to ping the management subnet from the Tier-0 gateway SR, you should be able to proceed past this error successfully.
This behaviour will be the same in VCF 3 and VCF 4.
ESXi Password After Imaging With VMware Imaging Appliance (VIA)
If you have chosen to image your servers using VIA, you may get stuck attempting to figure out what the password of the host is. If you have not changed any settings, then the default credentials out of the box should be.
- Username: root
- Password: EvoSddc!2016
This should be the same across VCF 3.x and 4.x deployments.
Renaming Objects Deployed by SDDC Manager
This section will be continuously updated, as of updating this article all versions prior to VCF 4.1 did not support renaming of any objects.
As of VCF 4.1, the only object that can be renamed that has been deployed by SDDC Manager is a vSphere cluster. All you have to do is rename the cluster, wait a few minutes and refresh SDDC Manager, this change should be reflected in the UI.
There should be additional objects that can be updated like this, however they will be in future releases, and as they are I will update this section.
Management Domain Bringup with EVC Failing
If you are attempting to do a bringup in cloud builder using EVC, this is usually because you have mismatched CPU’s in the cluster. This can be done, however if you do not stage it properly you will face issues during the bringup, which will mean you will have to start again.
You will start seeing this issue present itself once the hosts have been partially provisioned and vCenter has been deployed. It the appliance attempts to create a vSphere cluster with EVC turned on and then add the hosts to it. You should see something like this in the logs.
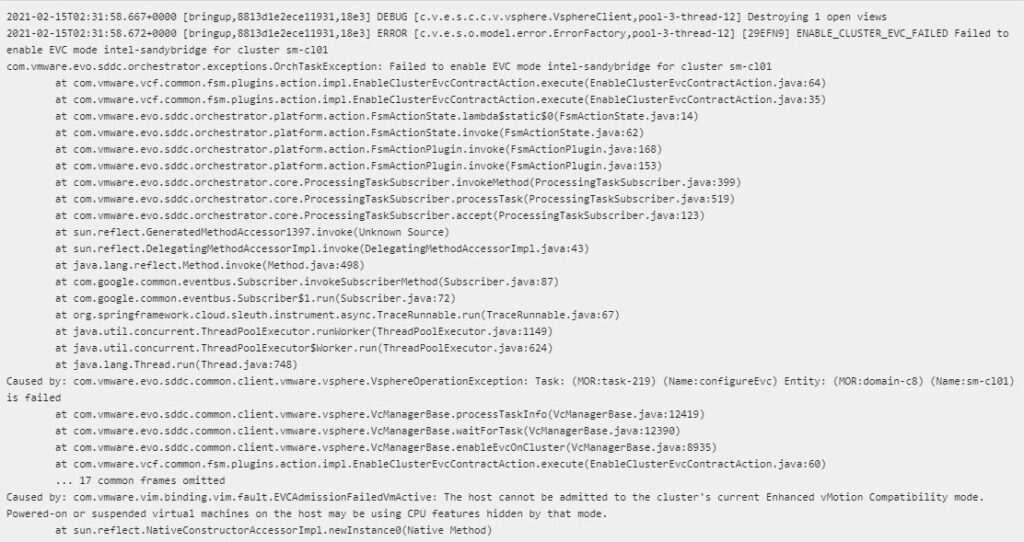
In my experience, the reason I have seen this happen is the vCenter appliance is being deployed onto a host with a newer CPU instruction set. Then when it tries to add hosts and itself into the cluster, EVC is being flagged as being an issue.
This can be due to either the wrong EVC setting being set in the spread sheet or in my case, the order of which the hosts are being imaged and deployed. In one of my cases, I changed the order of the hosts being built, the hosts with the older CPU’s were built on first and the newer hosts last.
This can be done in the bring up spreadsheet, you enter the details of 4 hosts, here ensure the first one or however many you have are the older hosts. Doing this should allow you to successfully build the management domain using EVC.
Modifying NSX-T Tier-0 Settings
**** Performing these changes may be Ok up front, however may result in edge cluster expansion or shrinking workflow issues in future releases.
Tier-0 HA Mode Change
If the edge cluster and Tier-0 gateways have been deployed with the incorrect HA mode – either Active-Standby or Active-Active, it can be changed. In order to change these settings, the usual process of stripping the BGP peer and removing the uplink interfaces must be done first. I would also be taking notes of their current config, so they can be put back once you have changed the HA mode.
Take note of the BGP peering settings as well, also keep in mind for lifecycle of the edge nodes to still be possible, the management interface and it’s assignments must not change. If possible, it is always best to redeploy the edge cluster, however if you have a good enough reason to not redeploy, then you can complete this process. Just keep in mind the caveats listed above.
Modifying BGP Configuration
As with above, the BGP ASN and peer addresses can be changed, this should not impact anything. However you must ensure full connectivity exists between all edges and peers. Management to the edge nodes must remain as is.
Unable to Configure Edge Bridging on Edge Cluster Deployed by SDDC Manager
When attempting to configure bridging on the unused vmnics of the Edge virtual appliances deployed by SDDC Manager. You may run into the error “[Fabric] PNIC and device configurations do not match for transport node 3aab847b-5ed4-49a5-88fd-3935ef0c4171. Unconfigured DPDK fastpath interface fp-eth2 is used for connecting transport node pnics. Please provide portgroup connection for this interface fp-eth2. (Error code: 15519)” or something similar, with the transport node ID matching your environment.
You could potentially hit this issue when attempting to add a new switch in the edge node configuration and map the unused NIC. Refer to the image below.
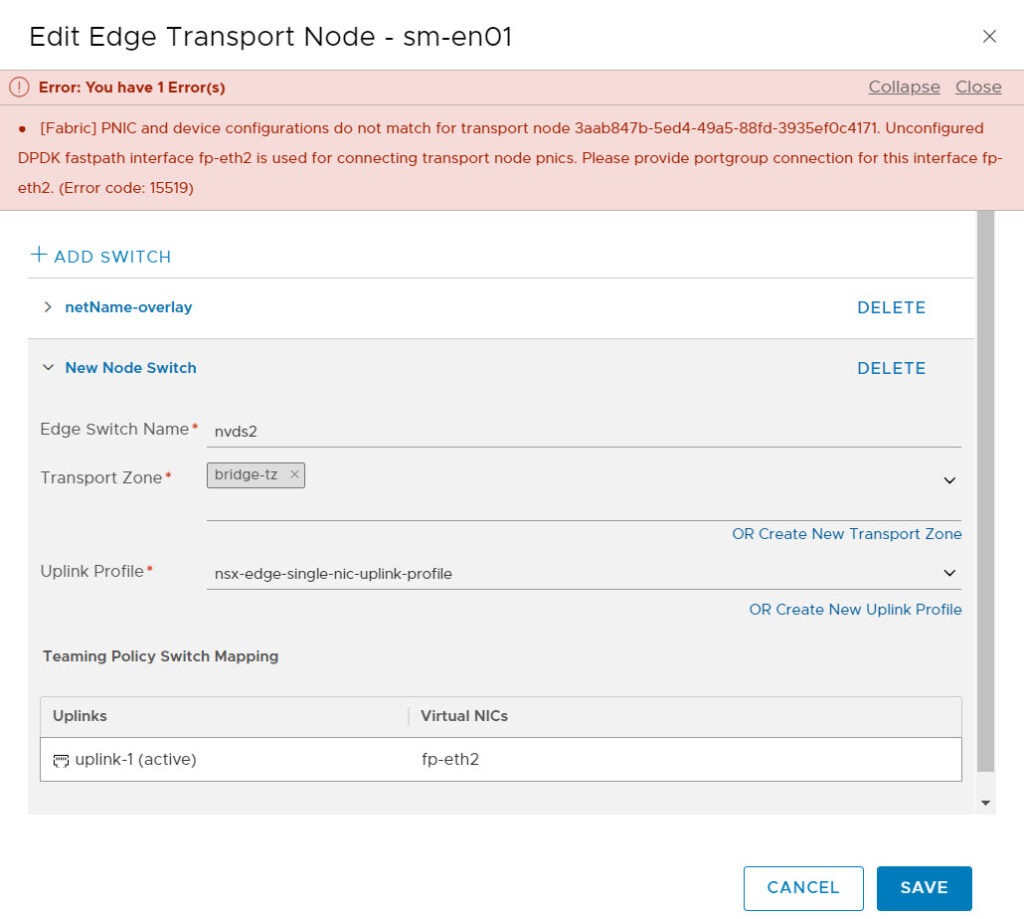
This is a bug in VCF 4.1 and potentially other versions, I have only tested this in 4.1. The workaround is to deploy another edge through the NSX-T Manager directly and create a separate edge cluster from bridging. This is actually my preferred method to bridge, rather than utilize the existing edge’s unused nics.
NSX-T Sequential Host Updates Through SDDC Manager
This is a quick note, as of writing this section that SDDC Manager / VCF’s sequential updates of NSX-T host transport nodes do not allow you to configure the order in which they are updated or skip particular hosts.
Incorrect or Duplicate IP Assignment When Adding Hosts
You may sometimes get into a position where you have removed a host from SDDC Manager forcefully, or some other way. Once the host is removed people usually move on and chalk that up as a win.
Whilst it is a victory in itself as you are able to proceed and remove the lock from SDDC Manager, you have just thrown your database out of whack. This is bad because and will cause you problems when you start moving forward with deployments. For example, since you have ripped out the host, the IP addresses that SDDC Manager allocated it out of the pool may not be listed back as available again. The opposite may also happen, where if you database isn’t consistent with your deployment, it may start issuing used IP’s, which will wreak havoc with both the deployment and your network! You may notice this behaviour when adding hosts back in, and it then fails on the network connectivity tests (vMotion vmkpings).
If you are quick enough, you can catch the IP address being assigned to the host by putty’ing onto it and running esxcfg-vmknic -l and it should you what IP address has been assigned.
In order to get over this hurdle we are going to have to perform some database edits. Remember to take a snapshot at this point so you can revert if required. And also note, contact VMware Support if you prefer them to assist with this.
***You may find yourself in an unsupported state if you complete the following steps. Proceed with caution.
Logging into the PostGres (PSQL) Database
To login to the postgres database, putty onto SDDC Manager, login as the user vcf and then su into root.
Once here;
- enter psql -h localhost -U postgres
- tpye in x for extended commands
- c platform to connect to the platform database
Finding and Fixing the Records in SDDC Manager’s Postgres Database
The steps below database steps should allow you to overcome this issue.
- Type in select * from vcf_network where type=’VMOTION’; the output from this will show you records of vMotion network pools, like the below image.

- You will need to identify which network pool or record in your environment needs to be updated. Once you have done that, copy the entire record to notepad to make things easier.
- Ensure you have that snapshot to failback.
- Now we will update the record to make sure the used IP is allocated in the record and not available in the free IP. I want to ensure 10.0.1.11 is used and not free to be re-issued.
update vcf_network set used_ip_addresses='["10.0.1.2","10.0.1.3","10.0.1.4","10.0.1.5","10.0.1.6","10.0.1.7","10.0.1.8"
,"10.0.1.9","10.0.1.11"]' where id='878a37ea-d66b-4a4b-b62a-cf1364e77e29,'; -- update the ID to suit you and make sure the command isn't wrapped in the cli.
- Here you can see the record has been updated, but notice it is still in the free_ip_addresses field, let’s fix that now.
update vcf_network set free_ip_addresses='["10.0.1.10"]' where id='878a37ea-d66b-4a4b-b62a-cf1364e77e29';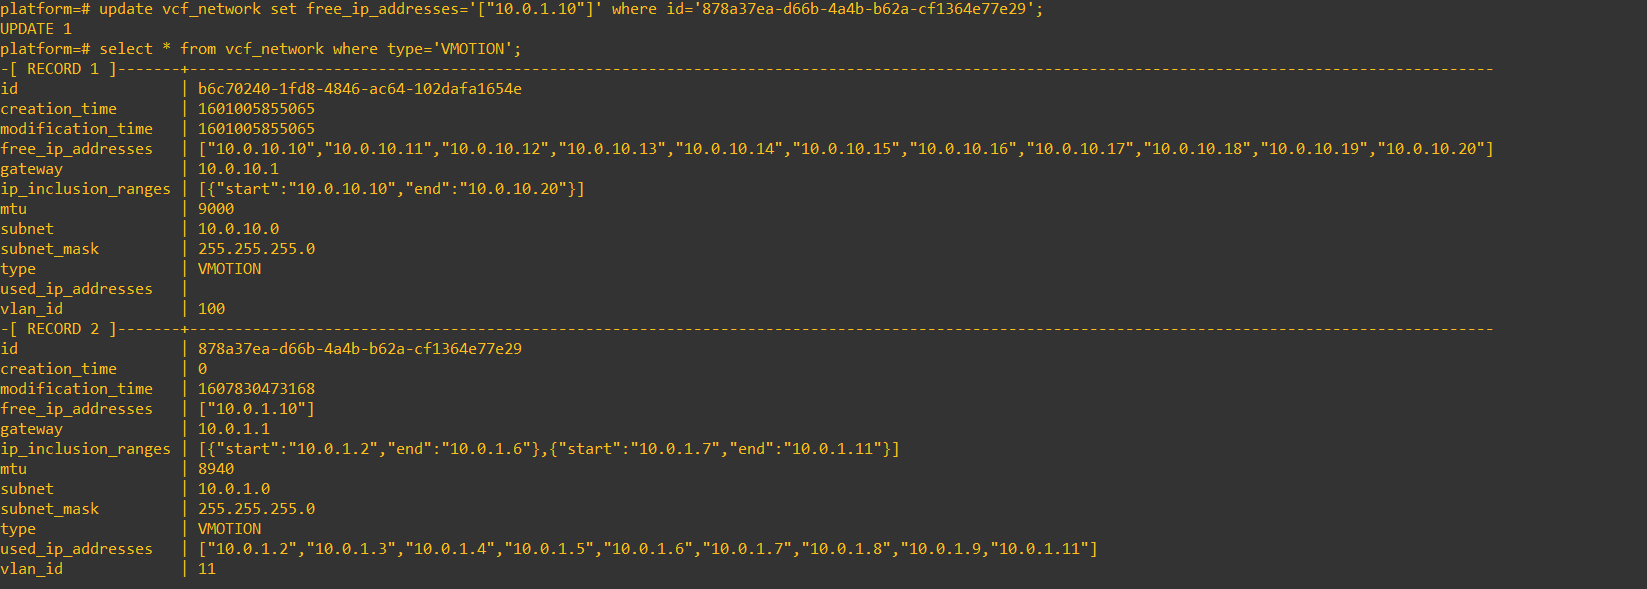
- Now the free IP address and the used ip address fields are correct, restart the domainmanager service (systelctl restart domainmanager) and then about a minute later restart the common services (systemctl restart commonsvc)
- The same process can be completed for VSAN, just replace VMOTION with VSAN. Once you are happy nothing has gone wrong, ensure you delete that snapshot.
Removing a Host From the SDDC Manager Database
*** This section involves a database change, ensure you have taken a snapshot. Remember if you proceed with any database changes, you may find yourself in an unsupported state.
As you did previously, putty into the SDDC Manager appliance as vcf and then su into root. Follow the steps in the previous section to log into the postgres database. Make sure you also have the host ID handy, you can get the ID by finding the host in the SDDC Manager UI and copying it from the URL.
Once you are in the platform context of the database, we will have to run the below commands to ensure the host is deleted from each of the tables.
delete from host_and_cluster where host_id='<hostID>';
delete from host_and_domain where host_id='<hostID>';
delete from host_and_network_pool where host_id='<hostID>';
delete from host_and_vcenter where host_id='<hostID>';
delete from host where id='<hostID>';- The host should now have been removed from the UI and database.
- Clear out any old workflow task that you may have had relating to this host (add / remove workflow);
curl -X DELETE http://localhost/tasks/registrations/<taskID>Starting a New Management Domain Bringup Using Existing Cloud Builder Appliance
You may need to use this workaround if you have started a bringup on cloud builder, but then realise you have not entered the right configuration details. This may be evident due to the bringup failing or you have otherwise been made aware.
I have had some success with snapshotting the cloud builder appliance, which can be reverted to if required. One thing to keep in mind with using this method is, ensure you do not keep the snapshot around for too long. This in itself could cause various other issues.
There are two methods to do this, the first is to retry the bringup with a modified json. This can’t be done via the UI and must be done using API. Use this method if its a minor change and the hosts do not need to be wiped.
- Putty onto the Cloud Builder appliance
- Navigate to the /tmp folder and have a look for a file called sddcspecxxxx.json (the xxx will have an ID for your environment)
- If the appliance has been rebooted, this file can be generated again using the xls, this process can be seen here
- Update the fields you require to update in the json file, once again be mindful of the changes you are making. If they are critical changes you may be better off starting again
- Get the UUID of the failed task, this can be found as the last errored execution in the /opt/vmware/bringup/logs/vcf-bringup-debug.log
- Run the following command for VCF versions below 4 to restart the bringup using the updated json
curl -X POST http://localhost:9080/bringup-app/bringup/sddcs/<uuid> -H "Content-Type: application/json" -d "@<path-to-json>- The below command is for versions 4 and above
curl -k -u admin:'<password>' -X PATCH https://localhost/v1/sddcs/<uuid> -H "Content-Type: application/json" -d "@<path-to-json>"The second method is to similar to reverting the snapshot, but is to clear the cloud builder appliances database. Once again this is for a fresh start, where the hosts have been reimaged and you don’t want to redeploy the cloud builder appliance.
This curl command will wipe the cloud builder appliances database.
curl -X GET http://localhost:9080/bringup-app/bringup/sddcs/test/deleteAll- The methods listed here may also be of use to you.
Skipping Tasks in SDDC Manager Workflows
This is something that I have played around with a bit, I have sometimes been advised by support to perform these actions so I have noted down the process. The important thing to note with doing this is, it is generally OK to skip verification tasks. However, you should not be skipping configuration tasks. If you do, they need to be performed manually.
The process I outline here will be demonstrating a BGP validation error, the config was valid, however SDDC Manager in VCF 4.1 does not support 2 different ASN’s during edge cluster deployment. So the skip task detailed here is to skip the BGP verification, however I did make sure BGP was up and 100% operational!!!
First let’s have a look at what you see in SDDC Manager, in the below image BGP verification sits there and after several attempts eventually fails.
Again, as with any database change, be extremely careful. Contact support if you are uncertain and take a snapshot first!
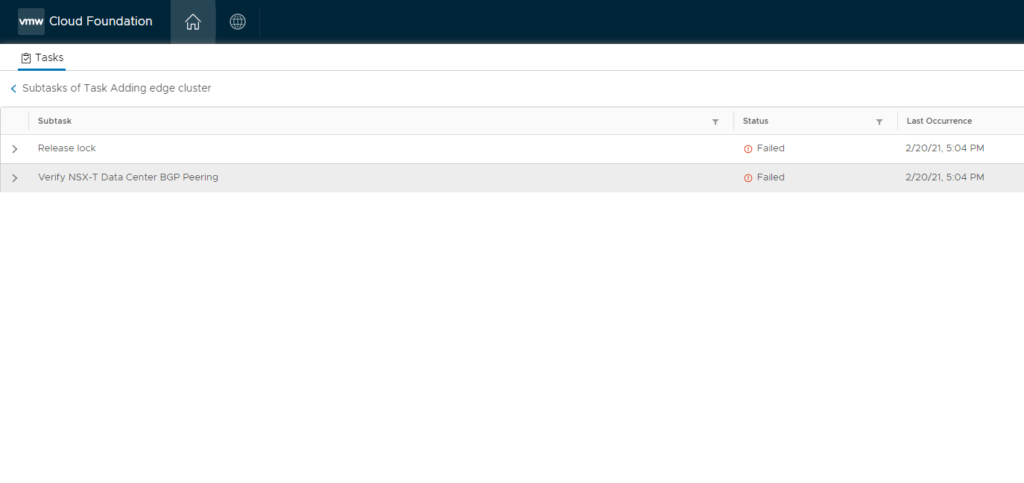
As mentioned earlier, this is because two ASN’s were entered for each Edge and this isn’t supported.
Log into the database
As mentioned in a previous section, we will need to log into the database. Prior to performing these actions, ensure you take a snapshot of SDDC Manager.
psql -h localhost -U postgresNow connect to the domainmanager database.
c domainmanagerTurn on expanded display, like so.
xRetrieve Task ID’s
List all tasks that have been executed.
select * from execution;
In the output, find the record that relates to your task and has a status of “COMPLETED_WITH_FAILURE”.
You should find something similar to the below image.

You can think of this record and task id as the parent task, you will now need to get all the child or sub tasks of it.
To do this you can run the below command, replace the ‘ID’ with the ID of your task in the previous step.
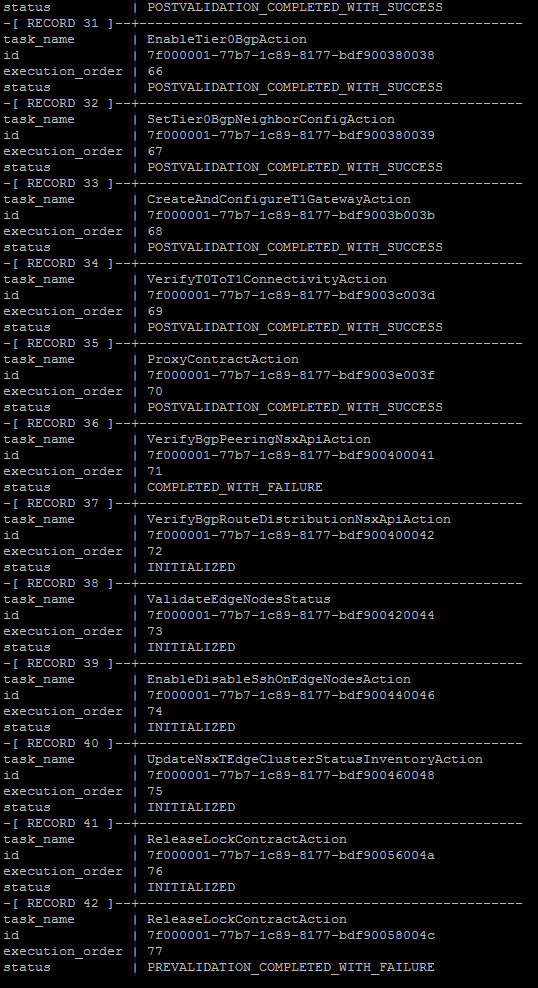
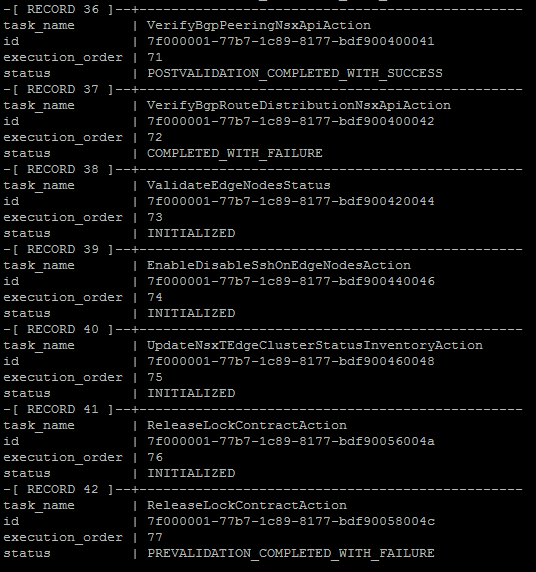
select task_name,id,execution_order,status from processing_task where execution_id='ID' order by execution_order;You should now see all subtasks, an example of this can be seen in the image below.
Update Task Status
From this output, copy records 36 and 37 to notepad or any other text editor of your choice. We will now need to mark the failed task as successful. The command to do that is below.
update processing_task set status='POSTVALIDATION_COMPLETED_WITH_SUCCESS' , execution_errors='' where id='recordIDfrompreviousstep'; 
After doing this, you will also have to mark the next task as failed, this is so the workflow picks up from this task instead. The command to do that is below.
update processing_task set status='COMPLETED_WITH_FAILURE' where id='record37ID'; 
Now check your work, list the tasks again and ensure record 36 is marked as successful and 37 is marked as fail, which we can see in the image below.
Restart Services
Now restart the domainmanager, operationsmanager and commonsvcs.service services. Wait about 3 – 5 minutes depending on your environment and log back into SDDC Manager.

Retry Workflow
Once you log back into SDDC Manager, the task you were working on will be in an error/failed state. Simply restart the task, click to expand it and check which subtask it is running. You should now see that it is not verifying BGP any longer, but has moved onto the next task.. at least in this case.

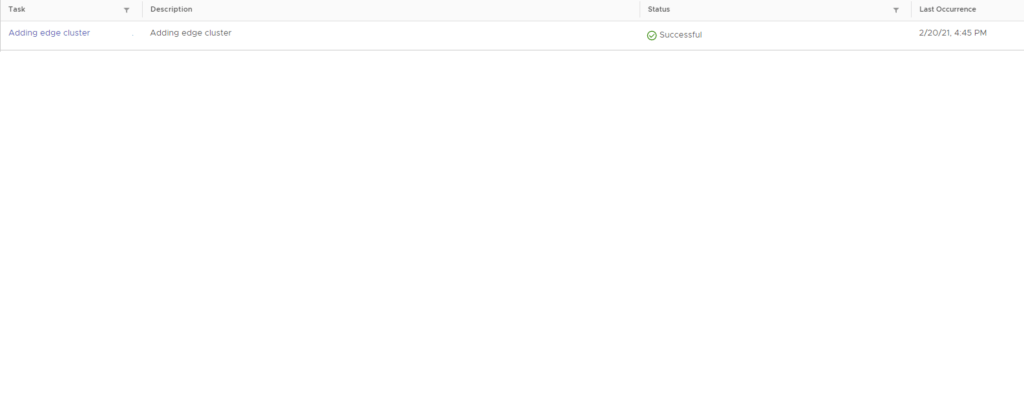
And finally the workflow completes successfully.
This process has been tested in VCF 3.x and 4.x.
VCF 4.2.1 Configuration Drift Bundle Pre-Check Failures
When upgrading to VCF 4.2.1 you may be presented with various errors. One error that I recently faced was an NSX-T audit pre-check failure. The resolution for the issue I faced is in this post.
Recreating VCF Managed vSAN Disk Groups
Depending on the circumstances, you may find issues with the way vSAN disk groups have been created on hosts managed by SDDC Manager. Refer to my post here to resolve the misconfigured vSAN disk groups.
VCF SDDC Manager Bundle Checksum Issue
Try this fix if you get stuck with the error LcmException: bundle checksum does NOT match the manifest value
Replace a Failed vSAN Diskgroup on a VCF Managed Node
Follow this process to get your VCF vSAN diskgroups back to a healthy state.
As with any of these changes, be very careful and if in doubt contact support.
Rebuild VCF Management Domain Host
The process detailed here will guide you in rebuilding a failed host that is no longer responsive.
Delete Domain Workflow Fails
The steps I used to resolve this issue are listed here.
You may find my other VCF related articles of use as well; LAB2PROD – VCF Related Articles.
VCF Domain Failed State
An end to end resolution of a VMware Cloud Foundation (VCF) domain in a failed state, preventing software upgrades can be found here.
SDDC Manager: Unable To Configure Security Global Config
This error appears when attempting to upgrade a VCF domain, this article shows you how to work through it.
VMware Cloud Foundation: Manual Product Upgrades
You should not be doing this, but if you do, read this article.
Stay tuned, this post is going to get a lot bigger as I overcome more hurdles. If you have any requests or sticking points, feel free to leave a comment and I will see what I can find for you!

