If you want consistent performance and a “Clear Cache” button that actually works,create a new test site today to experience RunCache.
Table of Contents
- 1 How to Identify Which Cache Is Causing the Problem
- 2 Why WordPress Changes Are Not Showing After an Update
- 3 How to Fix WordPress Changes That Are Not Showing
- 4 How to Handle Real-Time Updates with Stale Cached Assets
- 5 Wrapping Up
- 6 FAQs on WordPress Changes Not Showing After Update
- 6.1 Why do changes show when I’m logged in but not when I’m logged out?
- 6.2 What cache should I clear first: browser, plugin, server, or CDN?
- 6.3 Why is CSS not updating even after clearing the cache?
- 6.4 Should I purge Cloudflare by URL or purge everything?
- 6.5 How do I confirm a page is cached (HIT vs MISS)?
- 6.6 Can Cache-Control cause WordPress pages to stay stuck on an old version?
How to Identify Which Cache Is Causing the Problem
Common examples include Elementor, Divi, Oxygen, and block-based themes using theme.json.
- Changes are visible when logged in, but not logged out
- Server-level page cache or CDN cache is serving stale HTML
- Skip to Step 3 and Step 5
- Content updates show, but CSS or layout does not
- Browser, CDN, or server is caching static assets
- Skip to “How to Handle Real-Time Updates with Stale Cached Assets”
- Dynamic elements are wrong – cart counts, menus, widgets
- Object cache or transients are stale
- Skip to Step 4
- Code changes to the theme or plugin are not reflected
- PHP opcode cache or object cache issue
- See “Clear PHP OPcache” and “Clear Object Cache”
- Nothing updates anywhere
- Multiple cache layers active
- Follow all steps in order
Why WordPress Changes Are Not Showing After an Update
If your WordPress changes are not showing after an update, then you are in the right place. In this cache troubleshooting guide, we will move past the basic advice of “have you tried turning it off and on again?” We will dive deep into why your logged-out view differs from what you see as an admin, and how to verify whether you are hitting the page cache or the Redis object cache.Many modern WordPress themes and page builders generate compiled CSS and layout files that sit outside standard page caching.When troubleshooting a website, we should start with the easiest fix (your browser) and work our way back to the server.
How to Fix WordPress Changes That Are Not Showing
Once you have the path, you can remove the cache files. Be extremely careful with the rm -rf command. A single mistake can delete critical system files.
Step 1: Hard Refresh the Page and Verify
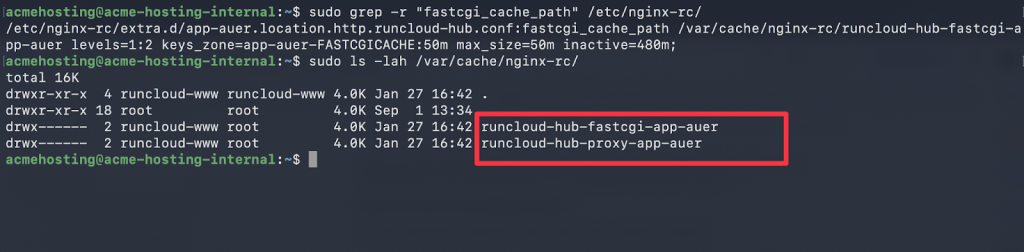
If these files are stale, server purging will have no effect because WordPress is still outputting old asset references.sudo grep -r "fastcgi_cache_path" /etc/nginx/
- Standard Install: Usually
/var/cache/nginxor/var/run/nginx-cache. - RunCloud Server: located at
/var/cache/nginx-rc/

When parts of your site that update automatically (like a “Recent Posts” widget, shopping cart count, or user login status) remain stuck, the issue is likely within your Object Cache (typically Redis).
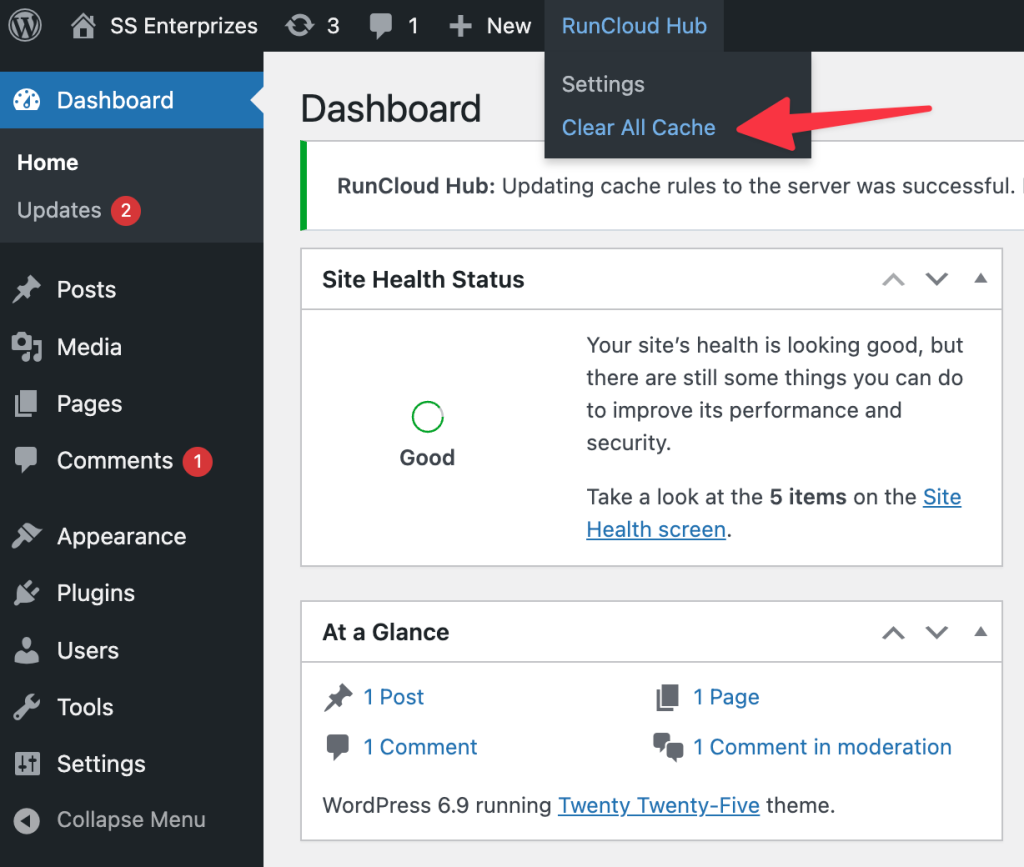
Step 2: Purge the WordPress Cache Plugin
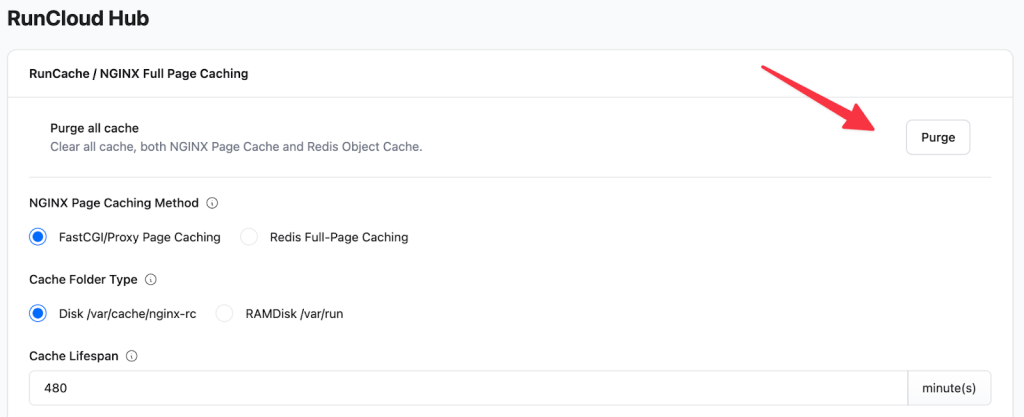
Always start by clearing the server-level cache, as this is the most common source of “stuck” content for dynamic sites. RunCloud lets you safely clear server and Redis object caches from a single dashboard, ensuring fresh content is served before you need to troubleshoot downstream layers like the CDN or the local browser cache.
The most reliable mechanism to force a browser to discard stale data and retrieve a fresh asset is not by manually renaming the file on the server, but by implementing versioning query strings (such as requesting style.css?ver=2.1), which instantly tells the browser that the underlying content has been modified. By appending this unique identifier to the resource URL, you can bypass local browser caches and CDN edges.On RunCloud servers, PHP-FPM reloads are handled automatically through the dashboard and do not require manual intervention.
Clear Theme and Page Builder Caches
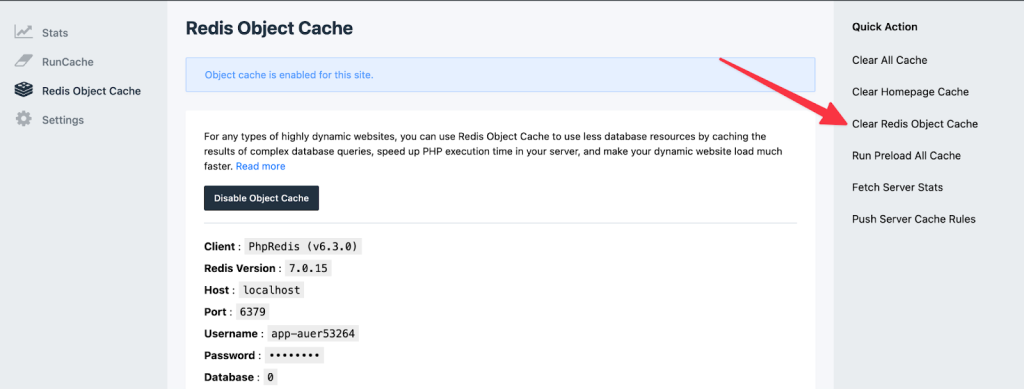
However, the best way to handle caching is to use a platform that simplifies it.Since every Content Delivery Network (CDN) operates differently, the exact steps here will vary depending on whether you use Cloudflare, BunnyCDN, or Fastly.This guide explains why those failures happen and shows you how to fix them in the correct order, without guessing.RunCloud offers a much simpler solution that eliminates the need for SSH access or complex commands. You can manage Redis directly from the WordPress Dashboard by navigating to your RunCache settings and clicking the Clear Redis Object Cache button.You publish an update, refresh the page, and nothing changes for your visitors.
- Elementor – Tools → Regenerate Files and Data
- Divi – Theme Options → Builder → Advanced → Clear Cache
- Oxygen – Settings → Library → Clear Cache
- Block themes – re-save global styles or theme settings
Run the following command to clear all the cache created by NGINX:Always confirm whether Redis databases or FastCGI cache folders are isolated per site before manually clearing them.
Step 3: Purge Server Page Cache (FastCGI / NGINX cache)
RunCache supports smart purging. It handles edge caching logic for you, ensuring that when you update content, the specific URL is automatically cleared from the CDN. This keeps your site fast and your server happy, without you ever needing to log in to a separate CDN dashboard.Sometimes, even after clearing every cache, the old design still appears. This usually happens not because the server is broken, but because the browser thinks it already has the correct file and refuses to ask for a new one. This is common with CSS (styles) and JS (functionality) files.
1. Locate the Cache Path
To resolve this via the command line, you will need to SSH into your server and interact with the Redis instance directly. You can run redis-cli flushall to remove all keys from the Redis database, forcing all applications using that instance to rebuild their cache from scratch.If the issue disappears, the problem is application logic, not caching.First, you need to find out where NGINX stores the cache. This is defined in your NGINX.conf or sites-available files under the directive fastcgi_cache_path.If you are not using RunCloud, reload PHP-FPM to force OPcache to rebuild.
2. Delete the Cache Files
Before changing any settings, force your browser to reload the page. On Windows, press Ctrl + F5, or Cmd + Shift + R on Mac. Alternatively, you can open the URL in an Incognito/Private window.If your WordPress website is not showing changes after an update, caching is the most common cause.If the source code shows the new version, but the site still looks wrong, you are facing a “Hard Cache” issue on the server or CDN. The browser is requesting the new file, but an intermediate layer (such as NGINX or Cloudflare) has aggressively cached that path and is ignoring the query string. To fix this, you need to update the caching rules of your server and CDN.sudo ls -lah /path/to/cache
Suggested read: How To Use Redis Object Cache To Speed Up Dynamic WordPress SiteBy following the workflow we outlined, you can stop guessing and start resolving issues systematically.
Warning: Avoid the “Purge Everything” or “Purge All” button if you can. This forces the origin server to rebuild the entire cache at once, which can cause CPU spikes and slow site-wide performance.Suggested read: Server Cache vs. Browser Cache vs. Site Cache: What’s the Difference?This is common after:
sudo rm -rf /var/cache/nginx-rc/runcloud-hub-fastcgi-app-auer/*
3. Reload NGINX
However, applying those same rules to your dynamic HTML pages is disastrous. If you accidentally instruct browsers to cache your homepage HTML for 30 days, no amount of server-side purging will resolve the issue. The visitor’s browser will simply stop requesting the page from your server entirely, relying on its local copy until the timer expires.Caching is the process of storing commonly accessed information on the server. To make your site load faster, browsers, plugins, servers, and CDNs show visitors a “snapshot” instead of rebuilding the page from scratch every time. This works well in most scenarios, but the problem arises when you update the site, and the cache keeps showing the old snapshot.If CSS remains stale, the asset URL likely hasn’t changed, so browsers and CDNs continue serving the file based on previous expiration headers. While you should implement versioning for your assets, you can also check your RunCloud NGINX configuration to ensure headers are set correctly and purge the specific file path from the server.Suggested read: How to Easily Fix Leverage Browser Caching Warning in WordPress
It is recommended to set a 1-year expiration for static assets (such as images and fonts) for optimal performance.
Only proceed to server-level cache clearing after completing this step.Object cache issues can also originate from WordPress transients stored in the database. Themes and plugins commonly use these for time-based data such as menus, pricing, or scheduled updates.A cached response confirms that the issue is not WordPress itself but an upstream cache layer.Typical actions include:
Clear PHP OPcache After Code Changes
This caching layer stores the results of database queries in memory to speed up PHP execution, but it can sometimes hold onto stale data even after the content has changed. If you only clear your page cache (HTML), these database-driven elements will persist because the server continues to retrieve the old query results from memory instead of the database.This step is not required for content edits but is critical for code-level changes.
- Theme file edits
- Plugin updates
- Custom PHP changes
Suggested read: How To Use Redis Full-Page Caching To Speed Up WordPressTo fix this, you need to clear the cache of your WordPress page cache plugin first. If that fails, check your functions.php file to ensure you are updating the version number on your enqueued scripts.Managing NGINX rules, Redis instances, and CDN purges separately is a recipe for frustration. RunCloud RunCache solves this by integrating server-side page caching, object caching, and edge caching into a single, intuitive dashboard. You get the raw speed of a custom-tuned server with the ease of use of a simple plugin.If your configuration separates caches by folder, then you can delete only a part of the cache without changing anything else. To do this, first run the following command to see a list of all the available folders in the Nginx cache:
Step 5: Purge CDN Cache
If clearing Redis does not resolve the issue, temporarily disable the object cache and reload the page to confirm whether a transient is responsible.Option A: Clear Everything (Root/Sudo)
sudo systemctl reload nginx

# OR

sudo service nginx reload
Yes, if Cache-Control headers set a long Time-To-Live (TTL) without validation, browsers will refuse to request new versions until the timer expires. RunCloud lets you standardize these rules at the NGINX layer, preventing config drift and ensuring users across all devices receive the latest updates.
How to Confirm Which Cache Layer Is Responding
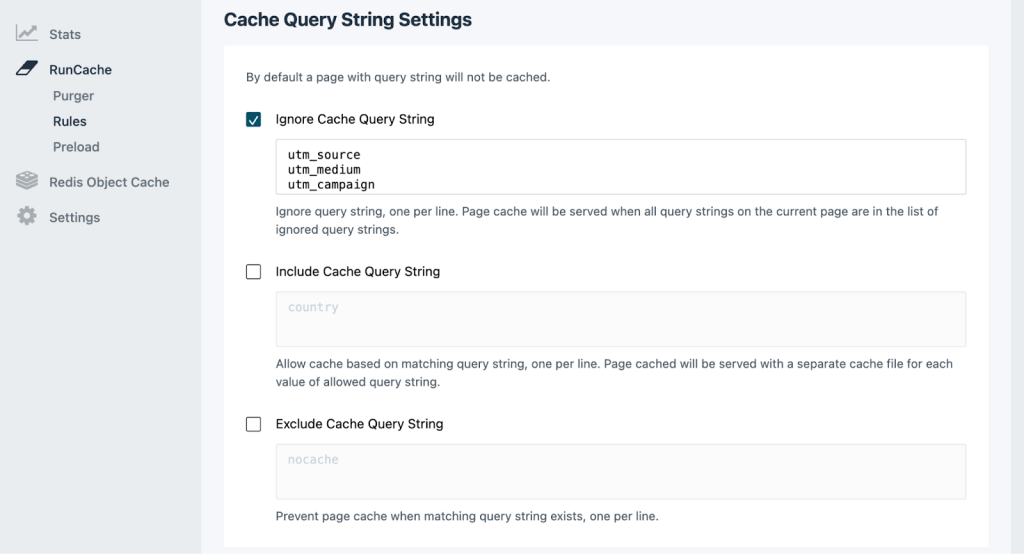
RunCloud allows you to control exactly how the server handles these dynamic parameters through its advanced NGINX caching rules:You should purge by URL whenever possible to avoid “cache rebuild” storms that can overwhelm your PHP/MySQL resources with sudden traffic spikes. RunCache simplifies this process by unifying edge and server caching, offering auto-purging capabilities that target specific content changes so you don’t have to wipe the entire cache.
- X-Cache or X-RunCache – server page cache
- cf-cache-status – Cloudflare edge cache
- Status 304 – browser or intermediary cache revalidation
If you are running Multisite, prefer site-specific cache purging through WordPress or RunCloud tools rather than command-line flushes.In the above example, we can see there are two different folders present on the server. You can delete the folder you want to clear the cache from. For example, if you want to clear the cache for runcloud-hub-fastcgi-app-auer, run the following command:
How to Handle Real-Time Updates with Stale Cached Assets
Even if you disable the caching plugin on your WordPress website, your server (NGINX/FastCGI) might still be holding a cached version of your HTML to speed up load times.
Step 1: Fix CSS/JS Cache Busting With File Versioning
Incorrectly configuring the Cache-Control headers can create persistent caching issues. This HTTP header instructs the user’s browser: “Save this file locally and do not check the server for updates for X days.”If you find yourself constantly modifying plugin settings, consider RunCache. It combines page, object, and edge caching into a single dashboard, which eliminates the need for complex plugins that don’t effectively communicate with your server.
- Include cache based on matching query string: This setting lets you specify parameters that trigger the creation of a unique cache file, ensuring that visitors viewing ?currency=USD see a different cached version than those viewing ?currency=EUR without slowing the page.
- Exclude cache based on matching query string: Conversely, this option lets you define specific query strings that will force the server to bypass the page cache entirely whenever they are present, ensuring that dynamic or sensitive URLs are always served live from the backend.
Step 2: Confirm the Browser is Requesting the New CSS/JS URL (Not a Cached URL)
If the source code still shows the old version, the issue is not the server cache. The issue lies within WordPress itself. Your caching plugin might be serving a stale HTML page that contains the old link tags, or your theme might be “hardcoding” the version number instead of using the dynamic wp_enqueue_style function.Most WordPress setups rely on disjointed tools, one plugin for page cache, another for object cache, and a separate dashboard for your CDN. This makes it hard to know which layer is holding onto the old data. With RunCache, server-level NGINX configuration and full-page caching are managed from a single dashboard, which reduces overlap between cache layers.
- Open a Fresh Session: Open your website in an Incognito (Chrome) or Private (Firefox/Safari) window to ensure your local browser history isn’t interfering with the test.
- Access the Source Code: Right-click anywhere on the page background and select “View Page Source” (or press Ctrl + U on Windows / Cmd + Option + U on Mac). Do not use “Inspect Element” for this, as the DOM can sometimes differ from the raw source delivered by the server.
- Locate the Specific File: Press Ctrl + F (or Cmd + F) to open the search bar. Type in the name of the file you modified, such as style.css, main.js, or the specific plugin stylesheet handle.
- Analyze the Query String: Focus on the filename’s ending. You are looking for a version parameter, which typically looks like
?ver=1.2.3or?ver=time_stamp. Compare this number to the version you expect (e.g., if you just updated a plugin from version 2.0 to 2.1, the tag should readplugin.css?ver=2.1).
Here is how you can do this:
- Scenario A: The Version Number Has Not Changed
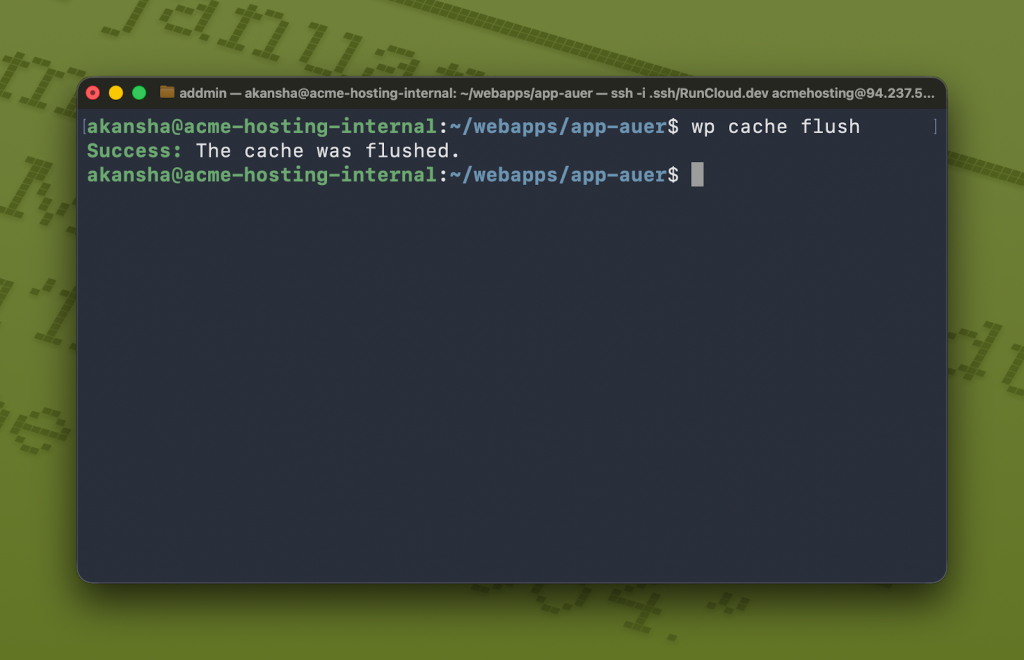
However, if you only want to flush the cache for a particular WordPress site, navigate to your WordPress root directory and run the wp cache flush command. This will clear the object cache for that site specifically, without risking data loss for other applications sharing the same Redis instance.If you are using a third-party caching plugin, clear its cache once before moving on. If this does not resolve the issue, do not keep purging here.
- Scenario B: The URL Has Changed, But the Style is Old
If theme or plugin code changes do not appear, PHP’s opcode cache may still be serving an older compiled version.If you are using a page builder or a performance-focused theme, you must clear its internal cache before touching the server.However, the process is generally the same: log in to your CDN provider’s dashboard, navigate to the Cache or Purge section, and look for the option to clear the cache. You should always select Purge by URL (or “Custom Purge”) and enter the specific link that is stuck, rather than clearing the entire cache.This occurs because WordPress typically bypasses caching for logged-in users, while logged-out visitors are served a static HTML copy stored in the server’s page cache. To resolve this, you need to purge the server-level cache (FastCGI/RunCache) via the RunCloud dashboard, which clears the stale HTML without affecting your browser settings.sudo rm -rf /var/run/nginx-cache/*
Before clearing anything, use the quick checks below to identify which cache layer is actually blocking your update.Guessing wastes time. Confirm the cache status before making any changes.WordPress Multisite environments often share Redis instances, PHP workers, and cache directories across multiple sites. Flushing object cache or Redis globally may affect other sites on the network.
Wrapping Up
Before you assume the server is broken, you need to determine if WordPress is actually telling the browser to fetch the new file. This diagnostic step determines whether the failure occurs within the WordPress application logic or at the server/network level.Open your browser’s developer tools and reload the page with the Network tab visible. Click the main HTML request and inspect the response headers. Look for indicators such as:How to interpret the results and fix the issue:If you need to clear the NGINX FastCGI cache manually, delete the temporary files NGINX has created, then reload the service. Here is how to do it safely.Inspect the HTTP response headers in your browser’s developer tools (Network tab) and look for headers such as X-Cache, X-RunCache, or cf-cache-status that indicate a HIT.
FAQs on WordPress Changes Not Showing After Update
Why do changes show when I’m logged in but not when I’m logged out?
Cache-Control policies. Our stack is tuned to aggressively cache static assets for maximum speed while ensuring dynamic HTML remains fresh and revalidates frequently. This built-in logic prevents “configuration drift” and safeguards you from accidentally locking your users onto an obsolete version of your site.